It's time for Tutorial Tuesday Thursday! Alyssa from Keep Calm and Carrion has generously given of her time and talents to show us how to make some adorable fabric flowers. If you need to see any of the images larger, just click on them.
So according to the little rhyme, April showers bring us May flowers! So that is what we are making for this month's Tutorial Tuesday Thursday .... Flowers!
Ever finish an outfit and look at it and go… this needs just
a little *something?* We’ve got you
covered with this month’s tutorial. AND
It will help you use you up some scraps!
I’ll show you how to make 5 different flowers today, and three of them we’ll make into headbands! But when you make them you can be creative... you can attach them to outfits, make jewelry, or save them for a later project!
Here is what you’ll need:
2yds of Fold Over Elastic (this will give you a little extra, but its BTY, so buy a bunch!)
2yds Ric-rac (this can be 1yd ea of two colors, or 2yds of one color)
Less than a FQ each of thee woven fabrics
4 pretty buttons that coordinate with the woven fabrics (two with one fabric, and one each for the others)
1 tiny button
AND:
Sewing machine (optional)
Needle and thread (required) -- I am going to do all my stitching in black so it shows up better, but I suggest using a matching color for yours!
Scissors (helpful)
Craft Glue (helpful)
Pins (if you need them)
Lighter (useful)
And either print out my little circle templates that are loaded in the Whimsical Fabric & Me Group under the files section, OR run to
your kitchen and get some various sized round things:
Making the Headbands
Okay… here we go… First, let’s cut the FOE for our headbands. Ultimately, you want it be slightly smaller
than the circumference of the head it is going on, but not so much smaller that
it squishes your brains.
Before you cut your
FOE, give it a good stretch. Sometimes
FOE will have a little bit of non-recoverable stretch, and you want to get that
out of the way before you start.
Here
are the measurements I use. But if you have a kid handy, just wrap the FOE around their head, stretching as you go to see how long you want it.
Newborns: 13”
Baby: 13.5”
Toddler: 14.5”
Young Child (6 and under) 15.5”
Tween/Teen: 16.5”
Adult: 18”
Now grab your lighter and heat seal the ends of the FOE so it doesn't get all wonky. Just run the lighter close to the raw edges so they soften.
Next, you’re going to overlap your ends ¼” to form a loop
and sew together. You can do this by
hand, or with your machine using a wide zig zag stitch ( I set my zigzag at 2.5 length and 4.5 width)
Set
these aside for now.
--------------------------------------
First Flower: the Yo-Yo Headband
For this one, you’ll want to cut 2 of the circles out. I am using the large and medium.
Take one circle, and using your needle and thread and start threading it around
the circumference of the circle, making stitches about ¼” apart all the way
around.
Once you get back to the end of your thread, gently pull
both ends of the thread. This will pull the outside in to the center (make sure its pulling so the right side of your
fabric is facing out). When you've pulled as far as it will go, neaten out the gathered center, and tie a knot with the two ends of the thread. Cut off your tail, but leave your needle thread attached for now.

Next, grab one of your pretty buttons and sew it to the
center, covering the gathered center.
Stitch it down with a couple of stitches, and then grab your FOE.
Continue to sew through the buttonholes, now
sew through FOE as well, covering the stitched seam that you made when you
connected your loop.
Once you’ve done
3-4 stitches to secure, tie it off and cut off the excess thread.
Repeat for your smaller yo-yo, but when you attach to your FOE, overlap partly with the first yo-yo.
And ta-da.. I’m ready or my first term at Hogwarts! Oh, you thought this was for my daughter??
Nope! Heehee
-----------------------------------------------
Second Flower: Star Flower Headband
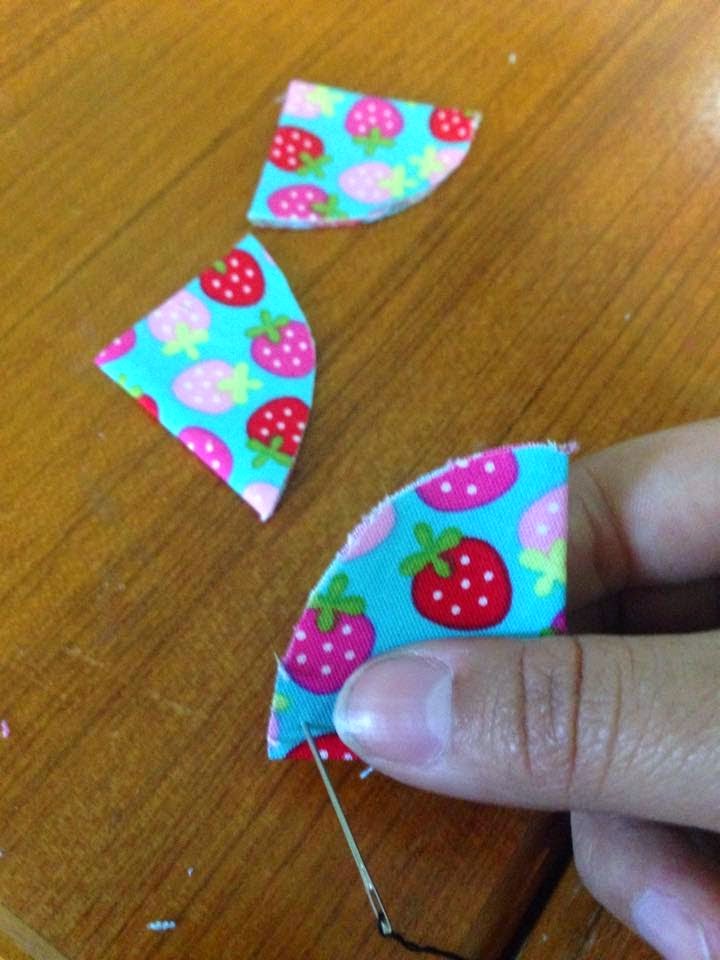
For this one you will need to cut 6 (yea I know there are 5 in the picture, but you need six, I promise!!) of the small circles.
Then you are going to fold them in 1/2 and then 1/2 again so the form quarter circles, and align them so that the curved edges are toward the inside.
Now, we will start stitching them together. starting from the top stitch loose stitches across the curved edge, through all four layers, ending with the needle coming up from the bottom again... this may sound a little confusing, but you want the edges of each piece to point downward when you start to gather.
Repeat this process until you have all of the petals on the thread. Then pull tight to gather them into a circle. Tie a knot and cut off JUST the knot tail, leaving the needle tail attached. Then take the 6th circle and sew the loose gathering stitches about 1/2" in from the outside of the circle.
Now, pull and gather into a tight shape and push the raw edges through the center of the flower and flatten out the poof on the top.
Now, you'll put one of the buttons on top of the poof, and stitch it in place, making sure to catch the edges of the flower on the bottom side, so you lock the center piece in place. If you have a really big button, you can almost forego the center piece, but it looks cute.
As you did with the last one, after a couple of stitches, you will then stitch through the button and the FOE, securing it to the FOE. Then flip it over, and trim off the excess of the center poof so it looks neat.
And ta-da!
----------------------------------------------
Third Flower: Peony Headband
For this one you are going to want to cut at least 16 small circles. You can do them all in one fabric or various ones if you want a more whimsical look.
Take all 16 circles and fold them in half.
We are going to do like the previous flower, and gather along the curve edge of the folded circles, going through both layers, ensuring the ends of the pieces point downwards.
Continue adding petals until you've got them all on the thread. Then, here is the semi-complicated part, starting at the end with the needle thread, make a loop with the petals. You'll want the first layer to be about four petals. Then pass underneath and make a second, slightly wider circle. Then, below again in an even looser circle. As you make the circle, you'll want to use a couple stitches to lock the circles into place.
When you get done, you'll have a layered flower.
And we'll repeat the button sewing business and attaching to the FOE like we did on the last two headbands..
And ta-da!!
----------------------------------------------------
Fourth Flower: Ric-Rac Rose
This one is simple, fast, and makes a really pretty accent on dresses! Though, I will say, they aren't super sturdy, so I highly recommend either gluing them to a pin backing, or using safety pins to attach.
Okay, here we go... take your 2 yards of ric-rac and cut it into two - 1yd pieces. Then heat seal the ends of one side together.
Now, either pin it to your pant leg, or the wall, or stick a weight on it.. and start crossing one side over the other to inter-twine the two pieces. And make sure not to twist them while you do this. Continue until you've twisted the whole length.
When you get to the far end, trim and heat seal those ends together too. Then we will start wrapping. Tightly wrap the ric-rac into a roll. Stop and pull tight as you go. Every few inches, add a dab of your craft glue to secure. If you don't want to glue, you can add a couple stitches here and there as you go to secure.
When you get to about 2 inches left, stop winding, add glue to the underside of the rose. and glue the end to the bottom of the rose.
Now, to make your rose look more rose like, run your finger along the outer petals, and lightly pull them outward. This will make your rose look like it's blooming. I suggest pulling the last couple coils outward.
Then attach to your top (pin!) and you're done!! Isn't it a cute detail? Don't forget to take it off before you wash it!
---------------------------------------------
Fifth Flower: Knit Carnation
Okay, last one! And this one is knit... Depending on how big you want your flower, either do the small or medium circle. I'm using the small circle. And cut 16 total circles. If you want multiple colors, just make sure you have equal amount of each color.
Now, take your circles and fold them in 1/2.
Then in 1/2 again.
Then fold one side to the front and one to the back.
You get kind of a mini fan.
Repeat this for all 16 circles.
And now we begin building out flower. Add each petal to the thread by threading through all layers of the bottom point of the flower.
Do this until all 16 petals are on the thread.
And now thread the needle back through the first petal and pull tight. You will be able to close the circle completely. Once you do, tie a knot, and cut the knot thread, but not the needle.
And now you've got a poofy flower! Take a couple moments to fluff your flower and arrange the petals so they look even and nice. And then you are ready to attach it.
Here
is where your tiny button comes in. The knit flower is a little heavy,
and knits stretch. So if you just sew it right to your fabric, it will
pull the fabric it is attached to.
So on the back side of the fabric you are attaching your flower to, sew the stitches through the tiny button. This will keep the flower from distorting your garment.
And you're done!
So now you have five new options in one tutorial for creating some great accessories and embellishments for you or your kiddos.
And the Challenge:
1. You have one month to make all 5 flowers.
2. Post a pic of what you've made in the Whimsical Fabric & Me Facebook group with the hashtags #mayflowers and #tuesdaytutorial.
Complete #1 and #2 and you'll be entered to win a $10 gift certificate to our shop!
Winner will be drawn on Monday, June 1st, 2015.
And a Coupon Code:
Save 20% off the regular price of all Notions with the coupon code MayFlowers now through Sunday, May 31st.
Happy Creating!
Danielle Storm
www.whimsicalfabric.com


.jpg)


