Welcome to Day 2 of the Log Cabin Quilted Pot Holder Sew Along!
Important: If you would like to see an image on our blog in a larger format, just click on it to enlarge. This may prove helpful for some of the steps in our sew alongs.
Please note that links to products within this post are either links to our website or affiliate links. All items purchased help us afford to host these sew alongs. Thank you.
Let's finish our pot holder!
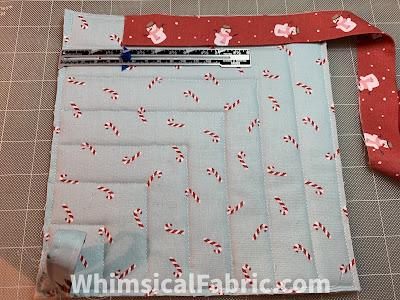
1. This is what you should be starting with today.
a.) Your pot holder sandwich - backing fabric, 2 layers of batting, and the top that you pieced together in Lesson 1.
b.) Your binding strip.
c.) And your a piece of fabric that will be your hanger.
If using a walking foot please consult your machine's instructions. I like to use a walking foot because it helps keep all the layers smooth. A walking foot is not necessary, but definitely helps.
2. Pin, clip, or use basting spray to secure your layers for sewing.
3. You can quilt your layers together however you desire. I did a simple stitch in the ditch method. If you are doing a straight stitch like I did you will want to set your stitch length between 2.5 and 3.


4. Next, stay stitch 1/8" from the edge all the way around the outside of your pot holder. If you are using a walking foot continue to use it. This step helps keep everything smooth and in place. I mark out my corners for this step.
The back will look something like this.
5. Trim away all the extra batting and backing fabric. Again, you can save those scraps for using as stuffing in other projects.
6. We will create our hanger next.
a.) Fold and press the hanger piece in half lengthwise.
b.) Open this up and press each long edge to the center.
c.) Next, fold along the center seam enclosing the raw edges inside.
d.) Stitch 1/8" away from each long edge.
7. Sew the hanger to the back side of the pot holder. Position each raw edge 1/2” away from the top corner formed by the Section 1 strips.
I like to use a narrow zigzag stitch to secure. 
Keep your stitches in the 1/8" side seam allowance.
Your hanger should look like this when you are done.

8. On to the binding - we will be working on the back side of your pot holder attaching the binding.
Starting on the bottom edge, place your binding strip raw edge against the pot holder raw edge. You want the binding strip to start about 2 inches away from the left side.
9. Using a 1/4" seam, start sewing the binding 2" away from the right edge of the pot holder. This will leave a long-ish, un-sewn, binding tail on the left. Make sure you secure the stitches at the beginning of your sewing.
10. Stop sewing 1/4" from the corner. You may want to mark this so you know where to stop. Secure your stitches and pull out your pot holder.
11. Flip the binding up, folding it as you do so and lining it up at a 45 degree angle. Place your thumb along the edge to hold it in place.
12. Flip the binding strip back down over your thumb lining up the raw edges to the right.
13. Continue to stitch around your pot holder, folding each corner as we just did, until you get to the bottom edge that you originally started on.
14. Once you return to the bottom of your pot holder sew only about 1.25" from the left edge. Then stop and secure your stitches.
15. Measure 2.25" from the left edge on the original binding tail.16. Place the left binding tail down over the top of the original tail that you just marked. Trim the top (left side) right at the spot you marked the lower tail. This needs to be very precise so make sure to double check your measurements and cut carefully.
17. Open up the binding on your left with right side of fabric facing up.
18. Open up the binding on your right with wrong side of fabric facing up.
19. Forming a right angle and matching up raw edges, pin the two binding strips together like shown below. I created a short video to hopefully help you visualize this step.
I like to use a straight edge and draw out my stitch
line.
Placing a pin diagonally along the stitch line can help hold the fabrics in place while stitching.
I also folded up my pot holder to help make it easier to sew.
20. Stitch along the diagonal.
21. Once you are sure you have done this step correctly, trim off the extra fabric triangle.
22. Press this seam open.
23. Fold your binding strip back in half and continue to stitch it to the back of your pot holder.
24. Press your binding out away from your pot holder.
25. Trim strings from edges and then fold the binding over to the front, securing with binding clips or pins.
26. Fold corners like below and secure with a clip or pin.
27.Continue all the way around the pot holder.
28. Now, carefully edge stitch all the way around the front of your pot holder securing the binding. Stitch as close to the loose edge of the binding as possible.
Woo hoo!! Congrats on creating your Log Cabin Quilted Pot Holder! Now go make some more. I find them addicting. 😁
Happy Sewing,
Danielle Storm
www.whimsicalfabric.com
*If you would
like to earn entries into the prize drawing, please make sure to submit
a photo of your completed Lesson 2 to this Facebook Album by 12:00 noon CT, Thursday, December 16th. If you
have any questions the Facebook Group is a great place to ask.