
Welcome to Day 1 of the Log Cabin Quilted Pot Holder Sew Along!
Important: If you would like to see an image on our blog in a larger format, just click on it to enlarge. This may prove helpful for some of the steps in our sew alongs.
Please note that links to products within this post are either links to our website or affiliate links. All items purchased help us afford to host these sew alongs. Thank you.
Let's get to sewing!
1. Pick out 6 of your 10"x10" fabric pieces for the backings and set them aside.

2. Press all of your remaining 10"x10" fabric pieces so that there are no creases or winkles.
3. Now you are going to cut your remaining 10"x10" fabric pieces (the ones NOT set aside for backing) into 1.5" strips.


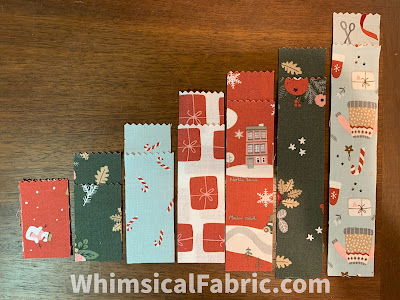
5. Once you have your plan set it's time to start cutting your fabric strips. You will need to save the extra pieces as you are cutting. They will be used for future pot holders you’ll want to make.
*Section 1 will form the top left corner of your pot holder.
*Section 7 will form the right edge and bottom edge of your pot holder.
Cut the following strips.
Section 1 | Cut 2 fabric strips - 1.5" x 2.5" |
Section 2 |
Cut 1 fabric strip - 1.5" x 2.5" |
| Cut 1 fabric strip - 1.5" x 3.5" | |
Section 3 |
Cut 1 fabric strip - 1.5" x 3.5" |
| Cut 1 fabric strip - 1.5" x 4.5" | |
Section 4 |
Cut 1 fabric strip - 1.5" x 4.5" |
| Cut 1 fabric strip - 1.5" x 5.5" | |
Section 5 |
Cut 1 fabric strip - 1.5" x 5.5" |
| Cut 1 fabric strip - 1.5" x 6.5" | |
Section 6 |
Cut 1 fabric strip - 1.5" x 6.5" |
| Cut 1 fabric strip - 1.5" x 7.5" | |
Section 7 |
Cut 1 fabric strip - 1.5" x 7.5" |
| Cut 1 fabric strip - 1.5" x 8.5" |

6. Grab two of the strips from the jelly roll fabrics. One will be your binding and the other will be used for the hanger.

7. Cut the hanger piece into a 5" strip.

8. Trim down the binding piece so that it is 2.25" wide.


9. Next, grab your batting and cut two pieces that are 10" x 10” square. You may want to press the batting first if you haven't already. Just be careful not to stretch the batting as you press it.

You have now finished all of the cutting of the fabric for your pot holder. Woo hoo!
10. Take your binding piece and press it in half lengthwise with wrong sides together.

Set your binding strip aside for later.
Now it’s time to sew!
Note: We will be using a 1/4" seam allowance throughout this entire project unless otherwise noted. Also, you must use 100% cotton thread to ensure the thread doesn't melt when using your pot holder.

11. Start with Section 1 (two 1.5” x 2.5” strips) and piece together along the long edge.

12. Press the seam to the side. You will want to press the seams every single time you add a new piece to your block.

13. The first strip listed in each section will be sewn to the right of this base block you just created. The second strip listed in each section will be sewn to the bottom.


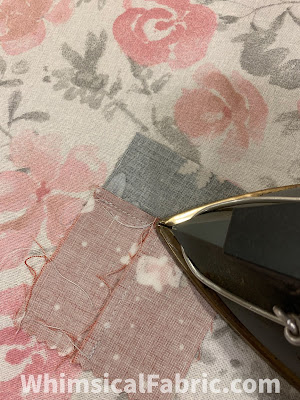
14. Add the second strip from Section 2 to the bottom. Press seam towards this new strip.


15. Repeat for section 3, 4, 5, 6, and 7. Pay special attention to make sure you keeping your proper orientation and order for piecing each strip to your block. Don't forget to press those seams each and every time.


16. Once you have added all 7 sections press your block well and then square it up if you need by trimming the sides.


We are almost done for today.😀
17. Pick the backing fabric you want to use and place it down with wrong side up.

18. Layer 2 pieces of the 100% cotton batting on top of your backing fabric.


That's it for today's lesson. Thanks for joining me and see you on Thursday!
Happy Sewing,
Danielle Storm
www.whimsicalfabric.com
No comments:
Post a Comment