Note: If you would like to see an image on our blog in a larger format, just click on it to enlarge.
Hi, I am Melissa from Rebel & Malice and I am so excited to bring you 2 tutorials for Whimsical Fabric
today. You can find me sewing for my 5 kids, well mostly for 4 of them,
and myself. We have a quirky family with eccentric taste, but we found
something everyone likes: WATERMELON
I was inspired by fruit for summer, and we love fruit. I love pineapple
and watermelon in the summer. Pineapple has taken over, so I thought
that watermelon needed a little love in the summer DIY department.
The first tutorial is a Watermelon Drawstring Backpack and this was
inspired by my teenage son because he loves fruit inspired things and
those drawstring backpacks.
Materials: This will be enough for both tutorials
scissors and/or rotary cutter
ruler
sewing machine
coordinating thread
glue gun (optional)
Prep your seeds for the backpack and skirt by cutting the black jumbo
ric-rac into seed shape pieces. I got this shape by cutting diagonal.
Cut out your pattern pieces for the backpack. You should have 2 of each.
I somehow
missed a photo of this step, but get your 2 strap pieces and sew
together on one of the short ends so that it is one continuous piece.
Then you will iron it in half and prepare like bias tape. Iron in half
so that all raw edges are enclosed. Sew all the way down the length of
the strap along the edge.
Get your main piece and middle piece
and place on top of each other (wrong sides together). Sew along edge
using a 1/4 seam allowance. If you are not doing french seams, use a 1/2
in seam allowance.
I will be showing you how to do this with french seams, but you are welcome to serge or zig zag if you prefer that method.
Trim the seam allowance and the fold the opposite way (right sides together.)
Sew across width using same SA.
Place the kelly green piece on the
lime green wrong sides together and sew across. Trim the SA. Fold back
putting right sides together. Seam across width of fabric.
The wrong side of your fabric should look like this with the french seams.
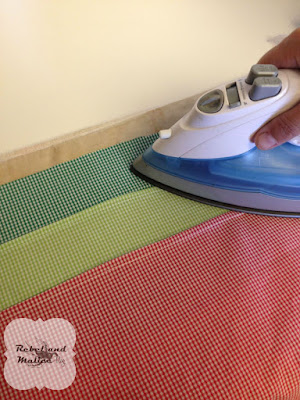
Press the french seams down toward the hem.
Flip fabric over to right side and sew each french seam down using a 1/4 in SA.
Get your 3x3 squares and fold in half diagonally. Sew across 1 1/2 inches up from point of triangle. Trim SA and flip right side out. Repeat to other square.
Press loops. Place along bottom corner of back piece.
There should be
about a 1 1/2 in space from corner.
Sew along edge where raw edges of
loops are.
Get those
"seeds" that you made with the black ric rac. You can attach them two
different ways. You can hot glue them on or you can sew around with a
zig zag stitch onto the fabric. Scatter the seeds in a way that looks
pleasing to you. Remember watermelon seeds are not perfect, so you can
have fun with it.
TIP:
If you plan on sewing them on, use a clear glue stick to put seeds in
place to sew on. This helps keep them in place and no use of pins.
Once all your seeds are on, you are ready to put the backpack together.
Measure 3 inches down from the top of pieces and cut a 1/2 inch slit on
both sides. This is the mark telling you where to stop sewing the sides.
Place
front and back piece wrong sides together. Using a 1/4 inch SA (or 1/2
if serging or stitching and zig zag) sew all the way down the sides,
across the bottom, and up the other side. Start and stop at the slits
you cut.
Trim the seam allowance all around the back where you have sewn only.
Snip the corners so that you have a sharp corner. Flip the bag right
sides together. and use a tool or pencil to make sure the corners are
straight.
Using the slit as a guide, start there and sew again down the side, across the bottom and up the other side using a 1/4 in SA.
You
should now have a 3 inch piece sticking out approximately 1/2 an inch.
You will fold that 1/4 inch and press. Then fold 1/4 inch and press
again. Seam down that piece on each side (this should be 4 times) This
will close the sides so that there is no raw fabric when making your
casing for the strap/drawstring.
Fold the top over 1/2 inch towards the wrong side and press. Then fold
over 1 inch and press again. The casing should overlap a tiny bit so
that you catch the side seam.. Seam across the casing using the same 1/4
inch SA. The sides of the casings should be open, but also attached to
the sides underneath the casing.
Flip your bag right side out. The back of the backpack will be the side with the loops.
Now is time to get your drawstring/straps through. Attach a safety pin to one end.
1. Pull through back casing
2. Pull through left loop
3. Pull through front casing
4. Take off safety pin. Attach to side coming out of back casing.
5. Pull through right loop
6.
Attach straps together. You can seam together and cut trim, zig zag
together, or place one end inside the other open end and seam closed.
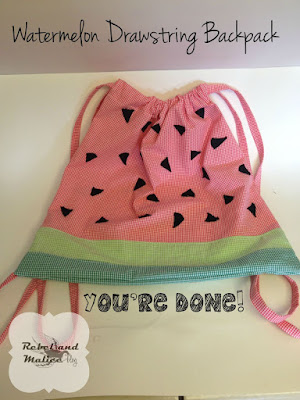
You have a draw string backpack perfect for summer!
This
pattern was made for a size 7 girl, so you will need to adjust the
length to your desired finished length. The skirt is around 58 inches
wide and 16 inches long.
You need to get your pattern pieces ready, as well as green ric-rac and
elastic for the waist. Your extra "Seeds" will be used on the skirt. I
attached the seeds prior to these steps so you may find it is easier to
attach them first, or after you get the pieces sewn together.
Place
your top and middle fabrics wrong sides together. Place the green ric
rac on top of main so that the middle portion of the ric rac is even
with the edge of the fabric. Seam across width of fabric using 1/4 in
SA.
Trim the SA and extra ric-rac. Fold right sides together and press
really well. The ric-rac makes the seam thicker so it needs to be
pressed well. Seam across with same SA.
Press
french seam down so that the ric rac is up towards the main fabric.
Seam across right side of lime fabric. Attach the kelly green to lime
using the same instructions as the backpack.
Place both
skirt pieces wrong sides together. make sure that sides are matching up
evenly. Seam across both sides. Trim the edges and flip fabric right
sides together. Seam sides again. Press toward side.
Fold hem up towards wrong side 1/2 in. Press. Fold hem over 1/2 in again and press, Sew hem.
For
elastic: Fold over 1/2 in. Press. Fold over 1 inch. Press. Seam casing
leaving a 2 inch opening to pull elastic through. Attach elastic to
safety pin and pull through. This is a width of fabric skirt, so you may
need to help ease the elastic through. Overlap the elastic one inch and
sew closed. Sew casing closed.
Press all your seams and hems one last time. Now you have a matching watermelon skirt.
Thanks for having me do this tutorial Whimsical Fabric. This was fun to think about summer and make something that both boys and girls can get use out of.
You can find me on my blog or any of these social media sites below.
 The Challenge:
1. Make a Watermelon Drawstring Backpack and Skirt
2. Post a pic of your project in the Whimsical Fabric & Me Facebook group with the hashtags #watermelonbackpack, #watermelonskirt, #whimsicalfabricdotcom, and #tutorialtuesday. Please consider posting it to other Facebook sewing groups, and Instagram too, if you have an account. :)
** Complete #1 and #2 by Sunday, August 23rd, and you'll be entered to win a $10 gift certificate to our shop! Winner will be drawn on Monday, August 24th, 2015.
And a Coupon Code:
We've made it super easy for you to make this watermelon drawstring backpack and skirt by offering a Watermelon Project Kit on our site. The kit contains everything you need (except the thread) to make both projects. Use the coupon code TutorialTuesday now through Monday, August 17th to save 20% on the purchase of the Watermelon Project Kit.
Happy Creating!
Danielle Storm


