Sunday, March 27, 2016

Happy Easter from Whimsical Fabric - Save 20%


Hoping you and your family have a wonderful Easter Sunday.
After the egg hunt and dinner hop on over to Whimsical Fabric to Save 20% off your entire order.
Use the coupon code: EASTER2016
This coupon code is valid Easter Sunday and the following Monday only.

Happy Creating!
Danielle Storm
 
www.whimsicalfabric.com

Wednesday, March 16, 2016

School Days Sew-Along Prize Giveaway - A Year of Oliver+S


Have you grabbed your School Day Jacket sew-along pattern and kit?  There is still time. The jacket is a fairly easy pattern with amazing results. We will be teaching how to sew it with both laminate and non-laminate fabrics. You won't want to miss out on this sew-along. Grab your kits today!


The Sew-Along Prize Giveaway
Did someone say something about a prize? I love prizes and I know you do also. At the close of the School Days Sew-Along we will be giving away a year's worth of Oliver+S PDF patterns to one lucky winner! The winner will receive 4 patterns of their choice upon winning and then 1 pattern of their choice each month for the remainder of 2016! Make sure to join the Facebook Group so you have a chance to win this amazing prize! This prize package is worth over $200! Wow!
We will give out entries for the prize drawing at the end of the sew-along. There are three different ways to earn entries into the prize drawing.

1. At the end of each lesson posted on this blog there will be a link to add a picture of your completed lesson into a photo album on our Whimsical Fabric & Me Facebook group. Each day that you turn in an assignment on time you will receive 1 entry per item you create. Thus, the more items you make, the more entries you will receive.

2. We will also award 1 entry for purchasing the School Days pattern from us using the coupon code SewAlongSavings from the Sew-Along #32 Category

3. In addition, if you purchased a kit from the Sew-Along #32 Category we will award you another 4 entries for each kit purchased. That's twice as many points as you normally get, so grab yourself a kit (or two) today!  *Note: Patterns purchased within the kit count as pattern purchases outlined in step #2 above. 

Happy Creating!
Danielle Storm

www.whimsicalfabric.com


Sunday, March 13, 2016

Announcing the Whimsical Fabric Voile Blog Tour


I'm excited to announce that we have a special blog tour starting this week. Five wonderful bloggers have created some fabulous items using voile and patterns Whimsical Fabric stocks. 


Be sure to check out all the posts this week.
So many different uses for Voile!
3/14: Larissa from Connected by a Thread
3/15: Denita from Hattielu Handmade
3/16: JaNette from Merri Poppins
3/17: Sharon from Sweet Pea & Pumpkins
3/18: Stacey from From a Box 


Make sure to shop voile on the Whimsical Fabric website. Use the coupon code: VOILE to save 10% on your entire voile order! The coupon expires Thursday, March 24th at midnight CST. 

Happy Creating!
Danielle Storm

www.whimsicalfabric.com

Saturday, March 12, 2016

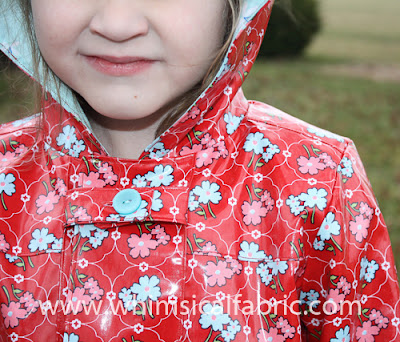
March Raincoat and Spring Coat Sew-Along Kits are Available


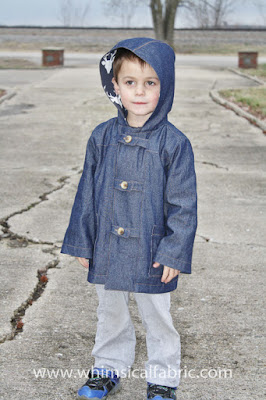
Our March sew-along kits are now available on the website. We will be sewing the Oliver+S School Days Coat.

  
We have kits with both laminated fabric for making raincoats and twill and denim for making an everyday spring coat. Both options will be covered in the sew-along lessons.

http://www.whimsicaldesignsclothing.com/index.php?main_page=index&cPath=367_601
  
The sew-along runs Wednesday, March 30th thru Tuesday, April 5th and all lessons will be posted on this blog/newsletter in addition to being posted in our Facebook group, Whimsical Fabric & Me.

http://www.whimsicaldesignsclothing.com/index.php?main_page=index&cPath=367_601
  
Grab your kit today. We have a limited number of kits available. Please use the coupon code SewAlongSavings to save 10%. 

http://www.whimsicaldesignsclothing.com/index.php?main_page=index&cPath=367_601

Our sew-alongs are a great chance to have lots of fun, learn some new skills, and win some great prices. I hope you will join us!
 
Happy Creating!
Danielle Storm

www.whimsicalfabric.com


Monday, March 7, 2016

March Quilt-Along Challenge


Hello! Sharon here with our March Quilt Block Tutorial. This is our third block in our year long scrap quilt along. In case you missed the announcement in January, I will give you a little recap. On the first Monday of each month, I will teach one quilt block pattern. You have until the last Monday of the month to sew your quilt block(s) and enter them into the album in our Facebook group, Whimsical Fabric & Me, and/or blog about your quilt blocks and link up your blog post in our link party (see below).

This months block is a fun one and a favorite of mine. I just made a whole quilt using these blocks; they are so fun and can change the look of a quilt based on the placement and colors you use. You can make a pinwheel or even a chevron pattern if you make each block identical. This month's block is designed to use all your longer pieces of scrap fabric.

Prizes
Each block that you sew and enter into the Facebook Album, will count as one entry into our monthly drawing. If you make two blocks, that is two entries. Make four blocks, that is four entries, and so on and so on. There will be a prize drawing each month.

In addition to the prize giveaway on the Facebook group, we also have a monthly Link Up Party. Blog about your entry and link up your post and you will automatically be entered to win a second prize.

Note: You CAN enter both giveaways to increase your chances of winning!
 
Supply List:
*quilter mat
* rotary cutter
*quilter's ruler
*your long scrap fabric pieces

1. First take out all your longer length scraps. They do not need to be the same length as we will trim them down later on. Cut them into 2" wide pieces by the length of the scrap fabric.

2. Next take two pieces and place them with right sides facing, matching up the raw edges.

3. Stitch with a 1/4" seam allowance down one side only.

4. Press the seam facing upwards. Repeat steps 2 and 3 with the third strip of fabric. And press the seam facing downwards.

5. Trim up the first edge so that it is square. This will give our block a nice shape for sewing our quilts later on.

6. Next we will cut out the blocks into our squares. (This method of sewing/cutting quilt blocks is called strip quilting.) All my blocks are going to be cut into 4 3/4" lengths. If your blocks are 5" please cute your blocks into 5" lengths. I sew mine all with a generous 1/4" seam allowance so after trimming my blocks they measure 4 3/4". Keep cutting down your strip until you can no longer any more full sized blocks.

7. Now onto the left over pieces! This is why I said that each strip could be different lengths, they will not go to waste at all. Cut out them into 2" lengths. If you have groups of three or even two they can be used still. Remember January's BOM? These are perfect to make a few more of those up!

I keep a gallon sized zip-lock bag hanging up in my sewing room just for these small scraps.  I call it my rainy day fun bag. One day my daughter's doll will get a quilt made from some of these scraps.

That is it, we now have our finished blocks! I think that you will find these sew even quicker than last month's blocks and you can make a dozen of these in no time at all.

Facebook Group
After you have sewn all your blocks together for this month please go over to our Facebook Group and share each of your blocks in our March Quilt Along Album for a chance to be entered into our monthly drawing! You have until Monday, March 28 at 12:00 pm (noon) CT to enter your blocks.

Link Up Party
In addition, if you blog, write up a short blog post about your quilt-along block(s) and link up your post in our Link Up Party. The button is located below. In addition:

1. Grab the February graphic, share it in your blog post, and link it back to this post here to let all of your followers know you are partying with us.
2. Share about your blog post on all your favorite social media outlets.
Note:We will be sure to visit and comment on your blog. We love interacting with our followers!

Remember, there is no required amount that you need to make. Make as many or few as you would like.

Happy Sewing!
Sharon

Wednesday, March 2, 2016

Celebrate Seuss Day Sale

http://www.whimsicaldesignsclothing.com/index.php?main_page=index&cPath=3_527
Happy Birthday Dr. Seuss! 
Come celebrate Seuss with Whimsical Fabric
All Seuss Fabric is 15% off today only
Hurry, sale ends at 11:59pm MT tonight.

Happy Creating!
Danielle Storm

www.whimsicalfabric.com

Tuesday, March 1, 2016

March Tutorial Tuesday - Easter Basket


Larissa Gibbs of Connected by a Thread brings us our March Tutorial Tuesday.

 **Note, click on the pictures to enlarge them for better detail**

Fabric Requirements
1/2 yard Main Fabric
1/2 yard Lining Fabric
Pellon SF 101
Peltex 71F
Wonder Under
Scraps: white, black, pink for face

All seams are 1/2" unless otherwise specified.

Cut - (WxH)
Base:
12" x 12" : 1 exterior, 1 lining, 2 SF 101
11" x 11": 1 Peltex 71F

Sides:
12" x 6" : 4 exterior, 1 SF 101
11" x 5" : 4 Peltex 71F

Strap:
31" x 4" : 1 exterior, 1 SF 101
30" x 3/4": 1 Peltex 71F


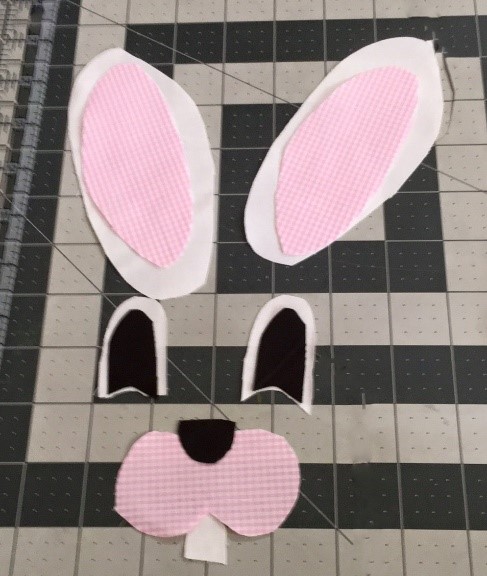
Bunny Face FMA (optional)
Cut out all pieces, using the template. Click here to download the template.  Following the directions for the Wonder Under, fuse it to all face and ear pieces, leaving the paper on.  

Remove the paper backing on the inner eye and ear pieces.  Layer them on the outer pieces and fuse.  

Use wonder under to secure your face pieces to one of the side panels.  Stitch around and add details using Free Motion Applique (FMA).  Be sure to lower your feed dogs before starting your FMA.  

Basket Construction
1.  Fuse SF101 to all pieces.

2.  Apply Peltex 71F to all exterior pieces except handle, leaving 1/2 around all sides.  

3.  Sew two side pieces RST along one short edge.  Open and press seam.  Repeat with remaining side pieces.

4.  Place side pieces RST and sew along short ends, creating a square hoop.

5.  Pin/clip the bottom to the sides RST.  Sew along all four sides to create your basket.  Go slow around the corners easing the fabric as needed.  

6.  Repeat steps 4 and 5 with the lining.  

7.  Turn the lining right side out and place inside the main fabric with right sides together.  Sew around the top, leaving a 4" opening to turn.  

8.  Turn and press well.  Topstitch along the top of the basket.  

9.  Fold your handle in half along the long edge, wrong sides together and press.  Open up and fold one edge to the center.  Repeat with the other side.  Fold in half along your original fold line and press well.  Open and place your stabilizer strip inside; fold back and press well.  Fold each end in by 1/2" and press well again.

10.  Topstitch along the entire length of the strap about 1/8" from the edge.  

11.  Center the handle on one side of the basket, placing the bottom of the handle 1 1/2" down from the top edge of the basket,  Sew in a a square, making sure to double stitch for added security.

12.  Repeat on the opposite side of the basket with the opposite end of the handle.

13.  Add ears, where desired.  Either hand or machine stitch in place.

14.  Press well with a lot of steam to get all of the wrinkles out.

And enjoy your bag!

Larissa Gibbs
Connected by a Thread: Blog   
Connected by a Thread: Facebook

Tuesday, February 23, 2016

Slow Cooker Chicken Noodle Soup - A THM Fuel Pull


I'm excited to bring a new series to our blog. On the fourth Tuesday of each month we will be sharing a favorite recipe. On today's menu is homemade slow cooker chicken noodle soup. Mmmm! It's a favorite at our house and so very good for you; it's packed with protein and lots of veggies.

I'm not the world's best cook. I don't even particularly like to cook. I'm all about convenience and simplicity. I'm a busy mom. Aren't we all? But just because I'm busy doesn't mean I can't feed delicious and nutritious foods to my large family of 8. This recipe is simple and quick to make. It's a staple in our house.

Note: Links to products within this post are either links to our website or affiliate links.

Here is what you will need to make a large batch of soup that feeds 8+ people. If you have less to feed, by all means, cut this recipe down.

• 2-3 lbs of boneless skinless chicken breasts
2 cups chopped celery
2 cups chopped carrots
1 large onion chopped
4 cloves garlic
1 tsp dried thyme 
• 2-4 bay leaves 
• 1 tsp ground black pepper 
• 4 tsp salt (or to taste)
12 cups chicken stock  
• dried pasta of your choice (I use low carb Dreamfields)
• a large slow cooker 


Directions
1.  Rinse the chicken breasts. Place them in the bottom of the slow cooker. If your chicken breasts are frozen, let them first thaw before rinsing and using. This will keep your soup broth clear.

I normally use Zaycon chicken. I adore Zaycon chicken and the price is very hard to beat. Unfortunately, we ran out. Our next pick up date is March 11th and it can't get here fast enough. I have 120 lbs of boneless skinless breasts ordered this time around, so hopefully we won't run out early again. 

If you don't know about Zaycon click through the name and check them out. They offer amazing meats at awesome prices. For example, boneless skinless chicken breasts are only $1.69/lb. Super lean 93/7 ground beef is only $3.99/lb. We order all of our chicken, ground beef, sausage, ham, and now even shrimp through Zaycon

2. Clean and chop the celery. Add 2 cups to the slow cooker.
  
3. Clean and chop the carrots. Add 2 cups to the slow cooker. I cheat and buy the matchstick carrots at the store.  Remember, I'm all about simplicity and speed in the kitchen.

4. Dice a large onion and add it to the slow cooker.

5. Clean and mince 4 cloves of garlic. Again, I go for convenience and buy the already minced garlic at the store. If you do also, add 2 tablespoons of minced garlic.

6. Add 1 teaspoon of dried thyme.

7. Throw two or more whole bay leaves on top.

8Add fresh ground black pepper. I just add it by sight, but you can measure it if you desire. I add about 1 teaspoon.

9. Add about 4 teaspoons of salt.

10. Poor in 12 cups of chicken stock. I use stock instead of broth because it has more protein. You can also use homemade stock, which is even better. But again, this busy mom takes shortcuts. You will notice in the first picture above that I show 4 containers of chicken stock. I sometimes will add some from a fourth container just to fill up my slow cooker, but not always. You only really need 12 cups, or three containers.

11. Stir it all together, cover, and set the slow cooker to low, and let it cook for about 8 hours.

12. Once your onions are translucent and you know your chicken is fully cooked, pull the chicken and bay leaves out. Throw the bay leaves away and let your chicken cool for a few minutes. 

13. While you are letting the chicken cool, put on a large pot of water to boil and cook your pasta according to the package directions. I use Dreamfields Rotini pasta. It's a low carb alternative pasta that tastes just like regular pasta. If you are doing the THM plan, using Dreamfields makes this meal a Fuel Pull.*

14. Shred the chicken and add it back to the slow cooker, letting warm back through.

15. Drain and rinse your pasta. Place some pasta in the bottom of your bowl and top with the soup. Salt and pepper to taste

Enjoy!
 A perfect high protein meal full of veggies for this hungry girl after basketball practice.

*A Side Note: Our family recently (25 weeks ago to be exact) committed to eating a specific way called THM (Trim Healthy Mama). Three of us needed to lose weight and the THM lifestyle has been life changing for us. Together the three of us have lost well over 100 lbs. 

This recipe is an old recipe that we ate before THM. But, like many recipes, I made one simple little tweak and it became THM compliant. I simply switched out regular pasta for Dreamfields pasta.


Dreamfields has gotten a lot of bad press in the past year or so. Dreamfields originally claimed that their pasta had only 5 net digestible carbs. They were sued and forced to change their packaging. But as you might know, just because someone is sued and settles, or even loses a case, doesn't necessarily mean they were wrong.

I'm no expert, but I am diabetic, and I've done my own little experiments. Twice. Both times I ate a serving of Dreamfields pasta with a my meal. I then checked my blood sugar every hour for the next 8-10 hours. For my second experiment I ate the pasta in the evening. I don't usually do well with carbs late in the day. I set my alarm every hour and continued to check my blood sugars throughout the night. I saw no spikes at all from the Dreamfields. So for me, Dreamfields is a good option for a low carb pasta. If you are thinking about using Dreamfields and are diabetic or insulin resistant, I encourage you to do your own test and see how your body handles the pasta.

If you would like more information on the Trim Healthy Mama plan, please check out the book. There is also have an awesome cookbook with more than 350 recipes.

Click here to download a printable PDF of this recipe. 
http://www.whimsicaldesignsclothing.com/download-bak/SlowCookerChickenNoodleSoupRecipe.pdf


Happy Cooking!
Danielle Storm

www.whimsicalfabric.com