Tuesday, December 7, 2021

Sew-Along #35 - Log Cabin Quilted Pot Holder - Lesson #1

Welcome to Day 1 of the Log Cabin Quilted Pot Holder Sew Along!

Important: If you would like to see an image on our blog in a larger format, just click on it to enlarge. This may prove helpful for some of the steps in our sew alongs.

Please note that links to products within this post are either links to our website or affiliate links. All items purchased help us afford to host these sew alongs. Thank you.


Let's get to sewing!  

1. Pick out 6 of your 10"x10" fabric pieces for the backings and set them aside.


2. Press all of your remaining 10"x10" fabric pieces so that there are no creases or winkles.
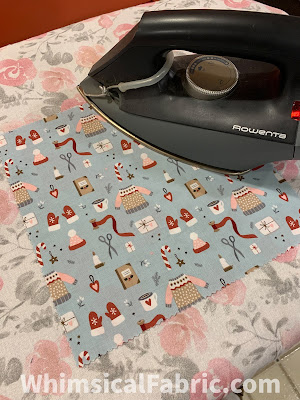

3. Now you are going to cut your remaining 10"x10" fabric pieces (the ones NOT set aside for backing) into 1.5" strips.

 
Be as accurate as possible with cutting these 1.5" strips.

 
You will end up with six strips and a 1" scrap per 10"x10" square.  
 
 
Pro Tip: Save the 1" scraps to use for stuffing in projects.
 

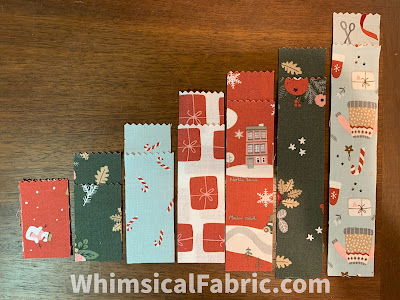
 4. I like to lay out my design before I get started. We are going to build our pot holder with seven groups of two strips. You can do a crazy mix of fabrics or plan it out, whatever your heart desires.
 
Note: I did decide to flip my red church print and my red snowman print positions as you will see in my pictures.
 

5. Once you have your plan set it's time to start cutting your fabric strips. You will need to save the extra pieces as you are cutting. They will be used for future pot holders you’ll want to make.

*Section 1 will form the top left corner of your pot holder.
*Section 7 will form  the right edge and bottom edge of your pot holder. 

Cut the following strips.

Section 1
     Cut 2 fabric strips - 1.5" x 2.5"


Section 2
     Cut 1 fabric strip - 1.5" x 2.5"

     Cut 1 fabric strip - 1.5" x 3.5"


Section 3
     Cut 1 fabric strip - 1.5" x 3.5"

     Cut 1 fabric strip - 1.5" x 4.5"


Section 4
     Cut 1 fabric strip - 1.5" x 4.5"

     Cut 1 fabric strip - 1.5" x 5.5"


Section 5
     Cut 1 fabric strip - 1.5" x 5.5"

     Cut 1 fabric strip - 1.5" x 6.5"


Section 6
     Cut 1 fabric strip - 1.5" x 6.5"

     Cut 1 fabric strip - 1.5" x 7.5"


Section 7
     Cut 1 fabric strip - 1.5" x 7.5"

     Cut 1 fabric strip - 1.5" x 8.5"

 
When you cut the very last strip you will have a 1.5" x 1.5" scrap of fabric left over. You don't need this for your future pot holders so you can throw it into your scrap pile.

6. Grab two of the strips from the jelly roll fabrics. One will be your binding and the other will be used for the hanger.


7.
Cut the hanger piece into a 5" strip.

8. Trim down the binding piece so that it is 2.25" wide.


9. Next, grab your batting and cut two pieces that are 10" x 10” square. You may want to press the batting first if you haven't already. Just be careful not to stretch the batting as you press it. 


You have now finished all of the cutting of the fabric for your pot holder. Woo hoo!

10. Take your binding piece and press it in half lengthwise with wrong sides together.

Set your binding strip aside for later.

Now it’s time to sew!

Note:
We will be using a 1/4" seam allowance throughout this entire project unless otherwise noted
. Also, you must use 100% cotton thread to ensure the thread doesn't melt when using your pot holder.


11. Start with Section 1 (two 1.5” x 2.5” strips) and piece together along the long edge.


12. Press the seam to the side. You will want to press the seams every single time you add a new piece to your block.

13. The first strip listed in each section will be sewn to the right of this base block you just created. The second strip listed in each section will be sewn to the bottom.


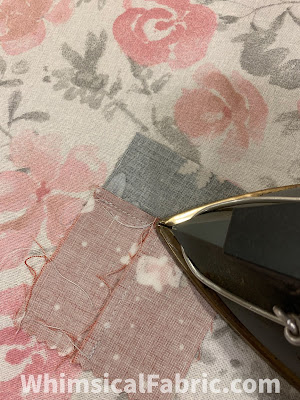
 
Remember, press out towards each newly added strip after every seam.


 14. Add the second strip from Section 2 to the bottom. Press seam towards this new strip.


15. Repeat for section 3, 4, 5, 6, and 7. Pay special attention to make sure you keeping your proper orientation and order for piecing each strip to your block. Don't forget to press those seams each and every time. 


16. Once you have added all 7 sections press your block well and then square it up if you need by trimming the sides.


We are almost done for today.😀

17. Pick the backing fabric you want to use and place it down with wrong side up.


18. Layer 2 pieces of the 100% cotton batting on top of your backing fabric.


19. Place your fabric block on top of your batting.

That's it for today's lesson. Thanks for joining me and see you on Thursday!
 

Happy Sewing,
Danielle Storm

www.whimsicalfabric.com

*If you would like to earn entries into the prize drawing, please make sure to submit a photo of your completed Lesson One to this Facebook Album by 12:00 noon CT, Thursday, December 14th. If you have any questions the Facebook Group is a great place to ask.


Wednesday, December 1, 2021

Sew-Along #35 - Log Cabin Quilted Pot Holder - Preparations

The Log Cabin Quilted Pot Holder  

Note: Links to products within this post are either links to our website or affiliate links. All items purchased help us afford to host these sew alongs. Thank you. 

Items to Collect 

  1. We have put together some great kits for this sew along. Everything you need, aside from thread, is included in the kit. We have lots of options left on the website. Purchase of these kits allow us to create sew along lessons for you. Click here to view them all.


  2. For this project you will need 100% cotton thread. I usually pick mine up at my local Hobby Lobby. The thread for this project must be 100% cotton so it does not melt when you place a hot pot or pan on your pot holder.


  3. You will also want quilting pins to sew this project. These are my favorite quilting pins! They are crystal headed so do not melt when you press over them with a hot iron. They are also the perfect length for going through multiple layers of fabric and batting.


  4.  A walking foot can make sewing through thick layers of batting much easier. It's not a necessity, but if you have one, you might want to grab it. And if you don't, but want to try a new foot, you can find some here. Just make sure you buy one that fits your machine.


  5. Wonder Clips are also nice for working with bindings. These little clips are great too for delicate fabrics that you worry about pin holes when pinning, such a swim fabric, rayon, voile, etc. If you don't own Wonder Clips I highly suggest putting them on your notions shopping list. These mini clips by Clover would be perfect for this small project.


  6.  A new to me find are these Fiskars Titanium Easy Action Scissors. These are life!! They stay super sharp and are so easy for my hands to cut with. I love them so much I bought a second set and gave my older and more expensive scissors to my 11 and 13 year old to use.


  7.  I also love this little handy Seams Right measuring guide and use it every time I sew. You will see me using it during this sew along.


  8. One other measuring tool I couldn't live with out is this handy Sewing Gauge. Yup, you will see me using mine during this sew along.


  9. And finally, you will need a sewing machine, a good iron (a steam iron is preferable for sewing), a quilting ruler, and maybe a fabric marker/pen or chalk.

Things to Do
  1. You DO NOT need to pre-wash your fabrics for this sew along. In fact I highly discourage you from doing so.
  2. Press your fabrics and batting to remove wrinkles if needed. Just be careful to not stretch out your batting in the process.
  3. Text SEW to (712) 481-2480 to receive text alerts each time the sew along lessons are posted.
  4. And don't forget to join our Whimsical Fabric & Me Group so you can post your progress pictures!

This sew along will consist of 2 lessons that will go live on Tuesday and Thursday, December 7th and 9th, 2021. 

Happy Sewing,
Danielle Storm
WhimsicalFabric.com

Saturday, November 21, 2020

Check Out Our Most Recent Bundle! 👀 WOW!!


Our most recent Wacky Wednesday bundle is stunning!!


This bundle contains four gorgeous and perfectly coordinated fabrics. These are premium quilting cottons from Art Gallery Fabrics. They feel like butter and sew like a dream! 💗


When you order this bundle you will receive all four fabrics. You have your choice of a half yard bundle or full yard bundle. You can even customize your bundle size in any half yard increments to make it exactly the length you desire. 


And did we mention that when you purchase this bundle, sew something up with it, and share on our Facebook group you can win a $5 off coupon off your next bundle and/or a full yard bundle of our next Wacky Wednesday fabric (coming December 16th) absolutely FREE! Check out our Facebook group, Whimsical Fabric & Me for more details.

 
Hurry and order your bundle today to save big. Priced at over 35% off the manufactures suggested retail price, it is a steal!!
 
Happy Creating!
Danielle Storm
WhimsicalFabric.com
 
http://www.whimsicaldesignsclothing.com/index.php?main_page=product_info&cPath=590&products_id=8015 Please note, if you ever have any checkout issues (which sometimes happens during big sales) please use this link for instructions. Thank you!

Thursday, November 19, 2020

Sew-Along #34 - Christmas Traditions Advent Calendar - Lesson #2


Welcome to Day 2 of the Christmas Traditions Advent Calendar sew along!

Today we are going to finish our Advent Calendars. Are you as excited as I am? 

Important: if you would like to see an image on our blog in a larger format, just click on it to enlarge. This may prove helpful for some of the steps in our sew alongs.

Please note that links to products within this post are either links to our website or affiliate links. All items purchased help us afford to offer prizes during our sew alongs. Thank you.

1. Grab your calendar, it's time to quilt it! We are going to start at the bottom on the line separating pocket 21 and 22. You can use whatever thread you want. You can even change up the stitch and use a decorative stitch on this part. The options are endless. Get creative if you wish!!

2. If you are using just a regular straight stitch and regular thread like I did, consider stitching a few stitches past the top of the pockets, then back-stitching 2-4 stitches. This will give the pocket tops extra strength and help keep them from tearing out. This is especially helpful if you have little hands that will like to play by putting things in and out of the pockets. 😉

 
3. Once you finish the middle line (starts with 21/22) move on to the line to the right, between 20 and 21, and stitch from the bottom to the top of that line. Next you will move to the left and stitch the line between 22 and 23. Continue stitching, alternating right side, then left side, and so on working out to the edges. Once you have completed all 7 vertical lines move on to the bottom and top horizontal lines (printed in grey on the fabric).

Note: You DO NOT need to quilt the outer most lines on the panel. Those are the cut lines. We will get to that later.
 

4. If you wish, you can add extra stitching around the white edges of the banner like I did (see image below to see where my presser foot was lined up). My stitches are hard to see because I used red thread and stayed just on the red plaid alongside the white banner.

5. Next, carefully trim the calendar along the outer most printed lines.


6. If you are adding hanging loops, now is the time to add them. I placed two of mine 1" from the outer edges and then the third dead center. Simply fold the loops in half with the seam on the inside. Then, matching up the raw edges of the loops with the raw edge of the calendar. Pin in place.


7. Once your hanging loops are pinned, quickly stitch over the loops, close to the raw edges, to tack them in place. I forgot to take a picture of this. Oops!

8. Now, grab your long binding strip. starting on a side of our calendar, pin (or clip) the binding to the back of the quilt matching raw edges of the binding strip to the raw edges of the calendar. You might want to work clockwise around the back of your calendar attaching the binding like I did. 

Make sure to leave a 5+" tail of the binding strip unstitched. Leave a little more if you have have never bound a quilt before. Trust me, it will make it easier for you when we finish off the binding. 

9. Begin stitching the binding down to the calendar edge, stopping 1/4" from the edge of the calendar. You can see I've marked it with a pin here.

10. Once you are 1/4" away from the edge of the calendar bury your needle, lift your presser foot, pivot 45 degrees and sew off the edge of the binding. 

11. Your stitching should look like this.

Click to Enlarge

12. Now, place your left thumb under the binding like so.

13. Pull up the binding folding it as you do so and lining it up on the edge. If this part is confusing, click here to see a short video tutorial.

 14. Continue to sew around your calendar attaching the binding. 

15. When you get to the side where you started attaching your binding, stop 5 inches (or more) from the tail you left. Measure up 2.5" from the end of the tail. 

Note: If you binding is a different width you will need to adjust the 2.5". This measurement should ALWAYS match the width of your binding. So if you are using a 3" wide binding, measure up 3".


16. Overlap the two binding ends marking the 2.5" measurement. This is where you will cut your binding so measure carefully!! Remember, if your binding is wider you will need to adjust this number. Now cut the extra binding away. You should now have 2.5" of binding overlapping each other.

 17. Open up the binding on your right with wrong side facing up.

18. Open up the left binding with right side facing up. 

19. Forming a right angle and matching up raw edges, pin the two binding strips together like so. I like to point my pin diagonally to remind me where I am supposed to stitch. If you would like, use a straight edge and draw out a stitch line. I also clipped my excess fabric on the calendar together with a binding clip to help make it easier to sew. It's hard to see, but look at the bottom center of the picture.

20. Carefully stitch across the diagonal.

21. Before cutting, fold your binding back down and make sure everything is done properly and fits.

22. Once you have confirmed that your binding has been pieced together correctly, unfold and trim off the corner. 

 23. We are now going to secure the hanging loops with a zig-zag stitch. Set your machine to zig-zag.

24. Zig-zag stitch close to the raw edges of all three loops. You will have a sandwich you are sewing through that has the binding on top, loops in the middle, and calendar on bottom. This is to make sure that the loops are securely attached and will not get pulled off if little (or big) hands tug on the calendar.

25. Now, flip your calendar over and pull your binding to the front. Flip your hanging loops up. Make sure both your binding and loops are smoothed out flat. Stitch along the upper edge of the calendar over where the loops are located, avoiding stitching the binding front. This will make sure the calendar hangs straight.

26. Your loops should  look like this from behind.

27. Begin pinning or clipping your binding to the front. As you get to the corners, carefully trim a tiny bit of the calendar corners off.


 28. As you get to the corners flip up and and examine the bottom binding. Whichever side of binding is on top on the back of the calendar you will want on bottom on the front of the calendar. Confusing? 

For instance, the binding on the left is on top of the binding on the right in the image below. So, reverse that for the front. The binding on the right needs to be on the top on the front of the calendar. This will help the corners lay flat.

Binding on Right Side is on Top
Thus, the binding on Right Side will need to be on Bottom for the front of the calendar.

29. Pin or clip your binding around the entire front of your calendar, clipping corners and folding the binding properly at each corner.


30. The final step is to top stitch you binding in place. I shortened my stitch length just a bit...

...and carefully stitched as close to the edge of the binding as I could get. It's also super helpful to make sure your binding is fully pulled over from the backside as you go. Take your time and stitch carefully to create a beautiful finished edge.

That's it! We are all done. 

You can make cute little stuffies from the printed characters on the directions panel to place in the pockets. Or you can put small presents, coins, or candy in the pockets. We printed off these bible verses from Happy Home Fairy, tucked them in each corresponding pocket, and will use them for family devotion time. Whatever you do with your calendar, make sure to admire your work of art and give yourself a pat on the back.

Thanks for joining me!!

Happy Sewing,
Danielle Storm

WhimsicalFabric.com

*If you would like to earn entries into the prize drawing, please make sure to submit a photo of your completed project to this Facebook Album by 12:00 noon CT, Monday, November 30th. If you have any questions the Facebook Group is a great place to ask.