Showing posts with label Sales. Show all posts

Saturday, August 27, 2022

$𝟏𝟎𝟎 𝐏𝐑𝐎𝐃𝐔𝐂𝐓 𝐆𝐈𝐕𝐄𝐀𝐖𝐀𝐘!!

We are giving away a $100 package of sewing supplies and fabric to one lucky customer!!
Read below to find out how you can win. 
 
𝐖𝐡𝐚𝐭: A package full of sewing supplies and fabric valued at over $100!
 
𝐇𝐨𝐰 𝐭𝐨 𝐖𝐢𝐧: Earn 1 entry for every $50 purchased from our Clearance items located on the Whimsical Fabric & Me group.
 
𝐖𝐡𝐞𝐧: Entry earning begins now and runs through Sunday, September 11th.
 
𝐁𝐨𝐧𝐮𝐬: If we have more than $1,000 in orders between now and the 11th we will giveaway a second $100 bundle! More than $1,500 and we will draw three winners!
 
𝐇𝐨𝐰 𝐭𝐨 𝐒𝐡𝐨𝐩: All Clearance items are located in the GUIDES on the Whimsical Fabric & Me group. Click on Guides to see everything available. There is so much listed and everything is priced to sell!


Hop on over to Facebook today to grab a deal and earn some entries!


Happy Creating!
Danielle Storm
WhimsicalFabric.com
 
PS Don't forget to check the Facebook group often. We are listing new discounted items weekly until everything is gone!

Thursday, June 2, 2022

Save an EXTRA 20% Off Clearance Prices 😍

Now through Monday save an extra 20% off everything in the Inventory Clearance Guides on the Whimsical Fabric & Me Facebook group!

  • Quilting Cottons are only $6/yard
  • Chambray and Denim is only $7.20/yard
  • Knits and Piques are just $7.60/yard
  • Children's Corner Patterns are only $9.60 each, while Izzy and Ivy Patterns are as low as $7.20 each


Hop on over to Facebook today to grab a deal. Hurry though because stock is limited and the extra 20% off is only good through Monday.

Happy Creating!
Danielle Storm
WhimsicalFabric.com
 
PS Don't forget to check the Facebook group often. We are listing new discounted items almost daily, M-F, every week throughout the summer until everything is gone!

Thursday, May 26, 2022

WIN FREE FABRIC from Whimsical Fabric! 🎁

We will be 𝐆𝐈𝐕𝐈𝐍𝐆 𝐀𝐖𝐀𝐘 𝐅𝐑𝐄𝐄 𝐅𝐀𝐁𝐑𝐈𝐂 to one of our customers next Wednesday, June 1st!!

There are 3 ways to enter to win!
  1. Comment on posts on our Facebook VIP group, Whimsical Fabric and Me. Earn 1 entry for each comment you make
  2. Purchase from our Inventory Clearance Sale. We have Quilting Cotton, Piques, Denim, Chambray, Knits, Precuts, Patterns, and more all on sale for 30% off or more!. Everything can be found by going to the Whimsical Fabric and Me group and clicking on the GUIDES section. Every yard or item purchased counts as an entry!!
  3. And Now thru Tuesday, May 31st, 𝐄𝐕𝐄𝐑𝐘 𝐈𝐓𝐄𝐌 𝐎𝐑𝐃𝐄𝐑𝐄𝐃 from the Guides 𝐂𝐎𝐔𝐍𝐓𝐒 𝐀𝐒 𝟐 𝐄𝐍𝐓𝐑𝐈𝐄𝐒!! Order 5 yards of fabric and earn 10 giveaway entries plus 5 more entries for your comments ordering, for a total 15 entries!! 🎁


Hop on over to Facebook today and earn some entries. 

Happy Creating!
Danielle Storm
WhimsicalFabric.com
 
PS Don't forget to check the Facebook group often. We are listing new discounted items almost daily, M-F, every week throughout the summer until everything is gone! 
 

Thursday, May 19, 2022

More DEEPLY Discounted Items as we Continue to Clear Out Whimsical Fabric's Inventory

In case you missed our last message, Whimsical Fabric is closing it's doors and we are selling off ALL of our inventory at 30%-50% off or more!

Please make sure you are a part of our Facebook VIP group, Whimsical Fabric and Me, as this is where we are listing these deals. 

 Below are all the new items we have listed over the past week. 

Everything is discounted 30%-50% or more!

KNITS


 DENIM & CHAMBRAY


Some of these CC patterns are now Out of Stock, Rare, 
and Hard to Find! Grab them now at this discounted price!!


Hop on over to Facebook today. 
 
And don't forget to check the Facebook group often. We are listing new discounted items almost daily, M-F, every week throughout the summer until everything is gone! 

Happy Creating!
Danielle Storm
WhimsicalFabric.com

Wednesday, May 11, 2022

Inventory Clearance Sale - BIG Discounts at Whimsical Fabric

 It is sometimes really hard to close chapters in our lives. Especially when those chapters were so good! 

Our family is moving on to a new adventure and with that I must close a chapter in my life. I am in the process of shutting Whimsical Fabric's doors. At least for the time being. And I need to clear out ALL fabric, patterns, packing supplies, notions, clothing blanks, etc. EVERYTHING must go. 

As I slowly work through all the goodies I am listing them at a deep discount on our Facebook VIP group, Whimsical Fabric and Me. We would love to have you join us and take a peek at all the goodies.

 Below is what we have listed over the past week. 

Everything is discounted 30%-50% or more!

KNITS


 QUILTING COTTONS


Izzy & Ivy Designs are no longer in business and these patterns are now super hard to find! Snag some while you can. 💖
 
Hop on over to Facebook, Grab some great deals, and Help Us fund our next adventure. 
 
Make sure to keep checking the Facebook group often. We are listing new discounted items daily M-F every week throughout the summer until everything is gone. 

Happy Creating!
Danielle Storm
WhimsicalFabric.com

Wednesday, November 26, 2014

Our Holiday Sale Starts Now! Save 35% or More!


Whimsical Fabric's Holiday Sale is going on Now!
The entire site is marked 25% off.
And. . . add $75 worth of goodies to your cart, use the code Save10%More, and save an additional 10% off your entire order!
 Sale runs through Tuesday, December 2nd.   
 We want you to enjoy your family during Thanksgiving so we started our Holiday Sale early and are running it late.  Plus you can shop from the comforts of your home.  No need to rush out into the cold at the crack of dawn.  Shop when you want.  But, with these awesome prices don't wait too long or we might run out of stock of some things.  

Happy Holiday Creating!

Saturday, May 31, 2014

Only 12 Hours Left!!


JUST 12 HOURS LEFT OF OUR FLASH SALE!


Use the code SAVE15% to save 15% off your entire order.
Even save 15% off the already 20% off Paper Pattern Category!

In addition, we have a little Facebook "Share This Status" giveaway. One person who PUBLICLY shares our Facebook Flash Sale post AND places an order with the SAVE15% coupon code will receive a FULL REFUND for their order. How amazing is that? Hurry, the code expires TONIGHT, Saturday at midnight MT!

Happy creating!
Danielle Storm
www.whimsicalfabric.com

Friday, May 30, 2014

32 Hour Flash Sale & Facebook Giveaway


FLASH 32 HOUR SALE!


Use the code SAVE15% to save 15% off your entire order.
Even save 15% off the already 20% off Paper Pattern Category!

In addition, we have a little Facebook "Share This Status" giveaway. One person who PUBLICLY shares our Facebook Flash Sale post AND places an order with the SAVE15% coupon code will receive a FULL REFUND for their order. How amazing is that? Hurry, the code expires TOMORROW, Saturday at midnight MT!

Happy creating!
Danielle Storm
www.whimsicalfabric.com

Thursday, May 29, 2014

Weekly Special - 20% Off All Paper Pattern


This Week's Special
http://www.whimsicaldesignsclothing.com/index.php?main_page=index&cPath=71_325
No coupon needed.  
Items have already been discounted on the website.
Prices are good through Monday, June 2nd.  
No further discounts apply.
  
Happy creating!

Tuesday, May 27, 2014

Only 8 Hours Left To Save Up To 20%!

Save up to 20% with our Memorial Day Sale
www.whimsicalfabric.com

Use the code Memorial10 to save 10%
OR
Spend $25 & use code Memorial15 to save 15%
OR
Spend $50 & use code Memorial20 to save 20%

Hurry, codes expire at midnight MT tonight!

Happy creating!
Danielle Storm
www.whimsicalfabric.com


Monday, May 26, 2014

Memorial Day 48 Hour Sale - Save Up To 20%


Save up to 20% with our Memorial Day Sale
www.whimsicalfabric.com

Use the code Memorial10 to save 10%
OR
Spend $25 & use code Memorial15 to save 15%
OR
Spend $50 & use code Memorial20 to save 20%

Codes are good for only 48 hours so order now before it's too late.

Happy creating!
Danielle Storm
www.whimsicalfabric.com


Tuesday, April 22, 2014

April's Tutorial Tuesday - Detachable Apron Dress

How to Create a Detachable Apron Dress

I just love detachable aprons on dresses.  Aprons can give a dress such a cute look. They are a great way to add a pop of interest or change the look of any dress.  And with a detachable apron it can be removed if desired.  Think of all the possibilities. . .  With a few detachable aprons you create almost endless options mixing and matching aprons with dresses.    

This tutorial will teach you how to create an apron to attach to almost any dress with a waistband.  Your little princess will love being able to create her own custom look.  

Make sure you read all the way to the very end for a special 20% off coupon! And remember, you can click on any of the photos to enlarge.

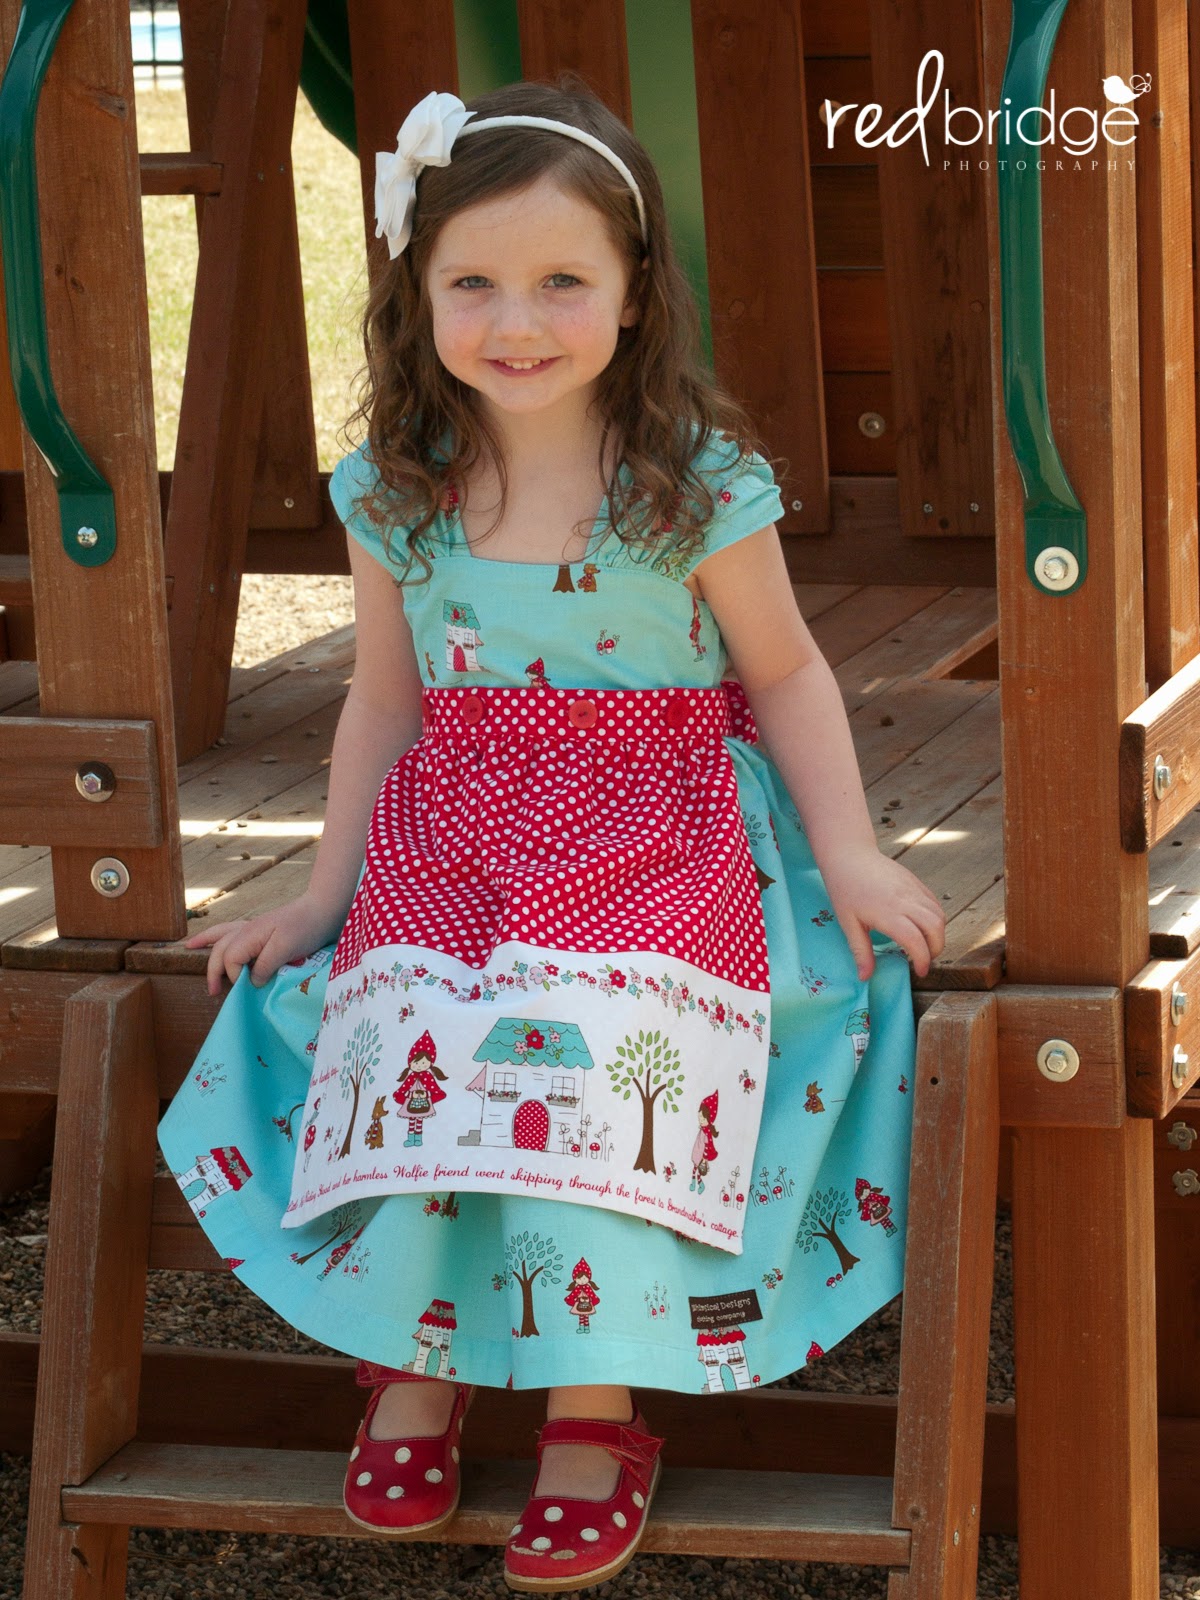
The first thing you will need to do is either create or find a dress with a waistband.  In our sample we created the Macy Giggles dress by Izzy & Ivy Designs out of Riley Blake Little Red Riding Hood fabric. If you would like to create the Macy Giggles dress we have a super detailed step by step set of sew-along lessons you can follow here.  We also have kits made up so all you need to do is pick your size, purchase coordinating thread and buttons, and your set to go!  


In my dress above I made the skinny hem version of the Macy Giggles, like taught in the sew-along, but omitted the hemband and pockets.

Once you have your dress you will need to decide how large to make your apron.  Below you will find a set of general measurements I use to cut my apron fabrics.  For my Little Red apron I changed up the numbers a bit because of the higher waist on the Macy Giggles and the fact that I wanted the apron to showcase the whole Little Red border print story.  I'll include exactly what I did to make my apron, which was created with a size 4t Macy Giggles in mind.  

For the best results you will want to measure the finished waistline of the dress you are using and decide what width and length of sash will look best with the dress.  You will also want to decide what width and length of apron panel will look best.  Keep in mind that you will be gathering the apron panel at the waistline.

Supplies
  • Front Apron Fabric
  • Back Apron Fabric
  • Sash Fabric
  • Lightweight Fusible Interfacing
  • Buttons
  • Coordinating Thread 
  • Marking Pen or Chalk
General Apron Measurements
Size Apron
Cut 1 from Front Fabric.
Cut 1 from Back Fabric 

(width of apron x length of apron)
Sash
Cut 1 from Sash Fabric
*See note below.

(width of sash x length of sash)
6-12M 14" x 9" 5.5" x 49"
12-18M 14.5" x 10" 6" x 52"
18-24M 15" x 10.5" 6" x 55"
2t 15.5" x 11.5" 7" x 58"
3t 16.5" x 12.5" 7" x 61"
4t 17.5" x 14" 7.5" x 64"
5 18.5" x 15" 8" x 67"
6 19.5" x 16" 8" x 73"
7 20.5" x 17" 8.5" x 75"
8 21.5" x 18" 8.5" x 79"
10 22.5" x 19" 9" x 83"
12 23.5" x 20 9" x 85"
14 24.5" x 21" 9" x 87"
*Note: To save on fabric you can cut your sash from selvage to salvage (width) and seam it together.  Keep in mind that if you divide your sash in half you will create a seam in the middle of the front.  You probably don't want to do that.  The best practice is to divide the sash into three pieces and have two seams.  Keep the front sash piece long enough so the seams will fall at the sides of the dress.  Don't forget to add in seam allowances for your spliced sash.  The seam allowance will need to be doubled for the center sash piece since it will have seams on both ends.

Directions

1. Determine the size you desire for your apron and sash pieces and cut them out accordingly.
I gave you all those numbers above as a general guideline but I did change mine up for the Little Red apron.  First, since the waistline is high on the Macy Giggles I feel the sash width looks better narrowed a bit.  I wanted my finished width to be 1.25".  I also wanted my sash to be a little longer for this dress.  Finally, the words on the bottom of the border fabric I used have an 18" repeat.  I wanted to make sure I got all of that on my apron.  I also knew that I wanted to cut about 1.75" off the bottom of my border so I added that to the length of my apron front piece (not the back piece).  I cut my apron and sash fabrics to the sizes listed below for my 4t dress.

Apron Front - 18.75"(w) x 15.75"(l)
Apron Back - 18.75"(w) x 14"(l) 
Sash - 4.5"(w) x 78"(l)
I then trimmed off the 1.75" at the bottom of the border print so my apron front fabric and apron back fabric were exactly the same size.

2. Measure across the waistline of your dress and determine where you want the apron panel to fall.  My dress measured 13" from side seam to side seam, so I wanted my apron to be 11" at the waist.

3. If you did not cut your sash from one piece of fabric you will want to seam that together now.  Make sure to press open your seams.

4. Take your sash and fold it in half matching up the ends to find the center.  Mark the center.

5. Using your center mark, measure out and mark where the apron will attach to the sash.  For my apron that was 5.5" on either side of the center mark.

6. Cut a piece of fusible interfacing.  The width should be your sash width minus 2".  The length should be the width you decided for your finished apron panel in step 2 above. My interfacing piece measured 2.5"(4.5"-2") x 11".

7. Iron your interfacing onto the wrong side of your sash centering it on the center mark. You should have about an inch of fabric on either side of your interfacing.  My picture here shows too much fabric on the left.  ;)

8. With right sides together and matching up fabric edges, fold and iron your sash lengthwise.  If desired, cut your sash ends at a 45° angle.

9. Sew your sash using a 1" seam allowance.  I know this sounds HUGE, but trust me, it's important so that we have a surface to attach the apron panel to.  Leave an opening from about 1" before the interfacing to about 1" after the interfacing so you can turn your sash right side out and have a spot to insert your apron panel. Oops, I forgot to take a picture of this.


10.  Trim your seam allowance on your sash everywhere except where you left it open and un-seamed in the middle.  Don't forget to clip corners.

11. Turn your sash right sides out, push out points and corners, and iron well.  Set aside.

12. With right sides together and using a ½" seam allowance, stitch the apron front to the apron back down along both sides and the bottom.  Leave the top open for turning.

13. To achieve really nice corners you can try this trick.

When you reach a corner stop 1 stitch shy of the corner and leave your needle down in the fabric.

Lift your presser foot and rotate your fabric 45°.  Now, using your handwheel, stitch 1 stitch across the corner.

Leaving your presser foot down again, rotate your fabric another
45° and stitch down the next side.

14. Once you have stitched up the three sides clip your corners, turn your apron panel right sides out, push out your corners, and press well.

15. We now need to create two rows of gathering stitches at the top of the apron panel.  Set your stitch length to the longest length and sew two rows of stitches about ¼" apart.  Try to keep them contained within ½" of the top edge.

16. Pull up your bobbin threads to gather your apron panel so that it fits on your sash between the two marks you created earlier.

17. Opening up your sash and folding out the bottom/back seam allowance, pin the apron panel to that bottom/back seam allowance.  The right side of your apron panel should be facing up and the front of your sash should be opened up and out of your way.  Note: Your interfacing should extend to both the front and back of your sash.  I only have mine on the front in this picture.  Your seam allowance will be longer than that pictured too.  I was distracted by a little and trimmed mine by accident.  Don't do that because it makes it very hard to work with.     

18. Use about a ½" seam attach your apron panel to the sash.  See why we used a 1" seam allowance on the sash?  Because I accidentally trimmed mine to about ½" I had almost nothing to work with.  :(  Not good.  Tim Gunn would be proud though because I "made it work!"

19. Fold the sash front down over the stitches.

I have a little cheat I like to use to hold my fabric down without pins.  Just apply it to the seam allowance and iron.  ;)

20. Edgestitch/topstitch in place continuing around the whole sash.

21. We now need to create some buttonholes on the sash.  Determine how many buttons you would like to use and space them out evenly.  I used 4 buttons for my 11" wide apron.  Mark your buttonhole placements.

22. Stitch those buttonholes.  This part always makes me nervous even though I've done buttonholes many, many times.  Anyone else feel that way?  I usually hold my breath.

23. Almost done!  Once you have created your buttonholes go ahead and lay your apron on top of your dress and mark where to attach the buttons.  I just use my marking chalk and draw right through the buttonholes.  Now, attach those buttons.  I'm not a huge fan of sewing on buttons by hand, so I use my machine.  If you have a button foot you can use that.  If not, you can just attach them like I do.  I explain how at the end of our Exchange Dress sew-along located here.
 
24. Your all done!!  Stand back and admire the cute little detachable apron you created!

Check out our website for kits to make both the Macy Giggles Dress and the Detachable Apron.  You can see all of them here.  Use the code TutorialTuesday to save 20% off the kits through Monday, 4/28/14.

Happy creating!
Danielle Storm
www.whimsicalfabric.com