Showing posts with label Quilting Cotton. Show all posts

Saturday, August 27, 2022

$𝟏𝟎𝟎 𝐏𝐑𝐎𝐃𝐔𝐂𝐓 𝐆𝐈𝐕𝐄𝐀𝐖𝐀𝐘!!

We are giving away a $100 package of sewing supplies and fabric to one lucky customer!!
Read below to find out how you can win. 
 
𝐖𝐡𝐚𝐭: A package full of sewing supplies and fabric valued at over $100!
 
𝐇𝐨𝐰 𝐭𝐨 𝐖𝐢𝐧: Earn 1 entry for every $50 purchased from our Clearance items located on the Whimsical Fabric & Me group.
 
𝐖𝐡𝐞𝐧: Entry earning begins now and runs through Sunday, September 11th.
 
𝐁𝐨𝐧𝐮𝐬: If we have more than $1,000 in orders between now and the 11th we will giveaway a second $100 bundle! More than $1,500 and we will draw three winners!
 
𝐇𝐨𝐰 𝐭𝐨 𝐒𝐡𝐨𝐩: All Clearance items are located in the GUIDES on the Whimsical Fabric & Me group. Click on Guides to see everything available. There is so much listed and everything is priced to sell!


Hop on over to Facebook today to grab a deal and earn some entries!


Happy Creating!
Danielle Storm
WhimsicalFabric.com
 
PS Don't forget to check the Facebook group often. We are listing new discounted items weekly until everything is gone!

Thursday, June 2, 2022

Save an EXTRA 20% Off Clearance Prices 😍

Now through Monday save an extra 20% off everything in the Inventory Clearance Guides on the Whimsical Fabric & Me Facebook group!

  • Quilting Cottons are only $6/yard
  • Chambray and Denim is only $7.20/yard
  • Knits and Piques are just $7.60/yard
  • Children's Corner Patterns are only $9.60 each, while Izzy and Ivy Patterns are as low as $7.20 each


Hop on over to Facebook today to grab a deal. Hurry though because stock is limited and the extra 20% off is only good through Monday.

Happy Creating!
Danielle Storm
WhimsicalFabric.com
 
PS Don't forget to check the Facebook group often. We are listing new discounted items almost daily, M-F, every week throughout the summer until everything is gone!

Thursday, May 26, 2022

WIN FREE FABRIC from Whimsical Fabric! 🎁

We will be 𝐆𝐈𝐕𝐈𝐍𝐆 𝐀𝐖𝐀𝐘 𝐅𝐑𝐄𝐄 𝐅𝐀𝐁𝐑𝐈𝐂 to one of our customers next Wednesday, June 1st!!

There are 3 ways to enter to win!
  1. Comment on posts on our Facebook VIP group, Whimsical Fabric and Me. Earn 1 entry for each comment you make
  2. Purchase from our Inventory Clearance Sale. We have Quilting Cotton, Piques, Denim, Chambray, Knits, Precuts, Patterns, and more all on sale for 30% off or more!. Everything can be found by going to the Whimsical Fabric and Me group and clicking on the GUIDES section. Every yard or item purchased counts as an entry!!
  3. And Now thru Tuesday, May 31st, 𝐄𝐕𝐄𝐑𝐘 𝐈𝐓𝐄𝐌 𝐎𝐑𝐃𝐄𝐑𝐄𝐃 from the Guides 𝐂𝐎𝐔𝐍𝐓𝐒 𝐀𝐒 𝟐 𝐄𝐍𝐓𝐑𝐈𝐄𝐒!! Order 5 yards of fabric and earn 10 giveaway entries plus 5 more entries for your comments ordering, for a total 15 entries!! 🎁


Hop on over to Facebook today and earn some entries. 

Happy Creating!
Danielle Storm
WhimsicalFabric.com
 
PS Don't forget to check the Facebook group often. We are listing new discounted items almost daily, M-F, every week throughout the summer until everything is gone! 
 

Thursday, May 19, 2022

More DEEPLY Discounted Items as we Continue to Clear Out Whimsical Fabric's Inventory

In case you missed our last message, Whimsical Fabric is closing it's doors and we are selling off ALL of our inventory at 30%-50% off or more!

Please make sure you are a part of our Facebook VIP group, Whimsical Fabric and Me, as this is where we are listing these deals. 

 Below are all the new items we have listed over the past week. 

Everything is discounted 30%-50% or more!

KNITS


 DENIM & CHAMBRAY


Some of these CC patterns are now Out of Stock, Rare, 
and Hard to Find! Grab them now at this discounted price!!


Hop on over to Facebook today. 
 
And don't forget to check the Facebook group often. We are listing new discounted items almost daily, M-F, every week throughout the summer until everything is gone! 

Happy Creating!
Danielle Storm
WhimsicalFabric.com

Wednesday, May 11, 2022

Inventory Clearance Sale - BIG Discounts at Whimsical Fabric

 It is sometimes really hard to close chapters in our lives. Especially when those chapters were so good! 

Our family is moving on to a new adventure and with that I must close a chapter in my life. I am in the process of shutting Whimsical Fabric's doors. At least for the time being. And I need to clear out ALL fabric, patterns, packing supplies, notions, clothing blanks, etc. EVERYTHING must go. 

As I slowly work through all the goodies I am listing them at a deep discount on our Facebook VIP group, Whimsical Fabric and Me. We would love to have you join us and take a peek at all the goodies.

 Below is what we have listed over the past week. 

Everything is discounted 30%-50% or more!

KNITS


 QUILTING COTTONS


Izzy & Ivy Designs are no longer in business and these patterns are now super hard to find! Snag some while you can. 💖
 
Hop on over to Facebook, Grab some great deals, and Help Us fund our next adventure. 
 
Make sure to keep checking the Facebook group often. We are listing new discounted items daily M-F every week throughout the summer until everything is gone. 

Happy Creating!
Danielle Storm
WhimsicalFabric.com

Tuesday, September 13, 2016

September Tutorial Tuesday #2 - Free Motion Applique Pillow

This month's Tutorial Tuesday is brought to you by Laura of Stitches by Laura.

** If you would like to see an image on our blog in a larger format, just click on it to enlarge.

I'm so excited to be sharing how I make pillow covers!

Supplies:
     • FMA Pattern by StitchART - (I used the Birthday Set) 
     3/4 yard Fabric Finders Chambray - (I used Grey)
     2 yards Jumbo 1.5" Riley Blake Ric-Rac - (I used White)
     1 Charm Pack
     1 Travel size pillow (14" x 20")
     Scrap of quilt batting approx. 20" x 28"
     Piece of other fabric for interlining approx. 20" x 28"
     Fusible Web (Amount varies.)
     Thread
     Scissors
     Rotary cutter, ruler, and mat
     Safety pins


1. First, cut your chambray (background fabric) 14" x 20."  Yes, this is the size of the pillow, but we'll trim it down just a little after the free motion applique.

2. YOU are in charge of the appliques - I styled mine after my nephew's children, changing the scale as needed for the different ages. I also flipped the smallest one halfway through tracing so he would be holding both of his sisters' hands. Follow the directions in the pattern or use methods you are already familiar with for creating your masterpiece.

3. After you have your scene created, trim about 2" off each side so that it now measures 10" x 16".

4. Next, we are going to sew on the ric-rac. As shown in the pictures below, position the ric-rac so that half of it is hanging off the edge of your chambray. Pin in place on one side and sew using a scant 1/4" seam allowance.  Trim off excess.  Repeat for the remaining three sides.

5. Now it's time to trim off the overhanging ric-rac.  Yikes, sound scary?  Don't worry, it's not!  Turn your piece over so that the back is facing up.  Using a ruler and rotary cutter or scissors, very carefully cut along the edge of the chambray.  All four sides!
Now you have clean edges all the way around!!
6. Take the charm squares that you didn't cut and stack them up. (maybe 2 stacks!)  Again, using a rotary cutter or scissors cut these in half so that they measure 2 1/2" x 5."
Also cut pieces the same size from the chambray and fabric you used for appliques.
I have a few pieces that are 2 1/2" squares because that's what I could get from the leftover applique fabrics.

7. On to the borders! Lay your appliqued piece on the table and surround it with the strips you just cut.  Keep moving them around until you are pleased with the layout, or go with a random selection like I did (except for the two pieces that were directional). These don't have to be exact, but need to be at least as long as each side!

8. Take your mini strips from one side and sew them all together to form a longer strip that is at least as long as your first side.  Pin to one edge of your appliqued fabric (right sides together), covering the ric-rac and matching raw edges.  Sew this seam, then press open.
See how mine is a little longer at the top edge? 
That's okay, just trim it off straight and even with your rotary cutter!

9. Repeat with the other three sides, remembering to trim as needed and don't forget to press!!

10. After it's all trimmed up nice and straight, we'll get started with the quilting process.  We need to make a quilt sandwich, as shown in the picture below.  The piece we've been working on will be the top layer, the middle will be the quilt batting, and the bottom will be the plain fabric.  I didn't use the chambray for this layer because it won't be seen later, but you can if you want.

11. Using safety pins, secure all three layers together (This is a small piece and doesn't need tons of pins.), then take it to your machine and free motion quilt however you would like to!  I did very sparse "meandering" lines  in the center and stitched on or very near the seam lines in the border.

12. After quilting, remove the safety pins and clip any threads you see hanging about.

13. It's time to measure our mini-quilt.  If your "pretty" top measures 14" x 20"  all you need to do is trim off the batting and backing fabric so that it is even with the top piece.  If your top piece measures a little larger than you need, trim off around all of the edges until it measures the same as your pillow.

14. Cut two pieces of chambray measuring 14" x 27" each.  Fold each piece in half, short sides meeting.  Press, then sew a line about 3/4 inch from the folded edge.  These will form the back of the pillow case/cover.

15. Place the front piece on the table, right side facing up.  Place one of your back pieces on top of the front piece matching raw edges--folded end will be near the center of the top piece.  Pin in place.

16. Repeat with other back piece.  Now it's time to sew all the way around the pillow cover. (We will turn it out through the overlapping back pieces.)  If you plan on washing this later on, it's a good idea to finish the seams either with a zig-zag stitch or using a serger. (I opted for the serger.)
Stitched and serged. You can see where the pieces overlap, right?

17. Turn right side out where the back pieces overlap and give it a good press.

All done!  Insert pillow form and sit back and admire all of your hard work!

Thank you for the great tutorial Laura! To check out more of Laura's creations take a peek at her blog, Stitches by Laura.

And don't forget that this week all precuts (charm packs, layer cakes, jelly rolls, fat eighth, and fat quarter bundles) are 20% off. The sale ends at 11:59pm MT, Friday, 9/16/16.
 
Happy Creating!
Danielle Storm
www.whimsicalfabric.com


Note: Links to products within this post are either links to our website or affiliate links.

Tuesday, September 6, 2016

September Tutorial Tuesday #1 - Simple Details


Hello! I’m Steph and I am the designer behind The Eli Monster. The purpose (for me at least) of sewing clothing for myself and my children is to get a better fit and a better quality garment than I can buy in the store.

Today I’m including a few tips to transform that “homemade” outfit into “HANDMADE.” Ooooh, see what I did there? Calling it “handmade” makes it fancy!  

1. FUSSY CUT  
What’s fussy cut, you ask? It’s cutting your fabric so an element is highlighted and/or centered on your pattern piece. You may need to buy a bit of extra fabric in order to get everything situated exactly where you need it. 

If you are limited on fabric or just don’t want to buy a lot extra and have a ton of scraps, pick the most important pieces to fussy cut and focus on those. For this example, I only had ¾ of a yard of the most gorgeous Vintage Market Bike Ride fabric and had to make the choice to fussy cut the front or the back yoke. The obvious choice it the front since I wanted a bike front and center of her top. It took adjusting my pattern piece about an inch to the left but the top looks a thousand times better than it would if that bike was not centered.
Center an important part of the design on your piece.
This yoke is front and center so I made sure a bike was right in the middle.

This piece is NOT fussy cut. But it's the back piece and not as important as the front yoke.
 2. UNDER-STITCHING
Under-stitching is simply pressing your seam allowance towards your lining piece and sewing it to the lining just next to the actual seam. When your project is turned and pressed, everything wants to roll in ever so slightly towards the inside so your lining doesn’t peek out. It eliminates the need to top-stitch certain areas, making the finished dress or top or whatnot look much cleaner and more finished (because haven’t we all made a great bodice only to mess up the top-stitching somehow?).  Here is a link to a great tutorial on under-stitching.
Look how nicely the main fabric rolls a teeny bit to the inside.


3. HEM FACINGS
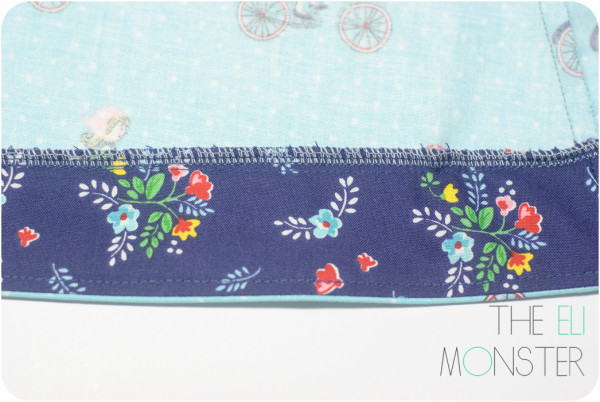
My most favorite detail to add to almost every item I make is a hem facing. It gives a totally flat hem and the appearance of a really deep hem (heirloom dresses generally have a 3” or larger hem). But since making a 3” deep hem on a curved hemline would create the biggest mess around, we use hem facings. Oliver+S has a great tutorial on their blog regarding how to sew hem facings. Check it out here.
Even though this top probably did not need a hem facing,
I used a shorter facing for a special secret pop of color that only Girly and I know about.

 4. COVERED SNAPS 
My last tip is probably a cheater tip. Because sometimes I get so excited about having the finished garment that I don’t want to take the time to make buttonholes and sew on buttons. Especially for a top like this with what seems like a gazillion buttons I would have to sew on. So I cheat and use poly snaps that I have left over from my diaper making days. Poly snaps don’t have that je ne sais quoi that really nice covered buttons have. It takes a little bit of effort but you can finish SO MUCH FASTER than buttons (if buttons aren’t your thing-I would rather sew a thousand zippers than make enough buttonholes for a shirt for Girly). 
Glue your snap to a small circle of fabric.
Stitch a couple of running stitches around the snap.
Pull the thread and tie. Apply snap as usual.


With a few of these tips, you can really level up on your finish of your next garment.


I paired Girly's new top with some bubble shorts made from more of the über adorable Vintage Market fabric. I decided to go a bit crazy and added a bit of white Ric-Rac just under the yoke. It really dressed it up a bit! 


Happy Creating!
Danielle Storm
www.whimsicalfabric.com

Tuesday, August 16, 2016

August Tutorial Tuesday - Reusable Snack Bags


 Hey it's Jona from Stitches and Spills here to share a quick and easy back to school tutorial! Our family is striving to create less waste and invest in more reusable products around our home. Last year I made a few reusable snack bags, and they have been a complete hit in our home! Today I will be showing two different methods for making snack bags (one using a serger and one using a sewing machine).

 A few notes before we begin:

You will need NON-directional fabrics. Otherwise one side of your reusable bag will be upside down.
• I recommend pre washing your fabric as these will be washed over and over. Also press well before sewing.• These are NOT water tight! They are made with two layers of cotton, so are perfect for snacks such as crackers, pretzels, or even a peanut butter and jelly sandwich. For a better water seal, food safe PUL can be used for the lining. This won't make it 100% water tight, but helps prevent moisture from soaking through.• The fabric is not tested to be food safe. If this is a concern, find a lining fabric that you feel is safe.

Now, let's get sewing! 

Supplies:  
2 coordinating cotton fabrics. (Two fat quarters will make two snack bags and one sandwich bag)  
Note: Art Gallery solids or Riley Blake solids are a great choice for adding embroidery or applique. I also love the Dr. Seuss fabrics for back to school.
Notions such as buttons, ric-rac, and/or embroidery floss
I used Jumbo Ric-Rac for mine!
Serger or sewing machine

Cutting:
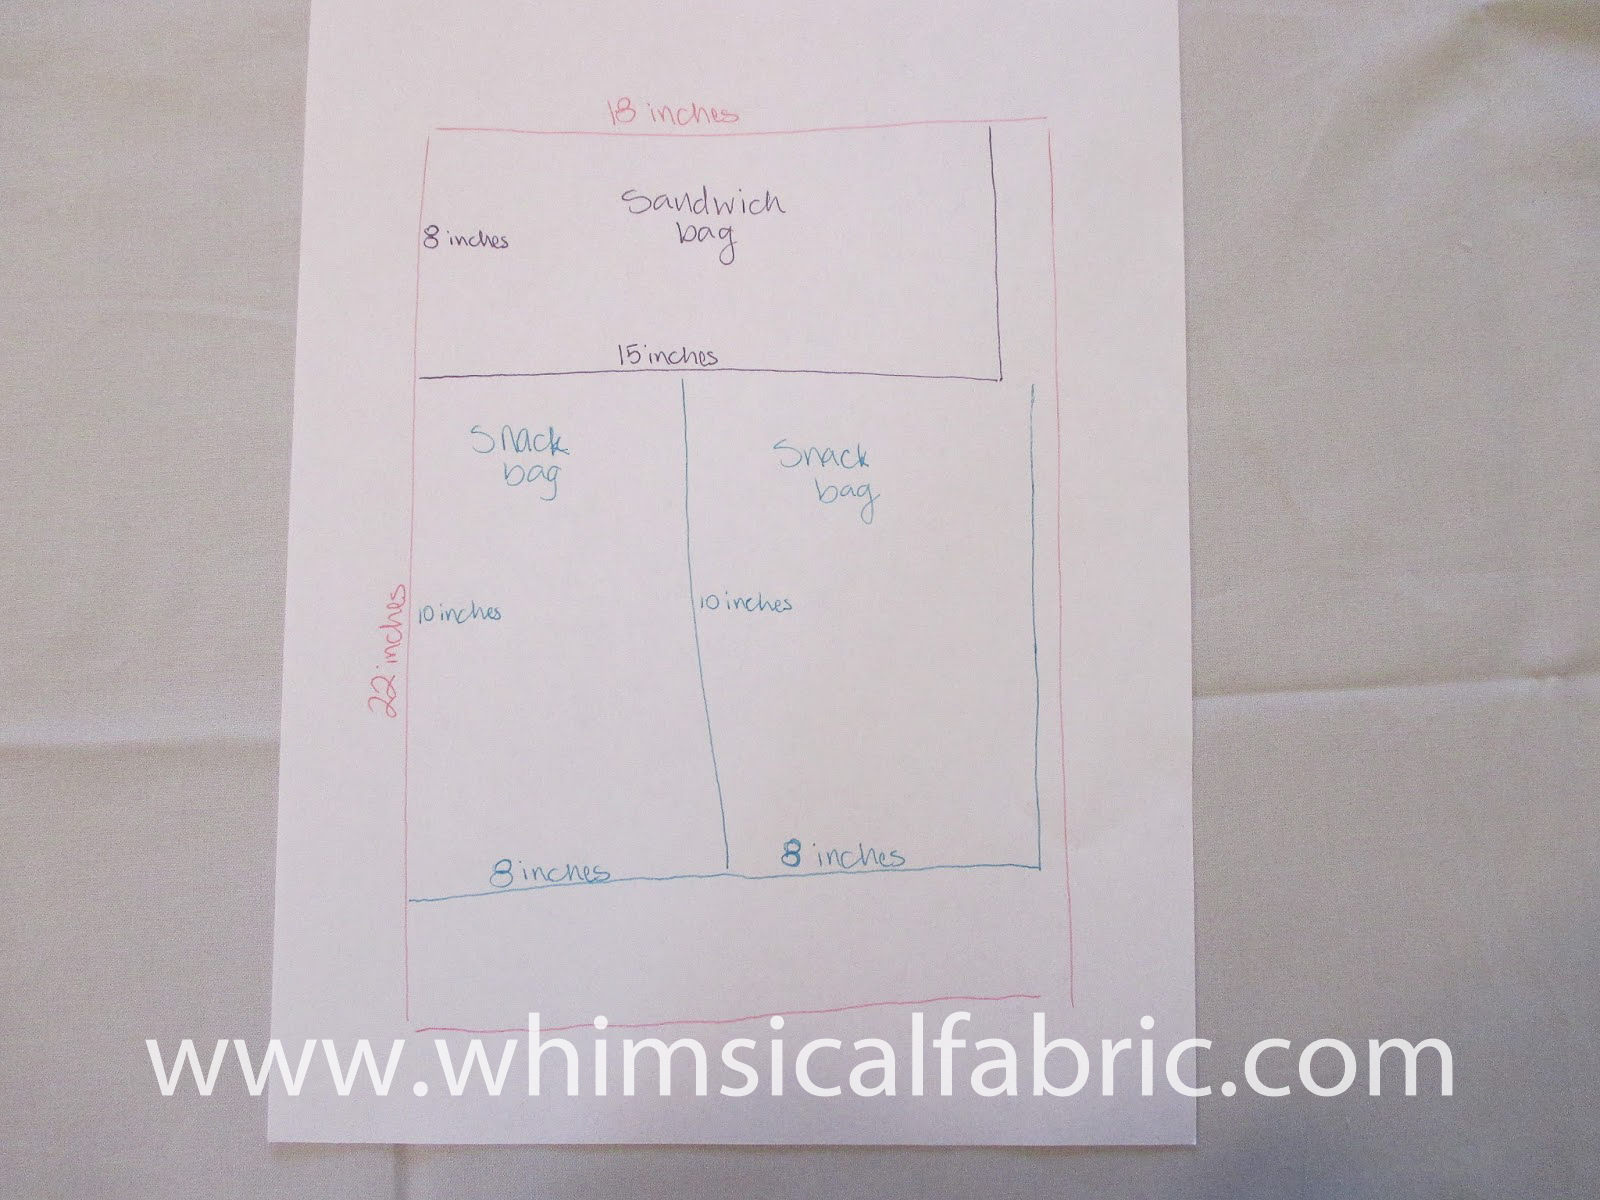
Snack bag: cut TWO 10" by 8" rectangles. One from the main print and one from the lining.Sandwich bag: cut TWO 15" by 8" rectangles. One from the main print and one from the lining.

Note: If using fat quarters, cut using this diagram to make the most of the fat quarter.


Embellishments:
At this point, figure out if  there are any embellishments you would like to add. Feel free to scroll down to the bottom of this post to see how to add hand embroidery to your reusable bag (this is added BEFORE the bag is sewn together).


Serger Method: (scroll down for the sewing machine method)

With WRONG sides together, serge the 8" sides of the bag together.

• With the main print down and the lining facing up, fold the bottom seam up towards the top, stopping TWO inches below the top seam.

• Fold the top seam down and pin in place if desired.

• Serge each side. Be sure to finish the beginning and ending tails using your preferred method.


And you are done! Wasn't that easy?!

Sewing Machine Method:

• With RIGHT sides together, sew a 1/4" seam all the way around, but leave an opening on one of the long sides (10" or 15" side depending on which bag you are making) to turn the fabric.


• When doing the sewing machine version, ric -rac can be added to the flap of the bag by putting it along the top seam PRIOR to sewing.

• Clip the corners and turn right side out through the opening along the side. Press well.


• With the main print down and the lining facing up, fold the bottom seam up towards the top, stopping TWO inches below the top seam.      

• Fold the top seam down and pin in place if desired.

Stitch along one side with a seam less than 1/4" to ensure the opening along the side gets closed. Backstitch at the beginning and end. Repeat with other side.


Wasn't that quick?!?!

Adding Hand Embroidery:
Personalize the snack bag with a cute hand embroidery design! The sandwich bag size is simply perfect for adding a cute design, or some kid art!

• Figure out where the top fold and bottom fold will be on the main bag fabric. To do this, fold the bottom of the bag up to 2.25"-2.5" from the top of the bag. Mark the top and bottom folds (finger creasing works perfectly).

• Add fusible interfacing to the wrong side of the fabric to strengthen the design, if desired.

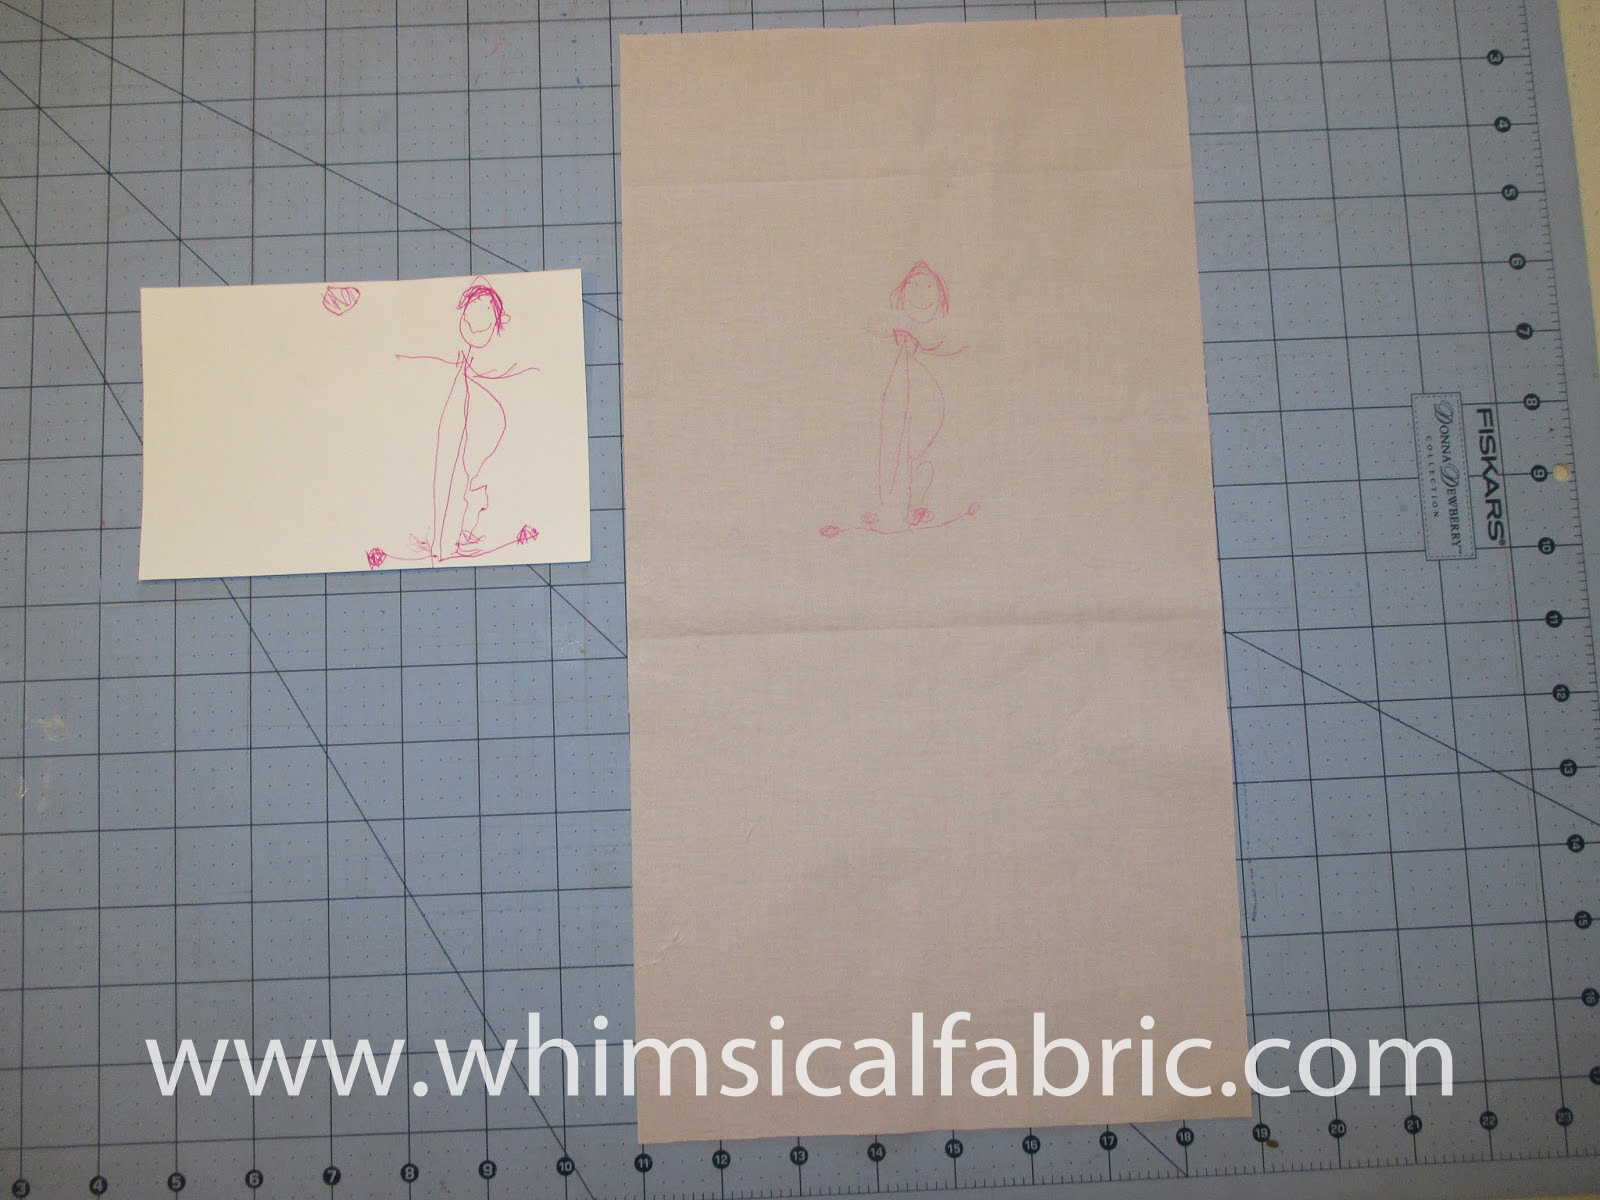
• Transfer the design (here I used a picture drawn by my five year old). I used a Frixion pen, but any water soluble pen/pencil will do. To transfer, I simply held the paper and the fabric up to our sliding glass window and traced the design.

Place design in the hoop and start stitching. New to hand embroidery? Browse our Pinterest Board for some ideas and tutorials! Also, Google searches, Pinterest, and YouTube are fantastic resources.

Iron out any wrinkles, remove drawings, and continue creating the snack/sandwich bag as shown above.
    
Happy Creating!
Jona
Lourenco
www.whimsicalfabric.com