
The Patchwork Charm Skirt
This month's tutorial is a
cute little patchwork skirt made from charm bundles. The skirt is
super easy to make and takes very little time. It's sure to be a
favorite with your little princess.
Click on any of the photos to enlarge.

What you will need:
- 18-52 charm bundle squares
- 1 yard of coordinating fabric
- 1 yard of 3/4" wide elastic
- coordinating thread
- quilting ruler or yard stick
- fabric marking tool (chalk, water soluble pen, etc)
- rotary cutter and mat (or shears)
- iron and ironing board
- sewing machine
We have a nice selection of kits on our site that contain the charm squares, coordinating fabric, and elastic you need to make this skirt. You can find those kits here. Use the code TutorialTuesday to save 20% off any kits through Monday, 2/3/14.
Sizing
Pick the size that best matches your child's measurements. The most important measurement to go by is the hip. The waist size can be customized with elastic and the length can be shorten or lengthen by adjusting the hem band.
| Size | 18M/2T | 3T/4T | 5/6 |
| Waist | 19.5"-20" | 20.5"-21.5" | 22"-23" |
| Hip | 20.5"-21.5" | 22.5"-23.5" | 24.5"-26" |
| Waist to Knee Length | 12"-13" | 13.5"-14.5" | 15"-16" |
| Size | 7/8 | 9/10 | 12/14 |
| Waist | 23.5"-24" | 24.5"-25" | 25.5"-26.5" |
| Hip | 27"-28" | 29.5"-30.5" | 33"-35.5" |
| Waist to Knee Length | 17"-17.5" | 18.5"-19.5" | 21"-23" |
Instructions
*All seam allowances are ¼" unless otherwise noted.*
1. Using the charts below, cut your waistband pieces, hem band pieces, and ties from your coordinating fabric.
| Size | 18M/2T | 3T/4T | 5/6 |
|---|---|---|---|
| # of Charm Squares | 18
(2 rows of 9)
|
20
(2 rows of 10)
|
22
(2 rows of 11)
|
| Waistband - Cut 4 | 3" x 12" | 3.5" x 13" | 4" x 14.5" |
| Hem Band - Cut 2 | 3.5" x 20.75" | 5.5" x 23" | 7.5" x 25.25" |
| Ties - Cut 2 | 5.5" x 25" | 5.5" x 26" | 5.5" x 27" |
| Size | 7/8 | 9/10 | 12/14 |
|---|---|---|---|
| # of Charm Squares | 36
(3 rows of 12)
|
36
(3 rows of 12)
|
52
(4 rows of 13)
|
| Waistband - Cut 4 | 3" x 15.5" | 3.5" x 16.5" | 3" x 19" |
| Hem Band - Cut 2 | 3.5" x 27.5" | 6.5" x 27.5" | 3.5" x 32" |
| Ties - Cut 2 | 5.5" x 27.5" | 5.5" x 28" | 5.5" x 28.5" |
2. Set your cut fabric pieces aside and open up your charm bundle(s).

3. Next, you will need to lay out your charm squares in pattern you would like them on the skirt. Use the chart in step 1 above to find the number of charm squares you will need. Some sizes will have 2 rows, some 3 rows, and the largest size will have 4 rows. Arrange the charm squares until you get the look you want. Remember that the first column of squares will be sewn to the last column.
4. Start sewing the first row of squares to each other (right sides together) using a ¼" seam allowance.

5. You will end up with a long strip of charm squares like this. Do the same with the second row creating another long strip. If you need to make a third or fourth row continue this process.

6. Press open all seam allowances on these strips.

7. You will now begin to stitch your rows of charm squares into one skirt panel. With right sides together and matching up seams, pin your first row of squares to your second row of squares. Stitch together. Continue this process until you have all rows of charm squares attached and have made one large skirt panel.

8. Press all seams open.

9. With right sides together and matching seams, pin the two short ends of your skirt panel together. Stitch together forming a circular skirt panel. Press this seam open.
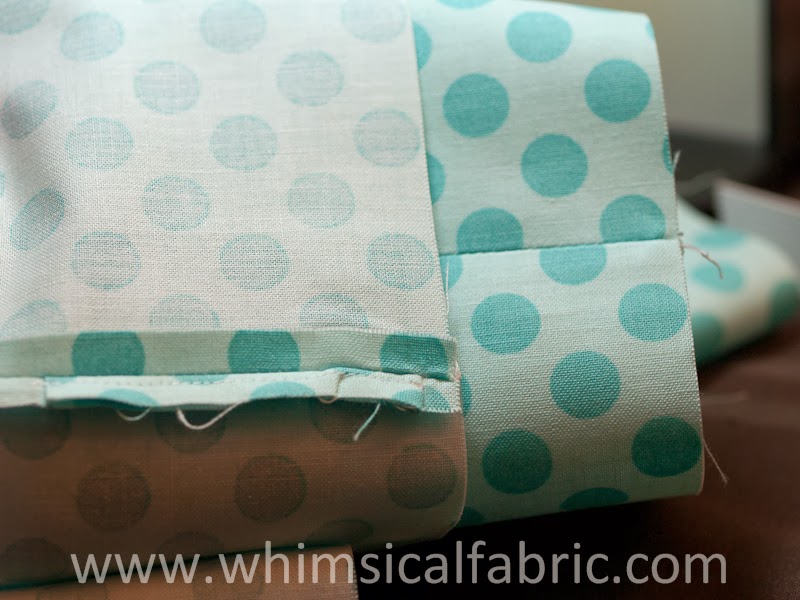
10. Grab your two hem band pieces. With right sides together stitch the two short sides forming one long circular hem band. Press these seams open.

10. With wrong sides together, fold your hem band in half lengthwise and press.
11. Flip your skirt so that the bottom is pointing up. With right sides together slip the hem band over the skirt panel. Match up the edges and pin in place.

12. Stitch the hem band onto the bottom of the skirt.

13. Flip the skirt over and finish this seam by either zigzag stitching or serging over it.
14. Press the seam to the top of the skirt.
15. Flip the skirt back over and topstitch on the on the skirt very close to the seam. You can lengthen your stitches for this a bit. It gives it a more professional finish. You want to stay very close to the seam and make sure you are catching the seam on the backside as you stitch.

16. Your hem band and skirt should look something like this when you have finished.

17. Grab your two two tie pieces, with right sides together, fold in half lengthwise and press. I like to cut my ends at 45 degree angles. You don't have too, but it adds a cute touch.

18. With right sides still together stitch along the raw edges of your ties. Leave one short end on each tie unstitched so you can turn your ties. If you 45ed one end, keep the opposite end open.
19. Trim your seams and clip any corners. Turn your ties and press well. You might want to use a skewer or chopstick to press out and roll the seams as you press with your iron. Make sure nothing is tucked under. Set your ties aside.

20. Grab your four waistband pieces. Select two of them for the waistband lining and two of them for the waistband. On both the front and back waistband pieces measure down 1⅛" from the top and mark a line with your fabric marking instrument.

21. On the front waistband piece also make a mark ¼" from the bottom on both sides.

22. With right sides together, lay your ties on top of the front waistband. Match up the raw edges of the ties with the two sides of your waistband piece. The ties need to fit between the top line and the bottom lines that you drew on the waistband piece. If they don't, see the picture below.

23. Pin ties in place on the waistband front. Note that if your ties are too wide you might have to pleat them a bit to get them to fall in between the two lines you drew. You DO NOT want your ties to fall outside these two lines or you will accidentally catch them in your seam!

24. Stitch the ties to the waistband front. You also might want to fold and pin your ties to the front of the waistband to keep them out of your way for the rest of this tutorial.

25. With right sides together stitch the front waistband piece to the back waistband piece on both sides. Do the same with the front and back waistband lining pieces. Press open all seams
26. With right sides together slip the waistband inside the waistband lining. Match up the side seams.
27. Match up the top raw edges, pin place and stitch together.

28. Turn the waistband right side out and press well. Make sure you use a chopstick or something to press out the top seam while ironing.

29. Stitch along the top line you drew leaving a 1" opening in the back to insert the elastic. (Or you can stitch it all the way closed if you inserting your elastic at the very end. See the note in step 31 regarding this.)

30. Top stitch very close to the edge along the top of the waistband casing.

31. Measure your child's waist for the elastic. I usually like to cut my elastic 2-4 inches shorter than the waist measurement. Insert the elastic into the casing and stitch it together. Stitch closed the casing in the back of your skirt. *Note: you can add the elastic later if you prefer. It will make stitching the waistband onto the skirt a bit easier. It will require you to rip out a few stitches on the inside of the skirt, at a side seam, within the casing area. This is how I actually prefer to do it. Your choice.
32. Next gather the top of your skirt. You can do this by stitching basting stitches and then pulling the bobbin threads. I prefer to do it on my serger. Once you have your skirt gathered, with right sides together and matching up the raw edge of your skirt with the raw edge of your waistband, pin the waistband to the skirt. You will want to evenly space your gathers while you are pining.
*It might be helpful to identify the sides of your dress so you can make sure you are evenly distributing your gathers.. If you used an even number of charm squares in each row then you could just line up your waistband side seams with the seams from the charm squares. If you used an odd number, like I did, identify what you want to be your front and then lay out your skirt panel, with the front centered, and press with your iron to identify and mark your sides. Line up the side seams of your waistband with the sides of your skirt when pinning.

33. Stitch the waistband to the skirt.

34. Being careful not to catch up your skirt gathers, finish your seam by either zigzag stitching or using a overlock stitch.
35. Press the waistband seam to the top of the skirt.

37. If you have waited to add your elastic, do this now. On the inside of the skirt pick a waistband seam. Using a seam ripper pick out a few of the stitches to open up the casing. Thread your elastic through the casing and stitch it together. Whipstitch closed your casing seam.
38. To keep the elastic in your waistband from twisting, stitch in the ditch of the two side seams to hold the elastic in place.
39. Add a cute tag on the hem and you're all done!

If you would like to purchase a Patchwork Charm Skirt Kit you can find those here. They contain all the fabric and the elastic you need to complete your skirt. Don't forget to use the code TutorialTuesday to save 20% off any kits through Monday, 2/3/14.

The above skirt was made from an Avignon kit.
Happy creating!
Danielle Storm
www.whimsicalfabric.com
Super cute! Want one in my size. :)
ReplyDelete