Tuesday, April 12, 2016

E+M Top No. 26 Pattern Review

The E+M Top Pattern No. 26 makes a nice casual knit shirt or dress for girls.  With options for short, 1/2, or long sleeves in a raglan style, and straight hemmed or high-low shirt, or dress length, this pattern fits all seasons.  And it fits your girls sizes 2 to 10.  

For this PATTERN REVIEW, I made a short sleeve, high-low top for my 6 1/2 year old girl.

The shirt fabric is from the online shop Whimsical Fabric.  It is Greeka in Skoura knit fabric from the Skopelos Art Gallery Collection for the short sleeves and lower front and back, and matched with a Strawberry Kiss knit fabric by Art Gallery for the upper front and back.

The E+M Top Pattern No. 26 is a PDF pattern that is professionally written, easy to follow, includes multiple sewing options, and is suitable for a beginner seamstress with experience sewing knit fabrics. 

Printing & Assembling the Pattern…

The pattern includes clear printing and assembling directions.  The pages to print for each of the look variations is listed for easy reference -  so ink and paper are not wasted.  The pattern does not have layers, meaning that you can’t select to print only the size desired.  Based on the pattern design, it isn't a ink and paper waste to print all sizes, but it does require attention to cut the on the correct lines.  The lines do not cross on the pattern, so this is simple enough.

Sewing Instructions & Pictures…

The instructions are clear with explanation of each sewing step.  The pattern includes different tips & tricks for the sleeve hems, different options for finishing the seams and neck band, and optional serger sewing instructions.  The instructions are not too wordy, and not too brief.  They are consistent and organized efficiently.  The pattern includes sizing and measurement charts, supplies list, and material needs - I found these to be accurate in my pattern use.

This pattern is appropriate for a beginner seamstress that has sewn knit garments before or that is ready to go further with knit patterns.  The instructions include detailed Sewing With Knits information for regular sewing machine.  And there are so many tutorials and videos to provide more information about knits, that I think this pattern is suitable for beginners that have some sewing garments experience.

My favorite feature of this pattern is the pictures.  Generally, I prefer line drawings in my PDF Patterns because I want to clearly see the sewing instructions and be able to distinguish the pattern pieces without the distraction of a fabric print or color.  Then I want close-up pictures of an actual item to see the results of a sewing step.  (forgive me if this is overly specific, but this is what I like best in my PDF Patterns)  Well, in this E+M Pattern, there are pictures of the actual garment, but she used a gray fabric photographed on a white background, and then annotated the photograph with dashed lines and arrows.  GENIUS.  

Here is an example:

So now, the pictures simply show me both the instructions and the results. Again, GENIUS.

And BEST of ALL, the finished garment…

My girl is between a size 6 and size 7, so of course I sized up, and the top fits well.  I am happy with the fit.  I like that the shape of the top gently curves in at the waist.  The length is long enough to cover my tall girl.

With the finished seams and top-stitching, gathers at the bodice, clean neckline, and high-low length, the completed shirt is a WINNER.  I expect this one to be seen often on my girl.

The pattern is available on Whimsical Fabric HERE.  And check out all the knit fabrics too!

To see more creations from Stacey, visit her blog at From-a-Box.


Happy Creating!
Danielle Storm

www.whimsicalfabric.com


Tuesday, April 5, 2016

April Tutorial Tuesday - Easy Pocket Apron

Stacey of From-a-Box brings us our April Tutorial Tuesday

**Note, click on the pictures to enlarge them for better detail**

Supplies:
2 yards of fabric, can be one print or several prints (this is the fun part, mix & match)
     * for this Tutorial, I used Arrow Flight by Michael Miller found HERE

64" of 1/2" bias binding
Lightweight Fusible Interfacing, 10"x20"
Thread, for sewing and top stitching
Fabric Marking Pen
Ruler
Iron
optional:
Wonder Tape, or glue to baste

Instructions:
All seams are 1/4", unless otherwise stated.

Step 1
Print the 2 page pattern template.  Make sure printer is set to full size (100%).  Line up the pages by matching the numbers in triangles.  Tape the pages together, and cut out the Template Piece 1.

Step 2
Cut the following pieces:
                         1 Front Apron from Template Piece 1
                         1 Back Apron from Template Piece 1
                         2 Pockets, 5”x 20”
                         1 Pocket Fusible Interfacing, 4 3/4”x 19”
                         1 Waistband, 3 1/2” x 19”
                         1 Waistband Fusible Interfacing, 3”x 18 1/2”
                         2 Ties, 3 1/2” x 22”
                         64” of 1/2” Bias Binding
                              

Step 3
Center the interfacing on the wrong side of one pocket piece and the wrong side of the waistband piece.  Fuse the interfacing, according to manufacturer instructions. 

Step 4
Place the pocket pieces right sides together.  Sew the bottom (long edge) of the pocket.  Turn right sides out and press the seam.

Step 5
Place bias binding on the top of the pocket.  

TIP: Use glue baste or Wonder Tape to secure the binding for sewing. 

Top Stitch approximately 1/8” from the edge of the bias binding, making sure to catch the underside in the stitching.  Cut the ends even at the sides of the pocket.

If you want to add a decorative tag to the pocket, do so now before attaching the pocket to the apron. 

Step 6
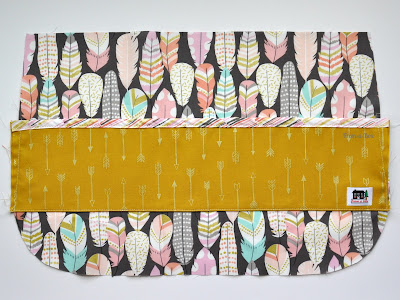
Place the pocket on the front apron piece at placement marks found on Template Piece 1, or approximately 4 1/2” down from the top of the apron.  Sew the pocket bottom to the front apron piece.  

Baste the pocket sides to the front apron piece. Trim sides of the pocket to match the contour of the apron.

Step 7
Using a fabric pen, draw lines on pocket where you want slots and compartments.  
Here is the spacing for my usual pocket contents, you can do them in whatever order you like:

            Pen or Pencil 1 1/2”
            Marker or Sharpie 2”
            iPhone 5 1/5”
            Sticky Notes, Small Pad of Paper 4”
            Keys, Folded Cash, other miscellaneous items 3”

Step 8
On each drawn line, sew from the bottom of the pocket to the top of the binding.  Use a tack stitch, or stitch forward and backward a couple of times at the top of the binding on the pocket to secure the openings of each compartment.

Step 9
Place apron pieces wrong sides together.  Sew a basting stitch around the outer edge of the apron.

Step 10
Place bias binding around the edge of the apron.  Use your iron to shape the binding on the rounded corners. 

TIP: Use glue baste or Wonder Tape to secure the binding for sewing.

Top stitch approximately 1/8” from the edge of the bias binding, making sure to catch the underside of the binding in the stitching.  Cut the ends even with the top sides of the apron.

Step 11
Place a tie piece right sides to each end of the waistband piece.  Sew and press the seam the seam flat.

Step 12
Press 1/4” towards the wrong side on both top and bottom of the ties and waistband.  Fold the entire piece in half and press.

Step 13
Fold the short end of the ties right sides together (this temporarily unfolds the 1/4” edges) and sew the short ends.  Snip the corner; turn right side out; poke out the corner, and press.

Step 14
Center the waistband and ties on the apron with the top 1/4" of the apron sandwiched between the folded waistband.  Sew from the end of one tie, across the waistband, to the end of the other tie.

Step 15
Give everything another good pressing.  Use steam to get everything nice & crisp.

Put your apron on and admire your work!

Come see more more great projects from Stacey at From-a-Box

Happy Creating!
Danielle Storm

www.whimsicalfabric.com


Sew-Along #32 - School Days Jacket - Lesson #5

The School Days Jacket by Oliver+S

** If you would like to see an image on our blog in a larger format, just click on it to enlarge.

Note: Links to products within this post are either links to our website or affiliate links.

You can find the Oliver + S School Days Jacket pattern in the shop. Kits are available as well. Click on the links below:

Welcome to Day 5

As we begin, both the laminate and woven coats will be sewn in the very same manner other than I use wonder clips on the laminate fabric (remember pins will leave holes) and I use straight pins on the woven. Be careful while sewing the laminate fabrics as even when seams can be ripped out the holes will remain in the same place. If for any reason a seam needs to be taken out be sure to sew right over or just to the left of it to prevent a line of holes in your rain coatAlso, do not press the laminate fabric as it will melt. A pressing ham is a great tool when sewing with laminates.  


You will need to read the pattern directions before you start today's lesson and will need them in hand to sew it as well.  

Today we will be finishing up our coats; yay!!  We will hem the bottom of our main coats and do all the hand stitching. The hand stitching on this coat is pretty important as it makes for a professional finished result. So are you ready? Let's begin.

1. We will first prepare the sleeves for hand stitching, turn the coat inside out with the sleeves aligned. As you can see the stitching line on the main (laminate) sleeve and the lining sleeve is pressed under already. Note, the woven coat will sew just the same as the laminate coat, so follow the same steps. 

2. Bring the top of the fold on the sleeve lining up to the meet the stitching line on the main sleeve. You will notice that the sleeve lining will have extra length; this is for ease while the coat is being put on and worn by the child.

Either pin your woven coat sleeve all the way around, or if your are using a laminate fabric for main, you can use scotch tape to hold your sleeve lining in place. Tape it in several places all the way around, and repeat with opposite sleeve. You can hand stitch your sleeves in place at this point, but like I said before, I wait until the very end to do all my hand stitching at the same time.

3. Next, pin your coat lining up out of the way.  We will be top stitching our coats and sewing the hem all the way around and we do not want to sew any of the lining at this point. (As you can see in the photo we still have our main coat hem clipped in place for sewing the next step.)

4. There was no easy to to take a picture of this next step so please refer to the pattern for the stitching guide. It is on the "Assemble The Jacket And Coat Lining, Step 3."  Also note that the woven main coat (like the denim) is pressed very well and does not need to be pinned before sewing this next step but the laminate cannot be pressed so it holds together better with clips along the outer edge. Also, as I sew the edge of the coat I use tissue paper between my machine and the coat to keep it from sticking to my sewing machine while it is being sewn.

5. Next, we will prepare the coat lining to be sewn. The coat lining will be longer than where it needs to be sewn; this is again for ease while being worn by the child.  Bring the coat lining up to meet the bottom stitching line.  If using a woven fabric pin in place; if using a laminate fabric tape in place.

Continue working your way across the bottom of the coat lining in same manner.

6. Now onto the hand stitching! I recommend a nice comfy spot to sit with a warm cup of tea for this next part as it does take a bit to stitch it all. We will start with the coat's bottom edge. First tie a couple of knots into the threads end on your needle. We will be using a ladder stitch to sew the coat's lining onto the main coat. 

Insert the needle into the bottom corner of the coat's lining. Then insert the needle into the main coat only through the inside layer. The needle and thread will be sandwiched between the outer coat and the inside of the coat. We do not want our needle to pierce through the outside main layer at all. We do not want any holes in this layer so take great care as we sew across.

7. Bring your needle out again about a 1/4" away. Then reinsert the needle into the coat's lining and bring it back out again another 1/4" along.

  8. Reinsert the needle again into the coat's hem with the needle sandwiched between the two layers and bring it back out a 1/4" further.

9. Pull the thread tight and you will not see any of your stitching. Repeat steps 7 and 8 across the the entire bottom of the coat. Then, when you reach the end, tie your thread off. Sew your sleeve(s) lining in the same manner as the coat's bottom hem.

10. We are almost done with our coats!! Now we will remove our basting stitching in the coat's lining back center. (See the next two pictures for this step.)  Carefully use your seam ripper to remove the basting stitch all the way up the lining.

11. Sew your buttons into the wearer's right side button tabs. Or, if you are using snaps apply them now.

12. Time to admire your coat!!! (This really is my favorite part.) I am so excited to see everyone's coat. Please share them in the Whimsical Fabric & Me group

Happy sewing,
Sharon 
www.whimsicalfabric.com
*If you would like to earn entries into the prize drawing, please make sure to submit a photo of your completed Lesson Five to this Facebook Album by 12:00 noon CT, Thursday, April 7th. If you have any questions the Facebook Group is a great place to ask.


Monday, April 4, 2016

Sew-Along #32 - School Days Jacket - Lesson #4

The School Days Jacket by Oliver+S

** If you would like to see an image on our blog in a larger format, just click on it to enlarge.

Note: Links to products within this post are either links to our website or affiliate links.

You can find the Oliver + S School Days Jacket pattern in the shop. Kits are available as well. Click on the links below:

Welcome to Day 4

As we begin, both the laminate and woven coats will be sewn in the very same manner other than I use wonder clips on the laminate fabric (remember pins will leave holes) and I use straight pins on the woven. Be careful while sewing the laminate fabrics as even when seams can be ripped out the holes will remain in the same place. If for any reason a seam needs to be taken out be sure to sew right over or just to the left of it to prevent a line of holes in your rain coatAlso, do not press the laminate fabric as it will melt. A pressing ham is a great tool when sewing with laminates.  


You will need to read the pattern directions before you start today's lesson and will need them in hand to sew it as well.  

Today we will sew the lining and sew the main coat to the lining coat.


1. Take the wearer's left side of the inside facing a piece and sew on the soft side of your Velcro dots. Just as before with my laminated fabric I measured the pattern piece and the fabric piece for placement but on my woven coat I transferred the dots from the pattern pieces onto my fabric piece.

2. On the woven fabric coats only, Take both your front facing pieces in hand. 

At the bottom notch, finish the raw edge from the notch down to the bottom edge of the piece. I do this with a narrow zig-zag stitch.

3. Now we will take our lining piece and clip/pin it to the front facing. They both have a curve, so we will have to do some clipping on the front facing piece to make them fit better for sewing. Transfer all the pattern piece markings onto the wrong side of both pattern pieces. Since you cannot wash the laminated fabric I recommend a disappearing fabric marker to mark these dots.

Clip or pin the two pieces together up to the curve portion and above it. Next clip into the front facing portion between the wonder clips. As of right now it looks like the front lining piece is shorter than the front facing piece; the clipping into the curved portion will help us ease the two pieces to fit perfectly together.

4. Finish clipping/pinning the two pieces together. Stitch together starting at the top and stopping at the dot transferred from the pattern piece a few inches up from the bottom. Be sure to lock your stitches well.


5. Carefully press the cotton lining part only on the bottom of the laminated coat; be sure to not press any of the laminated fabric at all.  On the woven coat press the whole seam.

This is what the whole piece will look like now.

6. Take your coat back lining piece and fold it in half with right sides facing. Baste the center fold together with a 1/2" seam all they way down. Be sure to sew with a long stitch length to make removing the stitching easier later on.

7. Press the center pleat to one side. Either side will work and it doesn't make a difference.

8. Take your lining back and lining front pieces; place them with right sides facing and clip/pin at the sides and shoulders. Stitch then press the seam open. Remember do not use an iron on the laminated fabric. 

9. Take your sleeve lining piece and sew a gathering stitch at the top between the notches just as you did with the main sleeve pieces. Again fold the sleeves in half with right sides facing and sew the side of the sleeves just as before with the main sleeves. Fold and press the bottom of the sleeve up 1/2". Do not stitch this. 

10. Attach the sleeve linings in the very same manner as the main coat's sleeves. This is what your coat lining should like at this point. (I will tell you ladies that I love the way the coat facing looks here and one day I will sew a coat for the lining to be the main side. I have planned to do this for years now.... )

11. Now take your coat lining and press the bottom of the cotton portion onlynot the front facing, press it up a 1/2" 

12. Next take your hood and match up the notches to the main coats notches and seams, clip/pin in place. baste the hood onto the coat with a 1/4" seam.


13. Now for the exciting part! We will sew our coat main to our coat lining. Match up the top of the coat and the all the notches on the coat's two sides and top on the main coat and lining pieces with the right sides facing. Clip or pin in place. 

14. We will start sewing at the bottom of the coat where the wooden chopstick is pointed.  You will sew around in one continuous line until you reach the opposite side of the coat.  Notice that you will be stitching a portion of the coat main to make a nice "pocket" for turning the coat to the main side. Trim your seam allowance to a 1/4" then turn and pull the sleeve main and lining together. Finger press your laminated coat and press your woven coats.

15. In the pattern instructions it calls for the sleeves to be hand stitched at this point. I save all my hand stitching for last to be done at the same time. Take your main coat bottom and finger press up the bottom hem 1 1/2" and clip it in place. (If using a woven fabric press the bottom with a hot iron and pin place.) Do not stitch this just yet. We will take care of that in tomorrow's lesson.

We are finished for today; our coats are really taking shape and are almost done! I hope you ladies are excited as I am!!

Happy sewing,
Sharon 
www.whimsicalfabric.com

*If you would like to earn entries into the prize drawing, please make sure to submit a photo of your completed Lesson Four to this Facebook Album by 12:00 noon CT, Wednesday, April 6th. If you have any questions the Facebook Group is a great place to ask.