Showing posts with label Fabric. Show all posts

Sunday, May 13, 2018

NEW Mystery Bundles - Pay as Low as $4.28 per Yard!!


http://www.whimsicaldesignsclothing.com/index.php?main_page=index&cPath=639
Mystery Bundles are now available on the site!!
Grab some first quality fabrics at a steal of a deal. Pay as little as $4.50 per yard!! This is a great way to build up your stash or just add some extra fun to you next sewing project.
Choose from 2 yard cuts to Fat Quarter cuts!

Save an extra 5% off your order with the code: Save5%Now, today through Sunday, May 20th. That brings our best Mystery Bundle down to only $4.28/yard!!!

http://www.whimsicaldesignsclothing.com/

Please note, if you have any checkout issues (which sometimes sales cause that) please use this link for instructions. Thanks everyone!

 http://www.whimsicaldesignsclothing.com/index.php?main_page=product_info&cPath=590&products_id=8015

Happy Creating!
Danielle Storm
WhimsicalFabric.com

Tuesday, May 3, 2016

May Tutorial Tuesday - Whimsical Wraps

Alyssa of Keep Calm and Carrion brings us our May Tutorial Tuesday

**Note, click on the pictures to enlarge them for better detail**


For this month's tutorial I am going to teach to to make Whimsical Wraps!

This tutorial is super fast, and since it's May, I'm making mine in adult size for myself for Mother's Day, but I'll give you the measurements that worked for the kiddos as well.  Since they stretch, the sizes are pretty flexible!

Whimsical Wraps - catchy name right?  There are two different versions, that will give you slightly different final looks - The single twist and the double twist.

The single twist will result in you seeing half of each fabric while worn.

The double twist will result in you only seeing the second fabric in the twist, and you'll have a reversible headband with a different focus fabric on each side. 

Here's what you'll need:
* 2 coordinating knit fabrics 
           you want good stretch and recovery - so check out our Knits Section for some great cotton/spandex knits that will work perfectly.
* Sewing machine
* hand sewing needle
* coordinating thread
* cutting mat, ruler and rotary cutter or scissors

This tutorial uses a 3/8" seam allowance.

1. From each of your two knits cut the following:
           Adult headband:  18" x 4" (greatest stretch needs to go along the 18" side)
           Child headband:  16" x 3.5" (greatest stretch needs to go along the 16" side)

2. Place the strips right sides together and sew along both long edges. 

3.  Turn right side out and press well along long seams. 

4. For the one twist version continue here, for the double twist, skip to step 12Take your pressed tube, and flip it once at the middle.  

5.  Now take the raw edges and bring them together, keeping the twist in place.  You'll want to line up the seams, and you'll have opposite fabrics together.

6.  This next part is a little bit awkward, and I find it easier to do on my sewing machine, not my serger, so I have the seam allowance left over to tuck for the hand sewing portion.  Here is what you're going to to.  Making sure you only grab two layers at once, position them under your presser foot.  Using a stretch or zig-zag stitch, sew starting at one seam all the way around as far as you can go.  Eventually, the headband will get in your way, and you'll have to stop.  You'll end up with a gap of about 1" to 1 1/2" left.  
eek! I lost a Jamberry!
7.  Now tuck the seam into the headband and this is what it should look like.  

8.  Now we are going to hand stitch this gap closed using a ladder stitch.  

9.  Start under the seam on one side of the headband and bring your needle out about 1/8" forward. 

10.  Now bring your needle through the other fabric and come out another 1/8" forward.  Repeat until the entire gap is closed.  Tie off your thread and tuck the knot in and snip the tails.  

11.  Now press this seam well, flip the headband over and press the twist well, and this version is done!

12.  Continue here from step 4 for the double twist version.  Take your headband and flip over at the middle.  Then flip over at the middle again, so that there is a twist in the middle, but the same fabric is showing at both ends.  

13.  Now line up the seams again and this time when you bring the raw edges together, the same fabrics should be facing each other.  

14.  Now follow steps 6 through step 11 to complete this version.

And here's me attempting to show them off!!  

I love them and wear one pretty much every day - and I love that they don't use a lot of fabric and are fun to mix colors with!  I hope you enjoy this tutorial and please head over to the Facebook Group to show off what you make!

~Alyss
Keep Calm and Carrion


Tuesday, April 5, 2016

April Tutorial Tuesday - Easy Pocket Apron

Stacey of From-a-Box brings us our April Tutorial Tuesday

**Note, click on the pictures to enlarge them for better detail**

Supplies:
2 yards of fabric, can be one print or several prints (this is the fun part, mix & match)
     * for this Tutorial, I used Arrow Flight by Michael Miller found HERE

64" of 1/2" bias binding
Lightweight Fusible Interfacing, 10"x20"
Thread, for sewing and top stitching
Fabric Marking Pen
Ruler
Iron
optional:
Wonder Tape, or glue to baste

Instructions:
All seams are 1/4", unless otherwise stated.

Step 1
Print the 2 page pattern template.  Make sure printer is set to full size (100%).  Line up the pages by matching the numbers in triangles.  Tape the pages together, and cut out the Template Piece 1.

Step 2
Cut the following pieces:
                         1 Front Apron from Template Piece 1
                         1 Back Apron from Template Piece 1
                         2 Pockets, 5”x 20”
                         1 Pocket Fusible Interfacing, 4 3/4”x 19”
                         1 Waistband, 3 1/2” x 19”
                         1 Waistband Fusible Interfacing, 3”x 18 1/2”
                         2 Ties, 3 1/2” x 22”
                         64” of 1/2” Bias Binding
                              

Step 3
Center the interfacing on the wrong side of one pocket piece and the wrong side of the waistband piece.  Fuse the interfacing, according to manufacturer instructions. 

Step 4
Place the pocket pieces right sides together.  Sew the bottom (long edge) of the pocket.  Turn right sides out and press the seam.

Step 5
Place bias binding on the top of the pocket.  

TIP: Use glue baste or Wonder Tape to secure the binding for sewing. 

Top Stitch approximately 1/8” from the edge of the bias binding, making sure to catch the underside in the stitching.  Cut the ends even at the sides of the pocket.

If you want to add a decorative tag to the pocket, do so now before attaching the pocket to the apron. 

Step 6
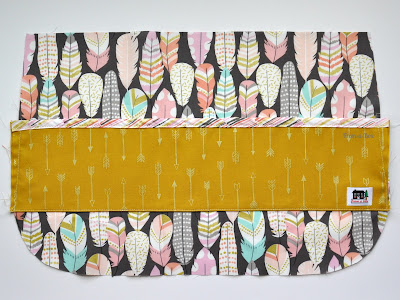
Place the pocket on the front apron piece at placement marks found on Template Piece 1, or approximately 4 1/2” down from the top of the apron.  Sew the pocket bottom to the front apron piece.  

Baste the pocket sides to the front apron piece. Trim sides of the pocket to match the contour of the apron.

Step 7
Using a fabric pen, draw lines on pocket where you want slots and compartments.  
Here is the spacing for my usual pocket contents, you can do them in whatever order you like:

            Pen or Pencil 1 1/2”
            Marker or Sharpie 2”
            iPhone 5 1/5”
            Sticky Notes, Small Pad of Paper 4”
            Keys, Folded Cash, other miscellaneous items 3”

Step 8
On each drawn line, sew from the bottom of the pocket to the top of the binding.  Use a tack stitch, or stitch forward and backward a couple of times at the top of the binding on the pocket to secure the openings of each compartment.

Step 9
Place apron pieces wrong sides together.  Sew a basting stitch around the outer edge of the apron.

Step 10
Place bias binding around the edge of the apron.  Use your iron to shape the binding on the rounded corners. 

TIP: Use glue baste or Wonder Tape to secure the binding for sewing.

Top stitch approximately 1/8” from the edge of the bias binding, making sure to catch the underside of the binding in the stitching.  Cut the ends even with the top sides of the apron.

Step 11
Place a tie piece right sides to each end of the waistband piece.  Sew and press the seam the seam flat.

Step 12
Press 1/4” towards the wrong side on both top and bottom of the ties and waistband.  Fold the entire piece in half and press.

Step 13
Fold the short end of the ties right sides together (this temporarily unfolds the 1/4” edges) and sew the short ends.  Snip the corner; turn right side out; poke out the corner, and press.

Step 14
Center the waistband and ties on the apron with the top 1/4" of the apron sandwiched between the folded waistband.  Sew from the end of one tie, across the waistband, to the end of the other tie.

Step 15
Give everything another good pressing.  Use steam to get everything nice & crisp.

Put your apron on and admire your work!

Come see more more great projects from Stacey at From-a-Box

Happy Creating!
Danielle Storm

www.whimsicalfabric.com


Wednesday, March 2, 2016

Celebrate Seuss Day Sale

http://www.whimsicaldesignsclothing.com/index.php?main_page=index&cPath=3_527
Happy Birthday Dr. Seuss! 
Come celebrate Seuss with Whimsical Fabric
All Seuss Fabric is 15% off today only
Hurry, sale ends at 11:59pm MT tonight.

Happy Creating!
Danielle Storm

www.whimsicalfabric.com

Tuesday, March 1, 2016

March Tutorial Tuesday - Easter Basket


Larissa Gibbs of Connected by a Thread brings us our March Tutorial Tuesday.

 **Note, click on the pictures to enlarge them for better detail**

Fabric Requirements
1/2 yard Main Fabric
1/2 yard Lining Fabric
Pellon SF 101
Peltex 71F
Wonder Under
Scraps: white, black, pink for face

All seams are 1/2" unless otherwise specified.

Cut - (WxH)
Base:
12" x 12" : 1 exterior, 1 lining, 2 SF 101
11" x 11": 1 Peltex 71F

Sides:
12" x 6" : 4 exterior, 1 SF 101
11" x 5" : 4 Peltex 71F

Strap:
31" x 4" : 1 exterior, 1 SF 101
30" x 3/4": 1 Peltex 71F


Bunny Face FMA (optional)
Cut out all pieces, using the template. Click here to download the template.  Following the directions for the Wonder Under, fuse it to all face and ear pieces, leaving the paper on.  

Remove the paper backing on the inner eye and ear pieces.  Layer them on the outer pieces and fuse.  

Use wonder under to secure your face pieces to one of the side panels.  Stitch around and add details using Free Motion Applique (FMA).  Be sure to lower your feed dogs before starting your FMA.  

Basket Construction
1.  Fuse SF101 to all pieces.

2.  Apply Peltex 71F to all exterior pieces except handle, leaving 1/2 around all sides.  

3.  Sew two side pieces RST along one short edge.  Open and press seam.  Repeat with remaining side pieces.

4.  Place side pieces RST and sew along short ends, creating a square hoop.

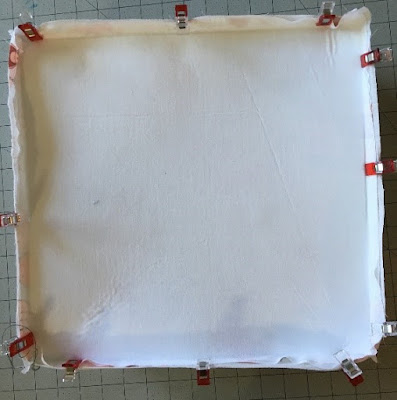
5.  Pin/clip the bottom to the sides RST.  Sew along all four sides to create your basket.  Go slow around the corners easing the fabric as needed.  

6.  Repeat steps 4 and 5 with the lining.  

7.  Turn the lining right side out and place inside the main fabric with right sides together.  Sew around the top, leaving a 4" opening to turn.  

8.  Turn and press well.  Topstitch along the top of the basket.  

9.  Fold your handle in half along the long edge, wrong sides together and press.  Open up and fold one edge to the center.  Repeat with the other side.  Fold in half along your original fold line and press well.  Open and place your stabilizer strip inside; fold back and press well.  Fold each end in by 1/2" and press well again.

10.  Topstitch along the entire length of the strap about 1/8" from the edge.  

11.  Center the handle on one side of the basket, placing the bottom of the handle 1 1/2" down from the top edge of the basket,  Sew in a a square, making sure to double stitch for added security.

12.  Repeat on the opposite side of the basket with the opposite end of the handle.

13.  Add ears, where desired.  Either hand or machine stitch in place.

14.  Press well with a lot of steam to get all of the wrinkles out.

And enjoy your bag!

Larissa Gibbs
Connected by a Thread: Blog   
Connected by a Thread: Facebook