Showing posts with label FREEBIE. Show all posts

Monday, October 10, 2016

WIN Your ENTIRE Order FREE! - Hurry, Today's the LAST DAY!


Today is the LAST DAY of our 20% Off Knit Fabric Sale!
Did you know that you can win your entire order for FREE

Here's how!
1. Place an order during our 20% off Knit Sale. Hurry, the sale ends TONIGHT!
2.Sew up ANYTHING you wish from your knit order. Yup, you have to use the knit you ordered from us during this sale to qualify.
3. Post a picture of you finished item on our Whimsical Fabric & Me Facebook Group along with the hashtag #OctKnitChallenge before the end of the day October 31st, 2016.
4. One winner will be randomly picked from all entries and that person will win their knit order for FREE*. *Note: Winner will receive a gift certificate to use on our website for the original purchase price of their knit order, up to a $50.00 value.


Happy Creating!
Danielle Storm
 
www.whimsicalfabric.com

Tuesday, June 28, 2016

June Tutorial Tuesday - Patriotic Flag T-shirt Tutorial


Hello! I'm Heather and I call my little part of the blogosphere, All Things Katy! Today, I'm here on the Whimsical Fabric Blog to show you a quick, simple Fourth of July flag T-shirt using a Whimsical Fabric Single Ruffled Short Sleeved Tee and some fun ruffled ric-rac.
Lil' Miss Fourth of July!

Okay, let's jump right in!
First, let's gather some supplies. For my size 6x, I used the following:

• 1 size 6x Whimsical Fabric Single Ruffled Short Sleeved Tee, color white.
• 9" of Ink Blue Ruffled Ric-Rac (cut into 3" segments).

• 40" of Red Ruffled Ric-Rac (cut into four 7" segments and three 4" segments).

• Thread to match
• Sewing Machine
• Walking Foot (optional)

Step 1
The first thing I did was divide my t-shirt blank into quarters. I ironed a crisp crease through the vertical and horizontal of the t-shirt . I did this so that I could easily find the center of the shirt.

Step 2
Next, using the center cross-hair mark as my starting point, I measured in 1" increments down, three times and three times up (from the cross-hair). You should now have a total of 7 lines. Be sure to make your marks in something that can be erased and/or the ink disappears. Personally, I like to use the Pilot FriXion pens.

Step 3
Before attaching the ric-rac to the shirt, I made sure to heat-seal the cut ends. I did this by quickly "kissing" the cut edges of ric-rac to a lighter. This will help the ric-rac to not fray after wear (and washing).

Step 4
I used the guide-lines that I drew in step 2 to help me attach the ric-rac to the shirt in nice, straight, even lines. I used my walking foot attachment, a ball-point needle and a longer stitch length (3.5 on my Brother sewing machine). I started with the red ric-rac and then moved onto blue (less thread changing ;-).

Step 5
Iron out the shirt and make sure that no markings from step 2 are visible. Go grab your cute model and *voila!* your little cutie is ready to celebrate the 4th in style!!
Ta-Da!

Happy Fourth of July!

by Heather of All Things Katy!

Thanks for the great tutorial Heather and happy creating everyone!
Danielle Storm
 
www.whimsicalfabric.com


Tuesday, May 3, 2016

May Tutorial Tuesday - Whimsical Wraps

Alyssa of Keep Calm and Carrion brings us our May Tutorial Tuesday

**Note, click on the pictures to enlarge them for better detail**


For this month's tutorial I am going to teach to to make Whimsical Wraps!

This tutorial is super fast, and since it's May, I'm making mine in adult size for myself for Mother's Day, but I'll give you the measurements that worked for the kiddos as well.  Since they stretch, the sizes are pretty flexible!

Whimsical Wraps - catchy name right?  There are two different versions, that will give you slightly different final looks - The single twist and the double twist.

The single twist will result in you seeing half of each fabric while worn.

The double twist will result in you only seeing the second fabric in the twist, and you'll have a reversible headband with a different focus fabric on each side. 

Here's what you'll need:
* 2 coordinating knit fabrics 
           you want good stretch and recovery - so check out our Knits Section for some great cotton/spandex knits that will work perfectly.
* Sewing machine
* hand sewing needle
* coordinating thread
* cutting mat, ruler and rotary cutter or scissors

This tutorial uses a 3/8" seam allowance.

1. From each of your two knits cut the following:
           Adult headband:  18" x 4" (greatest stretch needs to go along the 18" side)
           Child headband:  16" x 3.5" (greatest stretch needs to go along the 16" side)

2. Place the strips right sides together and sew along both long edges. 

3.  Turn right side out and press well along long seams. 

4. For the one twist version continue here, for the double twist, skip to step 12Take your pressed tube, and flip it once at the middle.  

5.  Now take the raw edges and bring them together, keeping the twist in place.  You'll want to line up the seams, and you'll have opposite fabrics together.

6.  This next part is a little bit awkward, and I find it easier to do on my sewing machine, not my serger, so I have the seam allowance left over to tuck for the hand sewing portion.  Here is what you're going to to.  Making sure you only grab two layers at once, position them under your presser foot.  Using a stretch or zig-zag stitch, sew starting at one seam all the way around as far as you can go.  Eventually, the headband will get in your way, and you'll have to stop.  You'll end up with a gap of about 1" to 1 1/2" left.  
eek! I lost a Jamberry!
7.  Now tuck the seam into the headband and this is what it should look like.  

8.  Now we are going to hand stitch this gap closed using a ladder stitch.  

9.  Start under the seam on one side of the headband and bring your needle out about 1/8" forward. 

10.  Now bring your needle through the other fabric and come out another 1/8" forward.  Repeat until the entire gap is closed.  Tie off your thread and tuck the knot in and snip the tails.  

11.  Now press this seam well, flip the headband over and press the twist well, and this version is done!

12.  Continue here from step 4 for the double twist version.  Take your headband and flip over at the middle.  Then flip over at the middle again, so that there is a twist in the middle, but the same fabric is showing at both ends.  

13.  Now line up the seams again and this time when you bring the raw edges together, the same fabrics should be facing each other.  

14.  Now follow steps 6 through step 11 to complete this version.

And here's me attempting to show them off!!  

I love them and wear one pretty much every day - and I love that they don't use a lot of fabric and are fun to mix colors with!  I hope you enjoy this tutorial and please head over to the Facebook Group to show off what you make!

~Alyss
Keep Calm and Carrion


Tuesday, April 5, 2016

April Tutorial Tuesday - Easy Pocket Apron

Stacey of From-a-Box brings us our April Tutorial Tuesday

**Note, click on the pictures to enlarge them for better detail**

Supplies:
2 yards of fabric, can be one print or several prints (this is the fun part, mix & match)
     * for this Tutorial, I used Arrow Flight by Michael Miller found HERE

64" of 1/2" bias binding
Lightweight Fusible Interfacing, 10"x20"
Thread, for sewing and top stitching
Fabric Marking Pen
Ruler
Iron
optional:
Wonder Tape, or glue to baste

Instructions:
All seams are 1/4", unless otherwise stated.

Step 1
Print the 2 page pattern template.  Make sure printer is set to full size (100%).  Line up the pages by matching the numbers in triangles.  Tape the pages together, and cut out the Template Piece 1.

Step 2
Cut the following pieces:
                         1 Front Apron from Template Piece 1
                         1 Back Apron from Template Piece 1
                         2 Pockets, 5”x 20”
                         1 Pocket Fusible Interfacing, 4 3/4”x 19”
                         1 Waistband, 3 1/2” x 19”
                         1 Waistband Fusible Interfacing, 3”x 18 1/2”
                         2 Ties, 3 1/2” x 22”
                         64” of 1/2” Bias Binding
                              

Step 3
Center the interfacing on the wrong side of one pocket piece and the wrong side of the waistband piece.  Fuse the interfacing, according to manufacturer instructions. 

Step 4
Place the pocket pieces right sides together.  Sew the bottom (long edge) of the pocket.  Turn right sides out and press the seam.

Step 5
Place bias binding on the top of the pocket.  

TIP: Use glue baste or Wonder Tape to secure the binding for sewing. 

Top Stitch approximately 1/8” from the edge of the bias binding, making sure to catch the underside in the stitching.  Cut the ends even at the sides of the pocket.

If you want to add a decorative tag to the pocket, do so now before attaching the pocket to the apron. 

Step 6
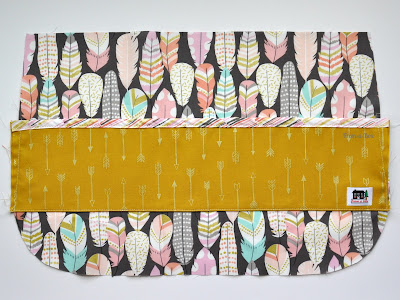
Place the pocket on the front apron piece at placement marks found on Template Piece 1, or approximately 4 1/2” down from the top of the apron.  Sew the pocket bottom to the front apron piece.  

Baste the pocket sides to the front apron piece. Trim sides of the pocket to match the contour of the apron.

Step 7
Using a fabric pen, draw lines on pocket where you want slots and compartments.  
Here is the spacing for my usual pocket contents, you can do them in whatever order you like:

            Pen or Pencil 1 1/2”
            Marker or Sharpie 2”
            iPhone 5 1/5”
            Sticky Notes, Small Pad of Paper 4”
            Keys, Folded Cash, other miscellaneous items 3”

Step 8
On each drawn line, sew from the bottom of the pocket to the top of the binding.  Use a tack stitch, or stitch forward and backward a couple of times at the top of the binding on the pocket to secure the openings of each compartment.

Step 9
Place apron pieces wrong sides together.  Sew a basting stitch around the outer edge of the apron.

Step 10
Place bias binding around the edge of the apron.  Use your iron to shape the binding on the rounded corners. 

TIP: Use glue baste or Wonder Tape to secure the binding for sewing.

Top stitch approximately 1/8” from the edge of the bias binding, making sure to catch the underside of the binding in the stitching.  Cut the ends even with the top sides of the apron.

Step 11
Place a tie piece right sides to each end of the waistband piece.  Sew and press the seam the seam flat.

Step 12
Press 1/4” towards the wrong side on both top and bottom of the ties and waistband.  Fold the entire piece in half and press.

Step 13
Fold the short end of the ties right sides together (this temporarily unfolds the 1/4” edges) and sew the short ends.  Snip the corner; turn right side out; poke out the corner, and press.

Step 14
Center the waistband and ties on the apron with the top 1/4" of the apron sandwiched between the folded waistband.  Sew from the end of one tie, across the waistband, to the end of the other tie.

Step 15
Give everything another good pressing.  Use steam to get everything nice & crisp.

Put your apron on and admire your work!

Come see more more great projects from Stacey at From-a-Box

Happy Creating!
Danielle Storm

www.whimsicalfabric.com