Stacey of From-a-Box brings us our April Tutorial Tuesday
Supplies:
2 yards of fabric, can be one print or several prints (this is the fun part, mix & match)
* for this Tutorial, I used Arrow Flight by Michael Miller found HERE
64" of 1/2" bias binding
Lightweight Fusible Interfacing, 10"x20"
Thread, for sewing and top stitching
Fabric Marking Pen
Ruler
Iron
optional:
Wonder Tape, or glue to baste
Instructions:
All seams are 1/4", unless otherwise stated.
Step 1
Print the 2 page pattern template. Make sure printer is set to full size (100%). Line up the pages by matching the numbers in triangles. Tape the pages together, and cut out the Template Piece 1.
Step 2
Cut the following pieces:
1 Front Apron from Template Piece 1
1 Back Apron from Template Piece 1
2 Pockets, 5”x 20”
1 Pocket Fusible Interfacing, 4 3/4”x 19”
1 Waistband, 3 1/2” x 19”
1 Waistband Fusible Interfacing, 3”x 18 1/2”
2 Ties, 3 1/2” x 22”
64” of 1/2” Bias Binding
1 Back Apron from Template Piece 1
2 Pockets, 5”x 20”
1 Pocket Fusible Interfacing, 4 3/4”x 19”
1 Waistband, 3 1/2” x 19”
1 Waistband Fusible Interfacing, 3”x 18 1/2”
2 Ties, 3 1/2” x 22”
64” of 1/2” Bias Binding
Step 3
Center the interfacing on the wrong side of one pocket piece and the wrong side of the waistband piece. Fuse the interfacing, according to manufacturer instructions.
Step 4
Place the pocket pieces right sides together. Sew the bottom (long edge) of the pocket. Turn right sides out and press the seam.
Step 5
Place bias binding on the top of the pocket.
TIP: Use glue baste or Wonder Tape to secure the binding for sewing.
Top Stitch approximately 1/8” from the edge of the bias binding, making sure to catch the underside in the stitching. Cut the ends even at the sides of the pocket.
If you want to add a decorative tag to the pocket, do so now before attaching the pocket to the apron.
If you want to add a decorative tag to the pocket, do so now before attaching the pocket to the apron.
Step 6
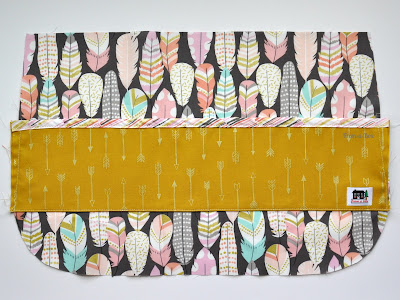
Place the pocket on the front apron piece at placement marks found on Template Piece 1, or approximately 4 1/2” down from the top of the apron. Sew the pocket bottom to the front apron piece.
Baste the pocket sides to the front apron piece. Trim sides of the pocket to match the contour of the apron.
Step 7
Using a fabric pen, draw lines on pocket where you want slots and compartments.
Here is the spacing for my usual pocket contents, you can do them in whatever order you like:
Pen or Pencil 1 1/2”
Marker or Sharpie 2”
iPhone 5 1/5”
Sticky Notes, Small Pad of Paper 4”
Keys, Folded Cash, other miscellaneous items 3”
Step 8
On each drawn line, sew from the bottom of the pocket to the top of the binding. Use a tack stitch, or stitch forward and backward a couple of times at the top of the binding on the pocket to secure the openings of each compartment.
Step 9
Place apron pieces wrong sides together. Sew a basting stitch around the outer edge of the apron.
Step 10
Place bias binding around the edge of the apron. Use your iron to shape the binding on the rounded corners.
TIP: Use glue baste or Wonder Tape to secure the binding for sewing.
Top stitch approximately 1/8” from the edge of the bias binding, making sure to catch the underside of the binding in the stitching. Cut the ends even with the top sides of the apron.
Step 11
Place a tie piece right sides to each end of the waistband piece. Sew and press the seam the seam flat.
Step 12
Press 1/4” towards the wrong side on both top and bottom of the ties and waistband. Fold the entire piece in half and press.
Step 13
Fold the short end of the ties right sides together (this temporarily unfolds the 1/4” edges) and sew the short ends. Snip the corner; turn right side out; poke out the corner, and press.
Step 14
Center the waistband and ties on the apron with the top 1/4" of the apron sandwiched between the folded waistband. Sew from the end of one tie, across the waistband, to the end of the other tie.
Step 15
Give everything another good pressing. Use steam to get everything nice & crisp.
Put your apron on and admire your work!
Come see more more great projects from Stacey at From-a-Box.
Happy Creating!
Danielle Storm
www.whimsicalfabric.com
Happy Creating!
Danielle Storm
www.whimsicalfabric.com


No comments:
Post a Comment