Monday, August 29, 2016

Sew-Along #33 - Sailboat Outfit - Lesson #1

The Sailboat Outfit by Oliver+S

** If you would like to see an image on our blog in a larger format, just click on it to enlarge.

Note: Links to products within this post are either links to our website or affiliate links.

You can find the Oliver + S Sailboat pattern in the shop. Kits are available as well. Click on the links below:

Welcome to Day 1

Before we begin with today's lesson be sure to read all of the patterns instructions. Today, and throughout the entire sew along, you will need your pattern in hand to go along with each lesson. Some things I will share/teach will not be in the pattern, but are some tricks and tips I have learned over the years from sewing this pattern. 
Today we will be modifying our pattern pieces (if need be) and cutting out our garments. 

1. First the pants/shorts. If you are sewing them as is from the pattern, have your pattern pieces cut out or traced off from the pattern in the size you need. If you are making the shorts modification we will need to adjust the pattern pieces on both the front and back pieces. For boys you will want the shorts longer, like board shorts style. (Well this style is cute on girls too!) For girls you will probably want them a shorter length. To get the length have your little one try on a pair of pants/shorts and measure the inseam for how far down you will want shorts fit. Take this measurement and add the 1/2" top seam allowance to it then add another 1 1/4" to the bottom for the hem. ( Example" child's inseam measurement 5"  + 1/2" top seam = 5  1/2". Add the hem to = 6  3/4" total). This total number will be your shorts leg length.  Now let me show you how to make this into the short pattern piece. 

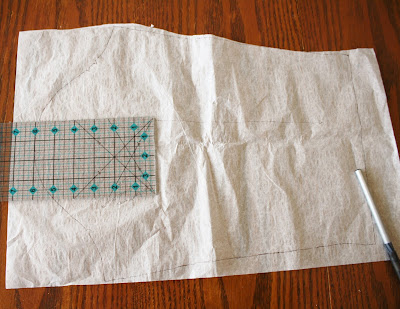
2. I like to trace out any pieces I modify from an original pattern piece. This way I can mark all over it and retrace if I need too. For the boy shorts I draw a straight line at the top of the side pant vent using my quilting ruler, making sure to trace the line even from the very bottom hem of the pants.  Repeat with the back side of the pants pattern piece.

Now for a shorter length than the board shorts you will need to take your measurement from before and measure down from the crotch seam and mark. Use your quilting ruler to make the short bottom cut line even by using the original hem line as a guide. Repeat with the back pants piece. Now you have your short pattern pieces ready for cutting!
   
3. Cutting out the shorts/pant/skirt fabric.
 For the shorts cut out the following pieces of your fabric:
          2 front pieces
          2 back pieces
          1 front facing/1 interfacing piece
          4 front panels/2 interfacing pieces
If lining your short also cut out of the lining fabric
          2 front pieces
          2 back pieces


For the pants cut out the following pieces of your fabric:
          2 front pieces
          2 back pieces
          1 front facing on fold/1 interfacing piece on fold
          4 front panels/2 interfacing pieces
If lining your pants also cut out of the lining fabric
          2 front pieces
          2 back pieces


For the skirt cut out the following pieces of your fabric:
          1 front piece on fold
          1 back piece on fold
          1 front facing on fold/1 interfacing piece on fold
          4 front panels/2 interfacing pieces
If lining your skisrt also cut out of the lining fabric
          1 front piece on fold
          1 back piece on fold

4. Onto our shirts! For the sew along we are using a knit, (knit is what comes in your kit if you purchased one from us) but you can use a woven as well. If you are using a woven I recommend that you size one up from what your child measures on the pattern for ease of dressing. The pattern top seam allowance is a ½" so it is OK to cut out those notches. One side note about the top pattern, some do find the top length to run short, so please measure the top against your child to see if this will be a problem. I add 1½" to my children's tops so they get plenty of wear out them. 

5. Short sleeve modification:
Measure your child's arm with a shirt that you like the sleeve length. Add a ½" seam allowance to the top of the sleeve measurement. Now add an additional 1¼" seam allowance to this number. This will give your sleeve length. 

 
6. Take your sleeve pattern piece in hand and mark from the top of the sleeve down the measurement you just calculated. To make sure the sleeve hem is even across, place your quilt ruler at the bottom of your mark and use the ruler to even up the line at both shoulder lines. Draw a line straight across.


Make sure that your sleeve hem is long enough to sew the sleeve onto the shirt by taking the hem measurement and the new short sleeve line and subtracting the bottom hem and the seam allowance at the shoulder.


7. Cut only the bottom portion of the sleeve pattern piece off.


8. To be able to make a lovely hem we need to straighten out the side of the sleeve piece. This will allow us to make a nice even hem with no puckers while we sew it in place.

9. We are now ready to cut out our shirts. You will need the following pieces cut for both short and long sleeve versions:
          1 front cut on fold
          1 back cut on fold
          2 sleeves (either short or long sleeve)
          1 front facing cut on fold
          1 back facing cut on fold
          2 bottom facings cut on fold


We will leave off here for today. Tomorrow we will begin sewing our tops together. I will be using a serger for mine but you can use a sewing machine as well. Both work very well for this pattern.

Let us know if you have any questions for today's lesson. Also, be sure to add a photo of today's lessons in our Facebook sew along album. I will see you lovely ladies back here tomorrow as we start sewing our tops!

Happy cutting,
Sharon 

*If you would like to earn entries into the prize drawing, please make sure to submit a photo of your completed Lesson One to this Facebook Album by 12:00 noon CT, Wednesday, August 31st. If you have any questions the Facebook Group is a great place to ask. 


Saturday, August 27, 2016

Autumn Selections and our Semiannual BIG Sale is Happening Now! Hurry!!


Our mornings are already becoming crisp and our evenings cool here in Iowa. Autumn is on it's way!
http://www.whimsicaldesignsclothing.com/index.php?main_page=index&cPath=626


We have some great news though! Maddisen has agreed to continue her special fabric selections for the website throughout autumn. Woo hoo! The new category is called Maddisen's Autumn Selections and her first selection was posted yesterday. Grab it for 20% off through Thursday, September 1st. Isn't it gorgeous? And we even have matching machine applique designs for this fabric (also 20% off)!
http://www.whimsicaldesignsclothing.com/index.php?main_page=index&cPath=626


 In addition, if you are a part of our Whimsical Fabric & Me Facebook group, you might have seen that we posted our semiannual BIG Sale. We have over 85 fabrics priced at $7 or less. Choose from Riley Blake, Art Gallery Fabrics, Robert Kaufman, and even Fabric Finders. Check it out HERE. But hurry, the album will only remain up and the fabrics deals will only be available until 12:00 midnight CT tonight. Grab the amazing savings while you can!!
https://www.facebook.com/groups/WhimsicalFabricAndMe/permalink/2108841182675259/


Happy Creating!
Danielle Storm
www.whimsicalfabric.com

Tuesday, August 16, 2016

August Tutorial Tuesday - Reusable Snack Bags


 Hey it's Jona from Stitches and Spills here to share a quick and easy back to school tutorial! Our family is striving to create less waste and invest in more reusable products around our home. Last year I made a few reusable snack bags, and they have been a complete hit in our home! Today I will be showing two different methods for making snack bags (one using a serger and one using a sewing machine).

 A few notes before we begin:

You will need NON-directional fabrics. Otherwise one side of your reusable bag will be upside down.
• I recommend pre washing your fabric as these will be washed over and over. Also press well before sewing.• These are NOT water tight! They are made with two layers of cotton, so are perfect for snacks such as crackers, pretzels, or even a peanut butter and jelly sandwich. For a better water seal, food safe PUL can be used for the lining. This won't make it 100% water tight, but helps prevent moisture from soaking through.• The fabric is not tested to be food safe. If this is a concern, find a lining fabric that you feel is safe.

Now, let's get sewing! 

Supplies:  
2 coordinating cotton fabrics. (Two fat quarters will make two snack bags and one sandwich bag)  
Note: Art Gallery solids or Riley Blake solids are a great choice for adding embroidery or applique. I also love the Dr. Seuss fabrics for back to school.
Notions such as buttons, ric-rac, and/or embroidery floss
I used Jumbo Ric-Rac for mine!
Serger or sewing machine

Cutting:
Snack bag: cut TWO 10" by 8" rectangles. One from the main print and one from the lining.Sandwich bag: cut TWO 15" by 8" rectangles. One from the main print and one from the lining.

Note: If using fat quarters, cut using this diagram to make the most of the fat quarter.


Embellishments:
At this point, figure out if  there are any embellishments you would like to add. Feel free to scroll down to the bottom of this post to see how to add hand embroidery to your reusable bag (this is added BEFORE the bag is sewn together).


Serger Method: (scroll down for the sewing machine method)

With WRONG sides together, serge the 8" sides of the bag together.

• With the main print down and the lining facing up, fold the bottom seam up towards the top, stopping TWO inches below the top seam.

• Fold the top seam down and pin in place if desired.

• Serge each side. Be sure to finish the beginning and ending tails using your preferred method.


And you are done! Wasn't that easy?!

Sewing Machine Method:

• With RIGHT sides together, sew a 1/4" seam all the way around, but leave an opening on one of the long sides (10" or 15" side depending on which bag you are making) to turn the fabric.


• When doing the sewing machine version, ric -rac can be added to the flap of the bag by putting it along the top seam PRIOR to sewing.

• Clip the corners and turn right side out through the opening along the side. Press well.


• With the main print down and the lining facing up, fold the bottom seam up towards the top, stopping TWO inches below the top seam.      

• Fold the top seam down and pin in place if desired.

Stitch along one side with a seam less than 1/4" to ensure the opening along the side gets closed. Backstitch at the beginning and end. Repeat with other side.


Wasn't that quick?!?!

Adding Hand Embroidery:
Personalize the snack bag with a cute hand embroidery design! The sandwich bag size is simply perfect for adding a cute design, or some kid art!

• Figure out where the top fold and bottom fold will be on the main bag fabric. To do this, fold the bottom of the bag up to 2.25"-2.5" from the top of the bag. Mark the top and bottom folds (finger creasing works perfectly).

• Add fusible interfacing to the wrong side of the fabric to strengthen the design, if desired.

• Transfer the design (here I used a picture drawn by my five year old). I used a Frixion pen, but any water soluble pen/pencil will do. To transfer, I simply held the paper and the fabric up to our sliding glass window and traced the design.

Place design in the hoop and start stitching. New to hand embroidery? Browse our Pinterest Board for some ideas and tutorials! Also, Google searches, Pinterest, and YouTube are fantastic resources.

Iron out any wrinkles, remove drawings, and continue creating the snack/sandwich bag as shown above.
    
Happy Creating!
Jona
Lourenco
www.whimsicalfabric.com


Saturday, July 30, 2016

Catch This Dreamy Deal!

http://dreamcatcherdesigns.net/
We have teamed up with Dream Catcher Designs to offer a great deal!! Dream Catcher offers adorable machine embroidery and applique designs. When you spend $15 on their website Whimsical Fabric will send you a coupon code for $15 off a $50 purchase on our site! Talk about a dreamy deal!! 

Happy Creating!
Danielle Storm
 
www.whimsicalfabric.com

Tuesday, July 5, 2016

Hurry! Only Hours Left for our Great Big Independence Day Sale!

www.whimsicalfabric.com
Our Great Big Independence Day Sale ends soon! Save 25% off everything on our website through 11:59pm MT tonight only. Hurry and shop now before you miss out on these amazing deals!

Happy Creating!
Danielle Storm
 
www.whimsicalfabric.com

Monday, July 4, 2016

Our Great Big Independence Day Sale Is Still Going On!

www.whimsicalfabric.com
Our Great Big Independence Day Sale continues! You still have time to grab everything on our site at 25% off. Hurry though as our sale prices are only through Tuesday, July 5th. 

Happy July 4th!
Danielle Storm
 
www.whimsicalfabric.com

Friday, July 1, 2016

Great Big Independence Day Sale Starts Now!

www.whimsicalfabric.com
Help us celebrate Independence Day while enjoying 25% off the entire site. Sale prices run now through Tuesday, July 5th. But don't wait too long to shop or the items you really want might be gone.

 Happy July 4th!
Danielle Storm
 
www.whimsicalfabric.com