
** If you would like to see an image on our blog in a larger format, just click on it to enlarge.
Note: Links to products within this post are either links to our website or affiliate links.
You can find the Oliver + S Sailboat pattern in the shop. Kits are available as well. Click on the links below:
Welcome to Day 2
Before we begin with today's lesson be sure to read all of the patterns instructions. Today, and throughout the entire sew along, you will need your pattern in hand to go along with each lesson. Some things I will share/teach will not be in the pattern, but are some tricks and tips I have learned over the years from sewing this pattern.

1. First, start by cutting a piece of interfacing into a 1¼" strip. I like to make mine wider when using a knit fabric for the top. Also, I like to cut the interfacing the length of the shoulder as well. Fuse the pieces onto the wrong side of both the back and front facing pieces with a hot iron.

2. Finish the bottom edges of all your top facing pieces and the top edge of your bottom facing pieces. I use my serger for these steps. If you are using your sewing machine, use a narrow zig-zag stitch to finish your edges. Be careful not to trim any of the fabric away from your pieces.

3. Take your front and back shirt bodice pieces and transfer your markings for buttonholes and buttons onto the right sides.

4. Take your front bodice and front facing pieces and place them together with the right sides facing. Pin at them shoulders and neck line only.

5. If using a sewing machine go ahead and sew the the shoulders and neck line in one step. If using a serger follow the next few steps to make nice pointed corners for turning.
a.) Serge the neckline only with a ½" seam. You will be trimming the seam as you sew.

b.) Next, sew the shoulders on both sides with leaving a length of serger thread tail. (Once again you will be trimming your seam as you sew.)

c.) Take a tapestry needle and thread the serger thread tail back through the top of your serger line, repeat with the second side.

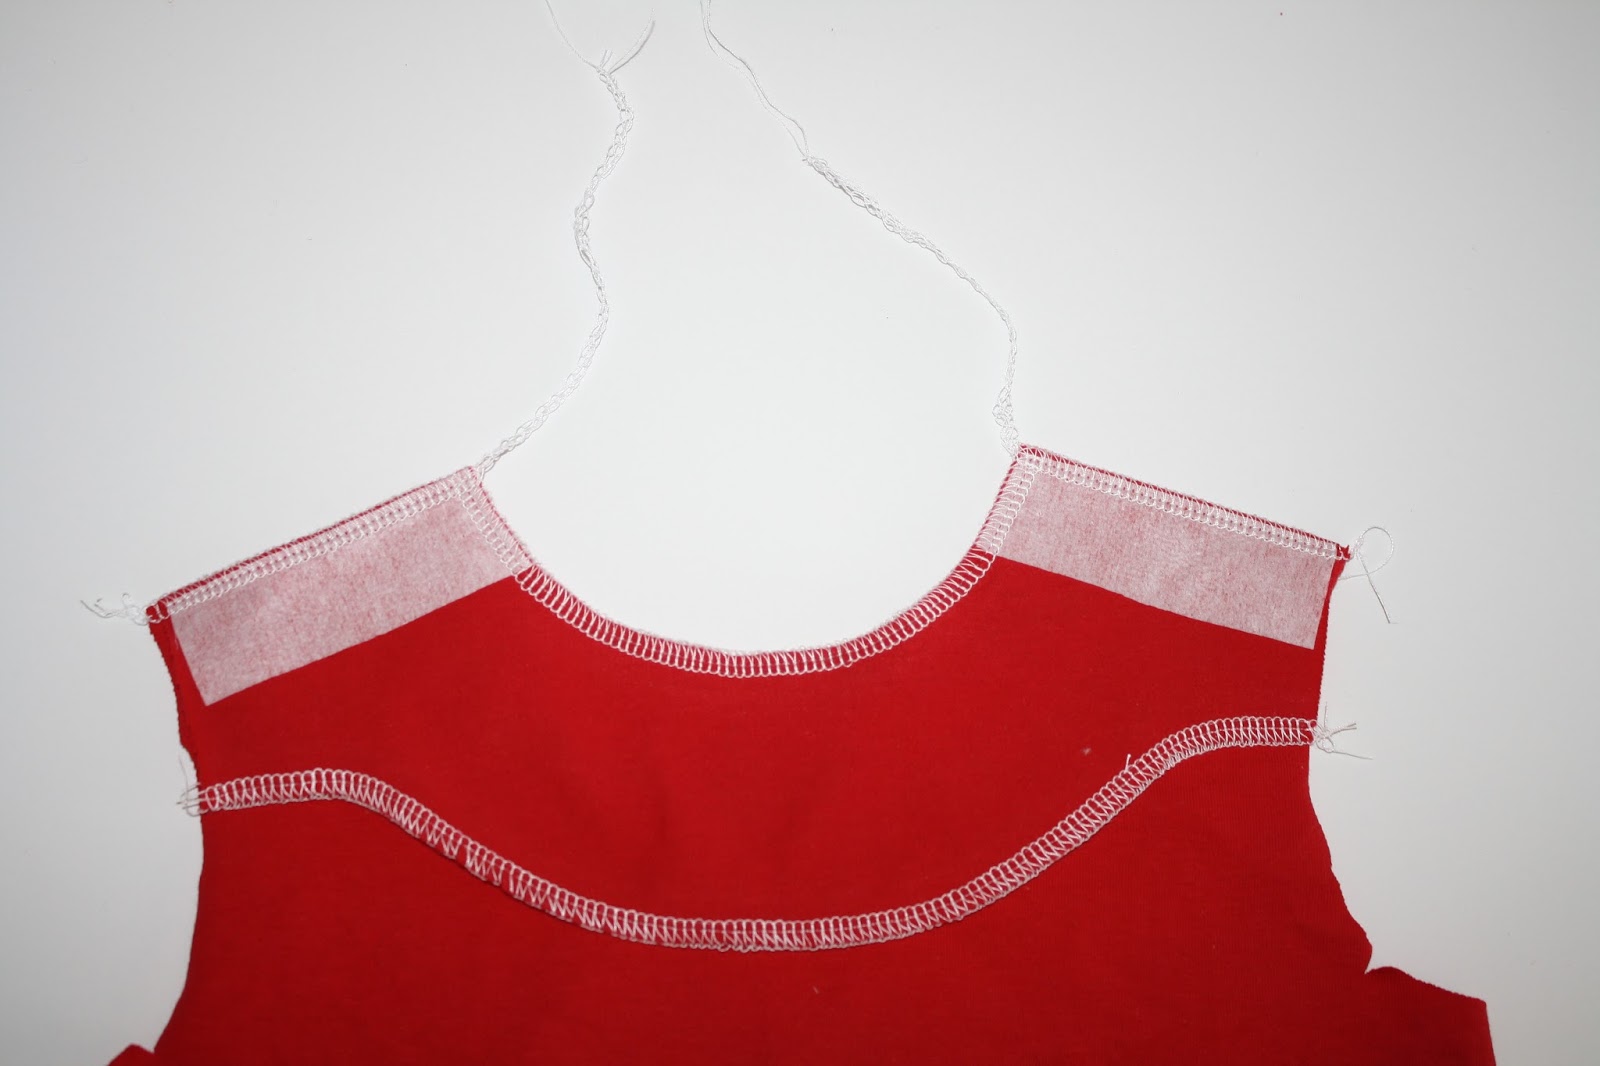
6. Turn your facing to the wrong side of the bodice and turn your corners out well; press. If you are using a sewing machine be sure to trim and clip your seams before your turn. Pin the facing into place.

7. Follow the bottom of the facing and sew it into place all the way across the facing's bottom.

This is what the front view will look like. This is also fun to use a contrasting thread or even trim here. Repeat with steps 4-7 the back bodice and facing.

8. Now take your front bodice and stitch your buttonholes.If you have never sewn a buttonhole on knit I recommend that you practice first. If your machine has trouble with eating the knit you can place a piece of wax paper between your sewing machine and fabric to help stabilize while stitching. When done simply tear away the wax paper.

9. Now take your back bodice and place it with the right side facing up. Then place your front bodice right side facing up, overlapping the back bodice at the shoulders with the front bodice on top. Match up the back bodice notch to the front bodice shoulder edge. Pin in place.

10. Baste the two pieces together with a 1/3" seam allowance. Repeat with the opposite shoulders.

Let us know if you have any questions for today's lesson either here or the Facebook group. Also, be sure to add a photo of today's lessons in our Facebook sew along album. I will see you lovely ladies back here tomorrow as we finish our tops!

1. First, start by cutting a piece of interfacing into a 1¼" strip. I like to make mine wider when using a knit fabric for the top. Also, I like to cut the interfacing the length of the shoulder as well. Fuse the pieces onto the wrong side of both the back and front facing pieces with a hot iron.

2. Finish the bottom edges of all your top facing pieces and the top edge of your bottom facing pieces. I use my serger for these steps. If you are using your sewing machine, use a narrow zig-zag stitch to finish your edges. Be careful not to trim any of the fabric away from your pieces.

3. Take your front and back shirt bodice pieces and transfer your markings for buttonholes and buttons onto the right sides.

4. Take your front bodice and front facing pieces and place them together with the right sides facing. Pin at them shoulders and neck line only.

5. If using a sewing machine go ahead and sew the the shoulders and neck line in one step. If using a serger follow the next few steps to make nice pointed corners for turning.
a.) Serge the neckline only with a ½" seam. You will be trimming the seam as you sew.

b.) Next, sew the shoulders on both sides with leaving a length of serger thread tail. (Once again you will be trimming your seam as you sew.)
c.) Take a tapestry needle and thread the serger thread tail back through the top of your serger line, repeat with the second side.

6. Turn your facing to the wrong side of the bodice and turn your corners out well; press. If you are using a sewing machine be sure to trim and clip your seams before your turn. Pin the facing into place.

7. Follow the bottom of the facing and sew it into place all the way across the facing's bottom.

This is what the front view will look like. This is also fun to use a contrasting thread or even trim here. Repeat with steps 4-7 the back bodice and facing.

8. Now take your front bodice and stitch your buttonholes.If you have never sewn a buttonhole on knit I recommend that you practice first. If your machine has trouble with eating the knit you can place a piece of wax paper between your sewing machine and fabric to help stabilize while stitching. When done simply tear away the wax paper.

9. Now take your back bodice and place it with the right side facing up. Then place your front bodice right side facing up, overlapping the back bodice at the shoulders with the front bodice on top. Match up the back bodice notch to the front bodice shoulder edge. Pin in place.

10. Baste the two pieces together with a 1/3" seam allowance. Repeat with the opposite shoulders.

We will leave off here for today.
Happy sewing,
Sharon
*If you would
like to earn entries into the prize drawing, please make sure to submit
a photo of your completed Lesson Two to this Facebook Album by 12:00 noon CT, Thursday, September 1st. If you
have any questions the Facebook Group is a great place to ask.
No comments:
Post a Comment