Showing posts with label Prizes. Show all posts

Monday, February 13, 2017

February 2017 Quilt Along Challenge


It's Sharon here with a new block for you! This month's block is a great one for using up those bigger pieces of your favorite colored scraps. Each bock will actually make a set of two blocks total. Very simple and lovely. 

Prizes
Each block that you sew and enter into the Facebook Album will count as one entry into our drawing.  If you make two blocks, that is two entries, make four that is four entries, and so on and so on. There will be a prize drawing at the end of the challenge. We will be giving away a gift certificate to Whimsical Fabric for our prize. For every 5 blocks entered the gift certificate will increase by $1.00! If 25 blocks are entered the gift certificate will be worth $5.00. If 100 blocks are entered the gift certificate will be worth $20. The more everyone sews the more you could win. *Maximum gift certificate value will be $25.
This month's prize is a Whimsical Fabric Gift Certificate!

Supply List
• cutting mat
• rotary cutter
• fabric pen
• scrap fabrics

Let's sew!
1. First we will cut two  5½" squares in coordinating colors. This will make two blocks total. 


2. Place the squares with the right sides facing and pin together. Draw a line starting from one of the top comers down to the bottom opposite corner.


3. Stitch with a ¼" seam along both sides of the line you drew onto the square.


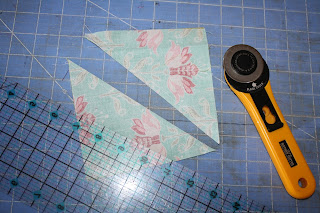
4. Take your block you have sewn and cut right down the center of it on the line your drew to create two pieces. Press each block open with the seam pressed to the dark side.


5. To create our two final blocks, place the two blcoks you have just made with the right sides facing each other, and the the center seam of each block lined up with each other. Being careful that the coordinating fabrics are facing each other like the one below. Draw a line starting from one of the top comers down to the bottom opposite corner going in the opposite direction of the center seam.


6. Stitch on both sides of the center line that you just drew with a ¼" seam allowance. Take your block and cut right down the center line again. Press each block open with the seam pressed to the dark side.


7.  Take your quilting ruler and square up each of your blocks. Now admire your two lovely finished blocks!


Facebook Group
After you have sewn all your blocks for this month please go over to our Facebook group and share each of them in our February Quilt Along Album for a chance to be entered into our drawing! You have until March 13th at 12:00pm (noon) CT to enter your blocks.

Remember, there is no required amount that you need to make. Make as many or as few as you would like.

Happy Sewing!!
Sharon
www.whimsicalfabrics.com

Monday, October 3, 2016

October Quilt Along Challenge


Hello again!  It's Sharon with October's Quilt Block of the Month. This month is another version of a star block. Autumn evenings for my family means sitting outside and stargazing. It is one of our favorite things to do. I had to use the scraps form my son's quilt as it seemed very fitting for this block. This is the Sarah Jane Magic! fabric line.

Prizes
Each block that you sew and enter into the Facebook Album will count as one entry into our monthly drawing. If you make two blocks, that is two entities, make four that is four entries, and so on and so on. There will be a prize drawing each month.
This month's prize is a $10 Whimsical Fabric Gift Certificate!
Supply List for this month:
cutting mat
rotary cutter
fabric pen
quilter's ruler
scrap fabric pieces

Let's Sew!
1. To cut out each of your squares use your quilting ruler and mat. 
To make this block you will need to cut the following;

Dark Color Fabric
(2) 2¼" squares
(1) 2" square

Light Color Fabric
(2) 2¼" squares
(4) 2" square

2. Grab your two larger sized light colored squares and draw a line right down the center from one corner to the opposite corner. Repeat on second light colored square.

3. Take your two larger dark colored squares and place them on your table right side up. Next, place your light colored square on top with the right sides facing, making sure that the two are even.

4. Sew on each side of the center line that you drew with a ¼" seam allowance. Repeat with the second square set. Then, cut right on the center line to make two triangles pieces. 

5. Press you squares open with the seam facing the darker fabric and trim off the "triangle" pieces on the seam that over hangs over the edge of the squares. You will now have four squares like the ones pictured below. 

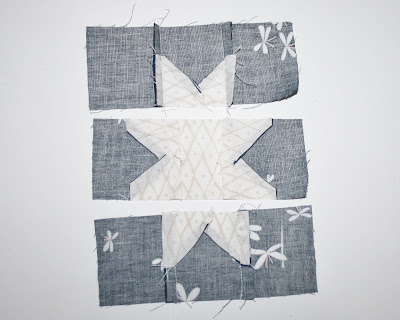
6. Lay your blocks out like in the picture below. 

7. Next, we will sew our blocks together into three rows; top row, middle row, and bottom row. On the top and bottom row press your seams away from the center square. On the middle row press your seams towards the center square. 

8. Sew all your rows together. Remember to place the seam together so that they "lock" together while sewing for neat points on our stars. This is why we pressed the seams in different directions on the rows in step 7.  Lastly, trim up your blocks with a straight edge quilt ruler.
Repeat to make as many blocks as you would like!
Facebook Group
After you have sewn all your blocks for this month please go over to our Facebook group and share each of them in our October Quilt Along Album for a chance to be entered into our monthly drawing! You have until Monday, October 31, at 12:00 pm (noon) CT to enter your blocks.  

Remember, there is no required amount that you need to make.  Make as many or as few as you would like.

Happy Sewing!! 

Monday, September 5, 2016

September Quilt Along Challenge


Hello! Sharon here with September's Block of the Month!

This month's block is a star patch.  The star patch is really a nine patch with a few more added squares to it. It is made with only square pieces so it is the same concept that we have already been working on. 

In case you missed the announcement in January, I will give you a little recap. On the first Monday of each month, I will teach one quilt block pattern. You have until the last Monday of the month to sew your quilt block(s) and enter them into the album in our Facebook group, Whimsical Fabric & Me


Prizes 
Each block that you sew and enter into the Facebook Album  will count as one entry into our monthly drawing. If you make two blocks, that is two entries. Make four blocks, that is four entries, and so on and so on. There will be a prize drawing each month.


This month's prize is a Riley Blake Medium Tone Dots Charm pack.

Let's get started!!
Supply List:
*cutting mat
*rotary cutter
*quilter's ruler
*scrap fabric pieces 

1. First we will need to cut out nine 2" squares. Mine are placed out in the order they will be sewn. You will need eight dark colored squares, and one light colored or bright square. (Refer to photo below with block color placement.

2. With the same light color fabric cut out eight 1¼" squares. 


3. Take one of your dark colored 2" squares and place the smaller light color squares on top of it, right sides together. Stitch the light color square to your darker square by stitching right down the middle from one corner to the other corner as pictured below. 

4. Trim away the extra from the block's corner to a ¼" seam allowance. Press your seam to one side.

5. Take a second light color small square and place on top of the darker big block on the opposite bottom corner, right sides together. Stitch the light color block to your darker block by stitching right down the middle from one corner to the other corner as pictured below.

6. Trim your seam to a ¼". Press the seam towards one side.

7. This is what your block will look like now. Repeat these steps with three more of the darker squares.

Remember that you can chain sew them all at once as well!

8. Now time to lay out your squares to be sewn together! Use the picture below as a map for square placement.

9. Sew your squares together in rows of three squares. Be sure to press each row's seams in a different direction. (As in the top and bottom row press the seam towards the outside and the middle row press the seam towards the center.)

Here is a photo of the back side with the pressed seams.

10. Now sew the three rows together as laid out in the photo, with pressing the seam towards  the center of your block.

Back side picture.

Facebook Group
After you have sewn all your blocks together for this month please go over to our Facebook group and share each of your blocks in our September Quilt Along album for a chance to be entered into our monthly drawing! You have until Monday, September 26th at 12:00 pm (noon) CT to enter your blocks. 

Remember, there is no required amount that you need to make.  Make as many or as few as you would like.

Happy Sewing!! 
Sharon 


Monday, June 6, 2016

June Quilt Along Challenge


Hello, Sharon here! This month's BOM is the Broken Nine Patch.  
Remember January's blockThis is the very same but with a few more added steps. I made my daughter a quilt out of this pattern a few years ago and I still dearly love this block. With just the block being re-arranged and using multiple prints it gives the block a whole new look. 

In case you missed the announcement in January, I will give you a little recap. On the first Monday of each month, I will teach one quilt block pattern. You have until the last Monday of the month to sew your quilt block(s) and enter them into the album in our Facebook group, Whimsical Fabric & Meand/or blog about your quilt blocks and link up your blog post in our link party (see below). 
  
Prizes 
Each block that you sew and enter into the Facebook Album  will count as one entry into our monthly drawing. If you make two blocks, that is two entries. Make four blocks, that is four entries, and so on and so on. There will be a prize drawing each month.

In addition to the prize giveaway on the Facebook group, we also have a monthly Link Up Party. Blog about your entry and link up your post and you will automatically be entered to win a second prize.

Note: You CAN enter both giveaways to increase your chances of winning!

This month's prize is a Riley Blake Medium Tone Dots Charm pack.

Supply List:
cutting mat
rotary cutter
quilter's ruler
scrap fabric pieces

Let's get started!!
1. First we will need to cut out nine 2 ¼" squares. Mine are placed out in the order they will be sewn. I used four light colored, four dark colored and one bright block to make my block. (Refer to photo below with block color placement.)

2. Sew your squares together in three rows of three strips. Press the top and bottom rows with the seam towards the outside of the rows and press the middle row seam towards the center. Pictured below is the front side. The photo under that is of the back side seams.

3. We will now sew our three rows together to make our first block. (The block will not stay this way for long!) As we sew our rows together the seam pressed in the opposite direction will "lock" together to make for lovely squared points. Press you seams towards the outside. Square up your block by trimming up your edges with the your cutting mat, ruler, and rotary cutter.

4. This next step we will take our cutting mat, rotary cutter, and ruler and cut our block twice right down the center as shown below to make four new squares. (It's how this block gets it's name, Broken Nine Patch!)

5. Now, re-arrange your blocks with the dark colored strips into a pinwheel shape as pictured below. (It is easier to show than tell you how to lay them out.)

6. Sew the two top squares together and the two bottom square together. Be sure to press the seams in the opposite direction.

 7.  Sew your two rows together at the center to make your finished block. Once again, take your cutting mat, ruler, and rotary cutter and square up your block by timing the edges even.

Repeat and make as many blocks as you would like!


Facebook Group
After you have sewn all your blocks together for this month please go over to our Facebook group and share each of your blocks in our June Quilt Along Album for a chance to be entered into our monthly drawing! You have until Monday, June 27th at 12:00 pm (noon) CT to enter your blocks. 


Link Up Block Party
In addition, if you blog, write up a short blog post about your quilt-along block(s) and link up your post in our Link Up Party.  The button is located below. In addition, 
1. Grab the June graphic, share it in your blog post, and link it back to this post here to let all of your followers know you are partying with us.
2. Share about your blog post on all your favorite social media outlets.
Note: We will be sure to visit and comment on your blog. We love interacting with our followers!

Remember, there is no required amount that you need to make.  Make as many or as few as you would like.

Happy Sewing!! 
Sharon 

Tuesday, May 10, 2016

Sew Along #14 - Frannie Dress - Lesson #4

The Frannie Dress by Children's Corner

** If you would like to see an image on our blog in a larger format, just click on it to enlarge.

Note: Links to products within this post are either links to our website or affiliate links.

Please read the directions in your Frannie Dress pattern all the way through before you begin.  It's probably a good idea to read through this lesson once before you begin also.

Day 4 - Adding the Back Closure Button, Creating a Button Loop, and Closing Up the Lining.

1. If you have already added your button and an elastic loop to your dress go ahead and scroll all the way down to step 3 as you only have to close up the lining today and then you are finished.

Sew a button onto the top of the back dress opening.  I sewed mine here on the left side, but convention is to sew it on the right side.  You can add more buttons to the back opening if you like.  Kits came with just one button, but the choice is totally up to you.

2. We are now going to sew a button loop for your back closure.  I'm first going to show you how I originally learned to sew these.  Then, I'm going to share a series of videos that show you what I feel is an easier way to make the button loop.  Do not fret if your button loop isn't perfect.  You will get better at this the more often you make them.  Let's jump in.
Note: It will probably be helpful to click on the pictures to be able to see the steps in more detail.
A. I used 4 LONG strands of sewing thread for my button loop.  Thread these on your needle and tie a knot in the end so you will be sewing with a total of 8 strands of thickness.  You can probably get by with as few as 2 strands (4 when doubled), but I like my loops strong.  If you are using embroidery floss you may get by with even less.

B. Go up through the hole in your lining and out the edge of your seam opposite your button.  You want to come out near the top of where your button is on the the other side.  Secure the knot on the inside between the dress and the lining. 

C. Measure about how long you want your button loop to be by wrapping it around your button.

D. Then, go back into the dress and out the original hole with your needle.

E. Pull your threads until the loop is the size you just measured and determined you desired.  You can try it on the button to make sure.

F. When you have the loop the size you want and all the threads are lined up together, wrap the loose thread around your index finger like shown below.

G. Now, poke the needle through your button loop from back to front.

H. Next, slide your needle under the thread on your finger.

I. Pull the thread. 

J. Keep pulling and slide the knot down to the base of your loop until it is tight.

K. It should look like this.

L. Repeat steps F thru J until you have covered the whole loop with your stitches. 

M. When you have your loop finished, push the needle back in between the dress and the lining and knot your threads.

Below are three videos that also explain how to accomplish the same task of creating a button loop, but in a little different way.  This is how I prefer to make them now as it is really quick.  The only suggestion I would make is to keep the thread tails after your knot longer.  They will be hidden inside the dress and the knot is more secure if they are longer.


3. The very last step for your dress is to close up your opening in the lining.  I like to use a ladder stitch as I feel it is strong enough and hides the hole well.  You can use whatever method you prefer.

That's it!  You just made a Children's Corner Frannie!  Wasn't that awesome!  Thank you so much for joining me.  It's been a total pleasure to teach one of my all time favorite patterns.


Our youngest, Miss Sydney, in her very first Frannie I made for her first birthday.

Miss Sydney in a Frannie at age 5.  Oh how fast they grow!
 

Miss Sydney today in a Frannie.

* If you would like to enter the prize drawing, please make sure you submit a picture of your completed lesson four to the Facebook Album by 12:00 noon CT, Thursday, May 12th. Also, if you have any questions the Facebook Group is a great place to ask.


Thanks for sewing with me,
Danielle Storm
www.whimsicalfabric.com