
** If you would like to see an image on our blog in a larger format, just click on it to enlarge.
Note: Links to products within this post are either links to our website or affiliate links.
You can find the Oliver + S Sailboat pattern in the shop. Kits are available as well. Click on the links below:
Welcome to Day 6
Before we begin with today's lesson be sure to read all of the patterns instructions. Today, and throughout the entire sew along, you will need your pattern in hand to go along with each lesson. Some things I will share/teach will not be in the pattern, but are some tricks and tips I have learned over the years from sewing this pattern.
Today we will be finishing our pants/shorts. Some of the methods I will be using are not in the pattern, such as the shorts mods, lining, and some of the finishing techniques so if you have any questions along the way please don't hesitate to ask. Ready? Let's start!

We will start off with finishing up the shorts/lined version of our sailboats bottoms. If you are making a pair if the lined pants version, please follow these steps. If not, skip to step 10.
1. Separate the shorts lining from the main fabric. Pin the lining inside legs together only, with the right sides facing. Stitch the seam all the way across following the patterns instructions. Trim the seam then press it open.

2. Now take one side of the shorts/pants only, fold it with the right sides facing and pin in place with the shorts/pants lining pulled out of the way. Stitch this one side only. Press the seam open but do not trim.

3. Pull the one side that is stitched right side out and pull the finished lining leg into the finished main fabric leg.

4. Take your un-stitched leg and fold it over the shorts/pants with the wrong side of the shorts/pants facing the outside. It will resemble a ball-like shape.

5. With the shorts tucked inside the unfinished main short/pants leg, take this leg with the right sides together and pin it from the crotch area down to the bottom raw edge and stitch. Press your seam open but do not trim.

6. Turn the second leg you just stitched right side out and tuck the leg lining into it. Now you have a fully lined shorts or pants! Nice outside!

and nice inside!

7. Baste the shorts/pants lining and main together on each leg.

8. Now if you are making the pants skip down to step 11 to finish them up. Treat your lining and main as one for the side vents. For the shorts continue below.
Press up the bottom of the shorts a 1/2" then again another 3/4".

9. Turn the shorts leg right side out and then from the inside of the hem, stitch the hem in place.

Now we are going to finish up our pants!

10. Turn your pants inside out and pin the inside seam of the legs together with the right sides facing. Sew together according to the pattern directions. Finish your seam and press.

11. Press your bottom hem up a 1/2" then again another 3/4".

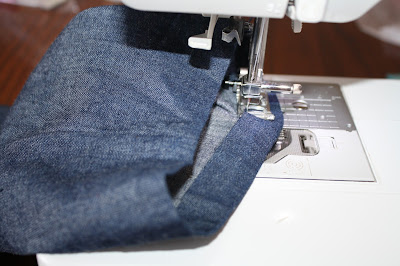
12. Turn your pants right side and stitch the hem from the inside of the pants as shown.
12. Take your pants and lay then with the outside seam facing up, press your side vent flat with your seam.

13. Take one side of your side vent and fold it under so teat the raw edge is sandwiched in-between. Press well.

14. Repeat step 13 with the opposite side of the side vent.

15. Stitch the side vent in place by stitching around all three sides. Repeat with opposite pant leg.

Here is the outside view.

Now we are all done with our pants and shorts outfits!! Woohoo!! Please share your finished outfits in our Facebook group. If you are sewing a skirt up please join us tomorrow as we start on those; see you then!

Today we will be finishing our pants/shorts. Some of the methods I will be using are not in the pattern, such as the shorts mods, lining, and some of the finishing techniques so if you have any questions along the way please don't hesitate to ask. Ready? Let's start!

We will start off with finishing up the shorts/lined version of our sailboats bottoms. If you are making a pair if the lined pants version, please follow these steps. If not, skip to step 10.
1. Separate the shorts lining from the main fabric. Pin the lining inside legs together only, with the right sides facing. Stitch the seam all the way across following the patterns instructions. Trim the seam then press it open.

2. Now take one side of the shorts/pants only, fold it with the right sides facing and pin in place with the shorts/pants lining pulled out of the way. Stitch this one side only. Press the seam open but do not trim.

3. Pull the one side that is stitched right side out and pull the finished lining leg into the finished main fabric leg.

4. Take your un-stitched leg and fold it over the shorts/pants with the wrong side of the shorts/pants facing the outside. It will resemble a ball-like shape.

5. With the shorts tucked inside the unfinished main short/pants leg, take this leg with the right sides together and pin it from the crotch area down to the bottom raw edge and stitch. Press your seam open but do not trim.

6. Turn the second leg you just stitched right side out and tuck the leg lining into it. Now you have a fully lined shorts or pants! Nice outside!

and nice inside!

7. Baste the shorts/pants lining and main together on each leg.

8. Now if you are making the pants skip down to step 11 to finish them up. Treat your lining and main as one for the side vents. For the shorts continue below.
Press up the bottom of the shorts a 1/2" then again another 3/4".

9. Turn the shorts leg right side out and then from the inside of the hem, stitch the hem in place.

Now we are going to finish up our pants!

10. Turn your pants inside out and pin the inside seam of the legs together with the right sides facing. Sew together according to the pattern directions. Finish your seam and press.

11. Press your bottom hem up a 1/2" then again another 3/4".

12. Turn your pants right side and stitch the hem from the inside of the pants as shown.

12. Take your pants and lay then with the outside seam facing up, press your side vent flat with your seam.

13. Take one side of your side vent and fold it under so teat the raw edge is sandwiched in-between. Press well.

14. Repeat step 13 with the opposite side of the side vent.

15. Stitch the side vent in place by stitching around all three sides. Repeat with opposite pant leg.

Here is the outside view.

Now we are all done with our pants and shorts outfits!! Woohoo!! Please share your finished outfits in our Facebook group. If you are sewing a skirt up please join us tomorrow as we start on those; see you then!

Happy sewing,
*If you would like to earn entries into the prize drawing, please make sure to submit a photo of your completed Lesson Six to this Facebook Album by 12:00 noon CT, Thursday, September 8th. If you have any questions the Facebook Group is a great place to ask.
Sharon
*If you would like to earn entries into the prize drawing, please make sure to submit a photo of your completed Lesson Six to this Facebook Album by 12:00 noon CT, Thursday, September 8th. If you have any questions the Facebook Group is a great place to ask.
No comments:
Post a Comment